HubSpot (Classic) Destination
Destination Info
- Accepts Page, Group, Identify, and Track calls
- Refer to it as HubSpot in the Integrations object
Components
- Browser
- Server
Connection Modes 
| Device-mode | Cloud-mode |
|---|---|
 Web Web |
 Web Web |
| Mobile |
Mobile |
| Server |
Server |
HubSpot (Classic) (Classic) is in Maintenance mode
The HubSpot (Classic) (Classic) Destination has entered maintenance mode. Future updates are limited to security updates and bug fixes. New versions of the destination are available. See HubSpot Cloud Mode (Actions) and HubSpot Web (Actions) for more information.
HubSpot is an inbound marketing and sales platform that helps companies attract visitors, convert leads, and close customers. The analytics.js HubSpot Destination is open-source. You can browse the code on GitHub.
As of July 2022, HubSpot no longer allows new connections to authenticate with an API Key. Existing API Keys will continue to work, but to authenticate a new API connection with HubSpot, use a Private App Token. To generate a Private App access token from the HubSpot dashboard, navigate to Integrations > Private Apps. Segment requires the following scopes: business-intelligence, crm.objects.contacts.read, crm.objects.contacts.write, crm.schemas.contacts.read, crm.objects.companies.read, crm.objects.companies.write, crm.schemas.companies.read. For more information, see HubSpot’s article Private Apps.
The HubSpot destination is not compatible with the Segment Event Tester. As result, Segment recommends using other tools to troubleshoot the HubSpot destination.
Getting Started
- From the Segment web app, click Catalog.
- Search for “HubSpot” in the Catalog, select it, and choose which of your sources to connect the destination to.
- Generate a Private App access token in HubSpot and enter it in the “Private App Token” field in the Segment web app. Segment requires the following scopes:
business-intelligence,crm.objects.contacts.read,crm.objects.contacts.write,crm.schemas.contacts.read,crm.objects.companies.read,crm.objects.companies.write,crm.schemas.companies.read. Note: HubSpot no longer allows generation of new API Keys so you must authenticate with a Private App Token. - Navigate to the “Settings” page in the HubSpot UI to find your Hub ID and enter it to the “Hub ID” field in the Segment web app.
When you activate the destination from the Segment web app, your changes appear in the Segment CDN in about 45 minutes, and then Analytics.js starts asynchronously loading the HubSpot snippet and recording data.
Page
If you’re not familiar with the Segment Specs, take a look to understand what the Page method does. An example call would look like:
analytics.page()
HubSpot supports Page calls on Device-mode connections from Analytics.js sources
Analytics.js requires an initial Page call to send data to HubSpot. The Segment snippet includes this initial call by default.
Identify
If you’re not familiar with the Segment Specs, take a look to understand what the Identify method does. An example call would look like:
analytics.identify('user1234', {
  email: 'petergibbon@email.com',
  firstname: 'Peter',
  lastname: 'Gibbon'
})
HubSpot’s device-mode integration has two conditions for Identify to create or update a contact: 1) Identify calls must include a traits.email value. 2) A Page or Track call must follow an Identify call. You can read more from HubSpot’s documentation. If you are using HubSpot’s cloud-mode integration, an Identify call updates records without the need for a Page or Track call.
HubSpot does not accept any trait keys that contain upper case letters or spaces. Segment converts any custom traits you send to lower case, and replaces spaces with an underscore.
HubSpot removes any traits from the request that aren’t contact fields in HubSpot. To find out which fields you can set, navigate to Settings > Data Management > Objects > Contacts and select Manage contact properties under the Setup tab. Example field names are firstname, lastname, company, and phone.
If you specify a company name (using traits.company.name), it appears as a property of the contact (you can find it in HubSpot’s UI using About [contact] > View > View All Properties), but it does not appear as the user’s company under [contact]’s Company.
HubSpot tags the following fields as special fields:
- address
- city
- companyName
- firstName
- lastName
- position
- phone
- zip
Track
If you’re not familiar with the Segment Specs, take a look to understand what the Track method does. An example call would look like:
analytics.track("Clicked Buy Now button", {
  value: 20.5
})
Important
Marketing Hub subscription is required to manage legacy behavioral events in HubSpot. You must have a HubSpot Enterprise account for Segment to pass traits from an Identify call to your Track call and send them as custom events to HubSpot.
The event will appear in your HubSpot UI but may take up to 60 minutes to appear in the graph visualization.
Server
When calling from one of Segment’s server-side sources, provide the contact’s email as properties.email so that HubSpot can tie the event to the appropriate contact. An example call in Python would look like:
analytics.track(
  user_id='YOUR_USER_ID',
  event='Bought Item',
  properties={
    'email' : 'peter@example.com',
  }
)
In this case, your HubSpot eventId is ‘Bought Item’. If you want to use an existing eventId, you can use it instead of the event value (for example, Bought Item). If you don’t want to match an existing eventId, you can use any event label and HubSpot will auto-create the event for you.
Setting Contact Properties on Track
Segment recommends that you send traits with an Identify call. You can also set HubSpot properties on a track call sent from any server-side source, as allowed by HubSpot’s events API. Segment recommends this method if you’re running out of HubSpot API calls on the Identify requests.
Include HubSpot contact properties into the context.traits object:
analytics.track(
  user_id='YOUR_USER_ID',
  event='Bought Item',
  properties={
    'email': 'peter@example.com',
  },
  context={
    'traits': {
    'firstname': 'Peter',
    'lastname': 'Gibbons'
  }
})
Group
Group calls are not compatible with the Analytics.js library.
If you’re not familiar with the Segment Specs, take a look to understand what the Group method does. An example call would look like:
analytics.group({
  groupId: "some_group_id",
  userId: "some_user_id",
  traits: {
    website: "https://www.example.com",
    name: "Example Inc."
  }
});
Group calls map to the HubSpot Companies API. Segment’s integration creates and updates company objects with whatever traits are set, and associates individual contacts to a company.
The three requirements to creating companies and associating contacts are:
- Group calls take effect when called using server-side libraries or mobile libraries, not the client-side JavaScript library.
- Your contact must be identified and created within HubSpot (called using
analytics.identifyfor thisuserId first). - You must include a
websitetrait in your group call, and it must be a full, valid, and complete URL. HubSpot uses the domain of the website trait as a unique identifier for companies. To create a new company you must use the full URL and not just the subdomain.
Segment can send the following group traits to HubSpot as special properties:
- address
- city
- state
- zip
- country
- description
- employees
- industry
- phone
- website
- name
Troubleshooting
I Don’t See My Data In HubSpot
If you don’t see your data in HubSpot, verify the HubSpot configuration in your Segment workspace. If you’ve selected the Enable HubSpot SDK for EU option, confirm with HubSpot that your HubSpot account is enabled for EU data residency.
API Call Limits
HubSpot limits the total amount of hourly and daily requests Segment can make to their API on your behalf. See HubSpot’s API Usage Guidelines for more information.
HubSpot Plan: Free & Starter
- Maximum Number of API Calls per 10 Seconds, per Key or Token: 100
- Maximum Number of API Calls per Day, per Key or Token: 250,000
HubSpot Plan: Professional and Enterprise
- Maximum Number of API Calls per 10 Seconds, per Key or Token: 100
- Maximum Number of API Calls per Day, per Key or Token: 500,000
HubSpot Plan: API Add-On (Any Tier)
- Maximum Number of API Calls per 10 Seconds, per Key or Token: 120
- Maximum Number of API Calls per Day, per Key or Token: 1,000,000
Sending Dates as Property Values
HubSpot’s API has specific requirements regarding you to format dates before they deliver as contact properties with date types.
To ensure proper transformation of these properties, pass them to Segment as ISO-8601 formatted strings and not as UNIX timestamps. Here’s a JavaScript example:
analytics.identify('userid', {
    offerDate: new Date() // not Date.now()!
});
Invalid ‘lifecyclestage’
When using any of Segment’s server-side sources, a connector infers traits.lifecycle_stage as lifecyclestage. If you’re using a custom contact property for custom lifecycle stage’s, you should give the property a distinct name, such as custom_lifecycle_stage.
Loading Forms SDK
Segment gives you the option to load the HubSpot Forms SDK alongside their tracking library. Enable the Load Forms SDK setting when you your HubSpot integration.
The Forms SDK expects to load synchronously but analytics.js loads asynchronously. To interact with the API, run code inside an analytics.ready callback. For example:
analytics.ready(function(){
  hbspt.forms.create({
    portalId: '',
    formId: '',
    css: '',
    cssRequired: ''
  });
})
Using HubSpot with Engage
You can send computed traits and audiences that you create in Engage to HubSpot so you can use the data in live chat, automated emails, and other HubSpot features to personalize interactions with your customers.
You can set a “lookback window” for both computed traits and audiences, which limits the period of time in which data is considered when calculating the trait or audience. For example, you might set a lookback window of 7 days on an audience or trait like new_users_7_days, but you would not add a lookback window to a trait that isn’t time-bounded, for example lifetime_value .
When you specify a lookback window, Engage updates the audience or trait hourly. If you do not specify a lookback window, Engage continuously updates both computed traits and audiences in real time.
Syncing Custom Traits to HubSpot
HubSpot requires that you create and define any custom traits in the HubSpot UI before you send any Engage data to HubSpot. If you try to sync a property from Segment that does not exist in HubSpot, the sync fails.
How it works: User-Level Traits and Audiences
Engage sends User-Level data to HubSpot to update properties on a user (or contacts in HubSpot) record, using an Identify call to add or update a standard Property or when Segment computes a trait, and a Track call when the user enters or exits an audience.
-
Computed Traits: When the trait is first computed, Engage sends an Identify call to update the records of all users who are included in the computed trait. Each time the trait is computed after that, Engage sends a Identify call to HubSpot to update the values. For example, if a computed trait counts the number of times a user visits your pricing page, and the user visits your pricing page five times, Segment first sends an Identify call with the property
pricing_page_visits: 5, then sends a Identify call when this number updates. This appears in HubSpot as aPropertyfor the contact. -
Audiences: Engage uses an Identify call to add the name of the audience to the user’s profile as a trait, and includes a boolean value that indicates if the user is a member of the audience. For example, when a user first completes an order in the last 30 days, Engage sends an Identify call with the property
order_completed_last_30days: true. When the user no longer satisfies these criteria (for example when it’s been longer than 30 days since the last purchase), Engage uses a Identify call to set that value tofalse. This appears as aPropertyfor the contact in HubSpot. If using a Track call, events will be sent forAudience EnteredorAudience Exited.- When you first create an audience, Engage sends an Identify call for every user in the audience. Later syncs only update users which were added or removed from the audience since the last sync.
How it works: Account-Level Traits and Audiences
Engage sends Account-Level data to HubSpot using Identify calls to add account traits to the users’ profiles, and Identify calls to update the trait when it recomputes, and will send a Track call when the group enters or exits an audience. Users are added to an account using a single Group call, which appends a groupID to each user within the account.
-
Computed Traits: When you build computed traits with Account-Level data, Engage computes for each account based on traits or aggregated user behavior. You can then export traits for each account, or for each user within an account. Engage adds a new trait (set as the name of the computed trait) to the user profiles for each user in the group, and sets the value of that computed trait.
For example: Imagine you have a computed trait that counts the number of times that users from a specific company visit your pricing page. If five different users visit your pricing page once each, Engage sends an Identify call with the property
pricing_page_visits: 5to each user in the group. -
Audiences: When you build audiences with Account-Level data, Engage returns a set of accounts, or a set of users that match your criteria. Engage adds the name of the audience to the user’s profile as a trait (both for individual users, and users within an account), and sets a boolean value to indicate if the user is in the audience. For example, if users in an account first complete an order in the last 30 days, Engage sends an Identify call with the property
order_completed_last_30days: true. When the users in this Account no longer satisfy these criteria (for example if it’s been more than 30 days since the last order), Engage sets that value tofalse. If using a Track call, events will be sent forAudience EnteredorAudience Exited.- When you first create the audience, Engage sends an Identify call for every user in the account in that audience. Later syncs only send updates for individual accounts and users which were added or removed since the last sync.
Note: For user-level events or traits, you can specify
None of the users,Any users, orAll userswhen you build your audience criteria.
- When you first create the audience, Engage sends an Identify call for every user in the account in that audience. Later syncs only send updates for individual accounts and users which were added or removed since the last sync.
Note: For user-level events or traits, you can specify
Creating Engage Audiences in HubSpot
-
Create your audience criteria and preview the audience in Segment. Click Select Destinations.
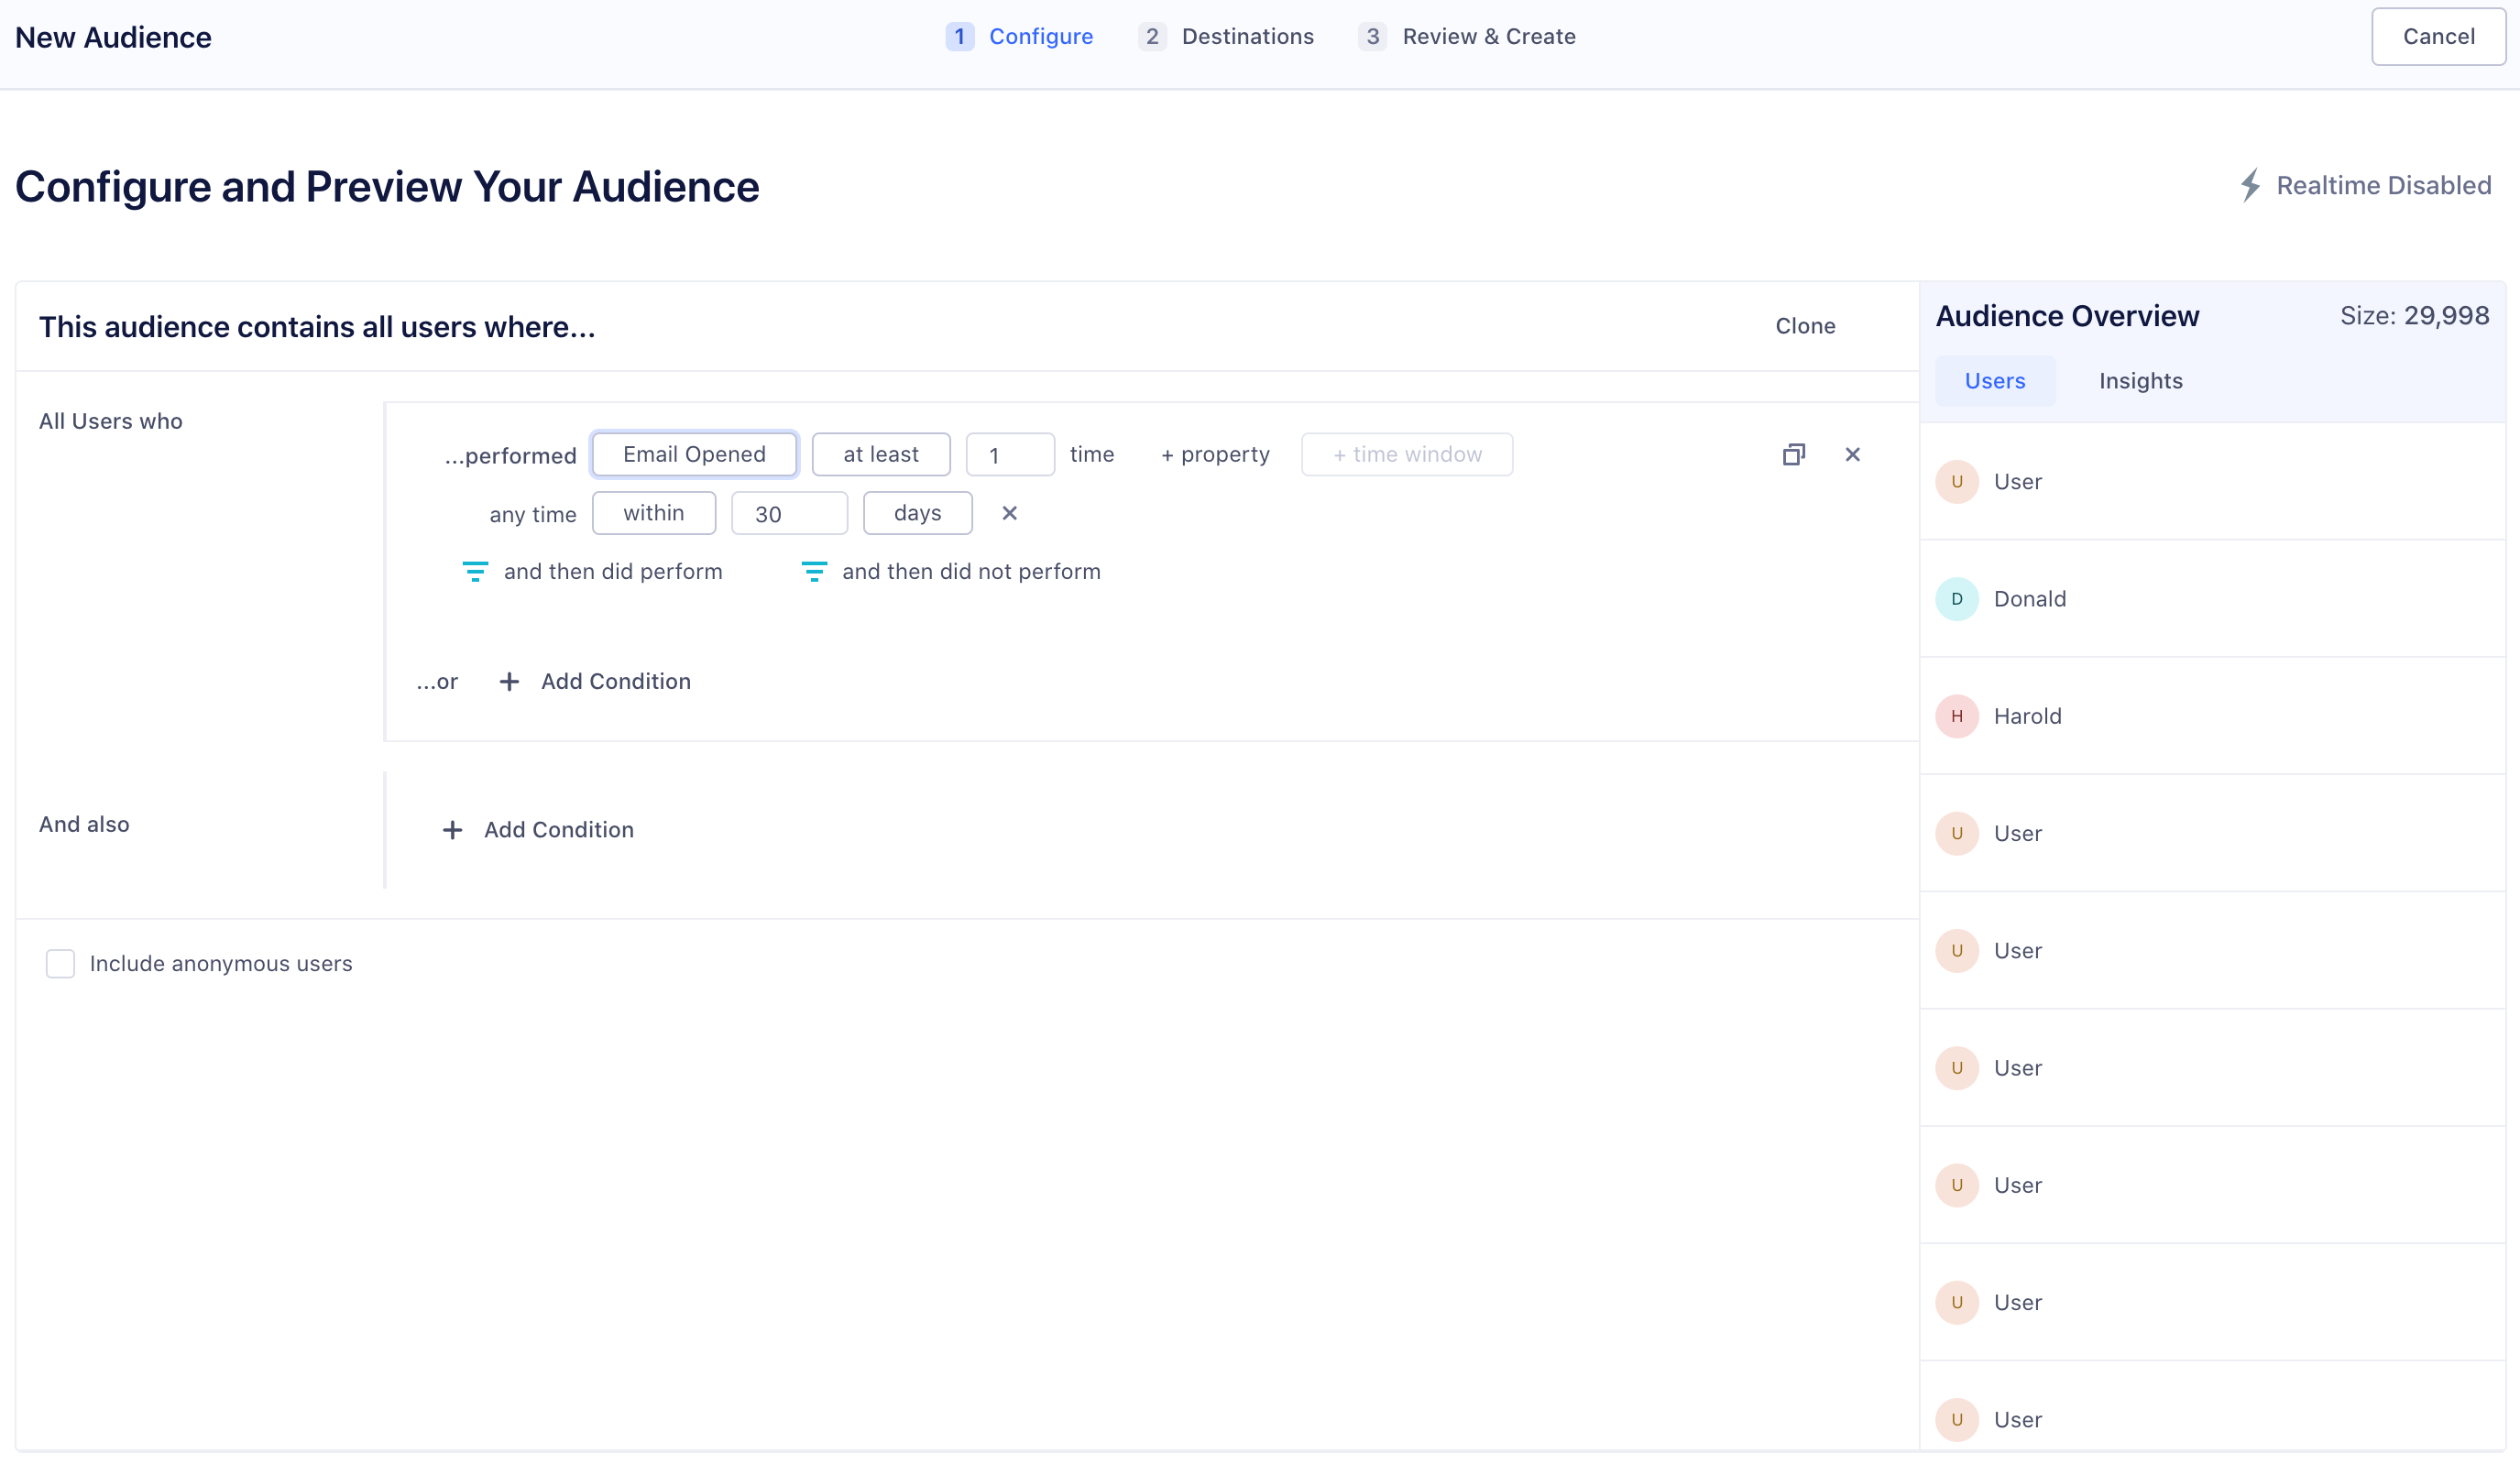
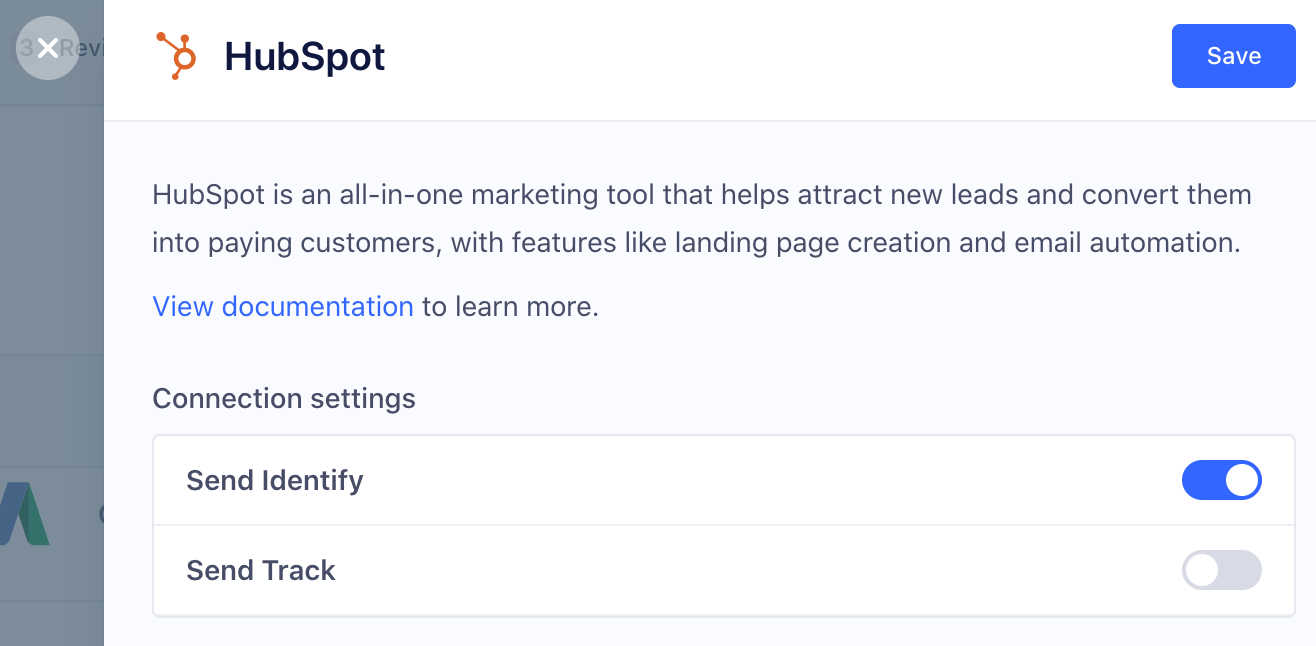
-
Next, select HubSpot as a destination for the audience in Segment. Use the default settings, which send an Identify call to mark users as members of an audience or when they have a specific trait.
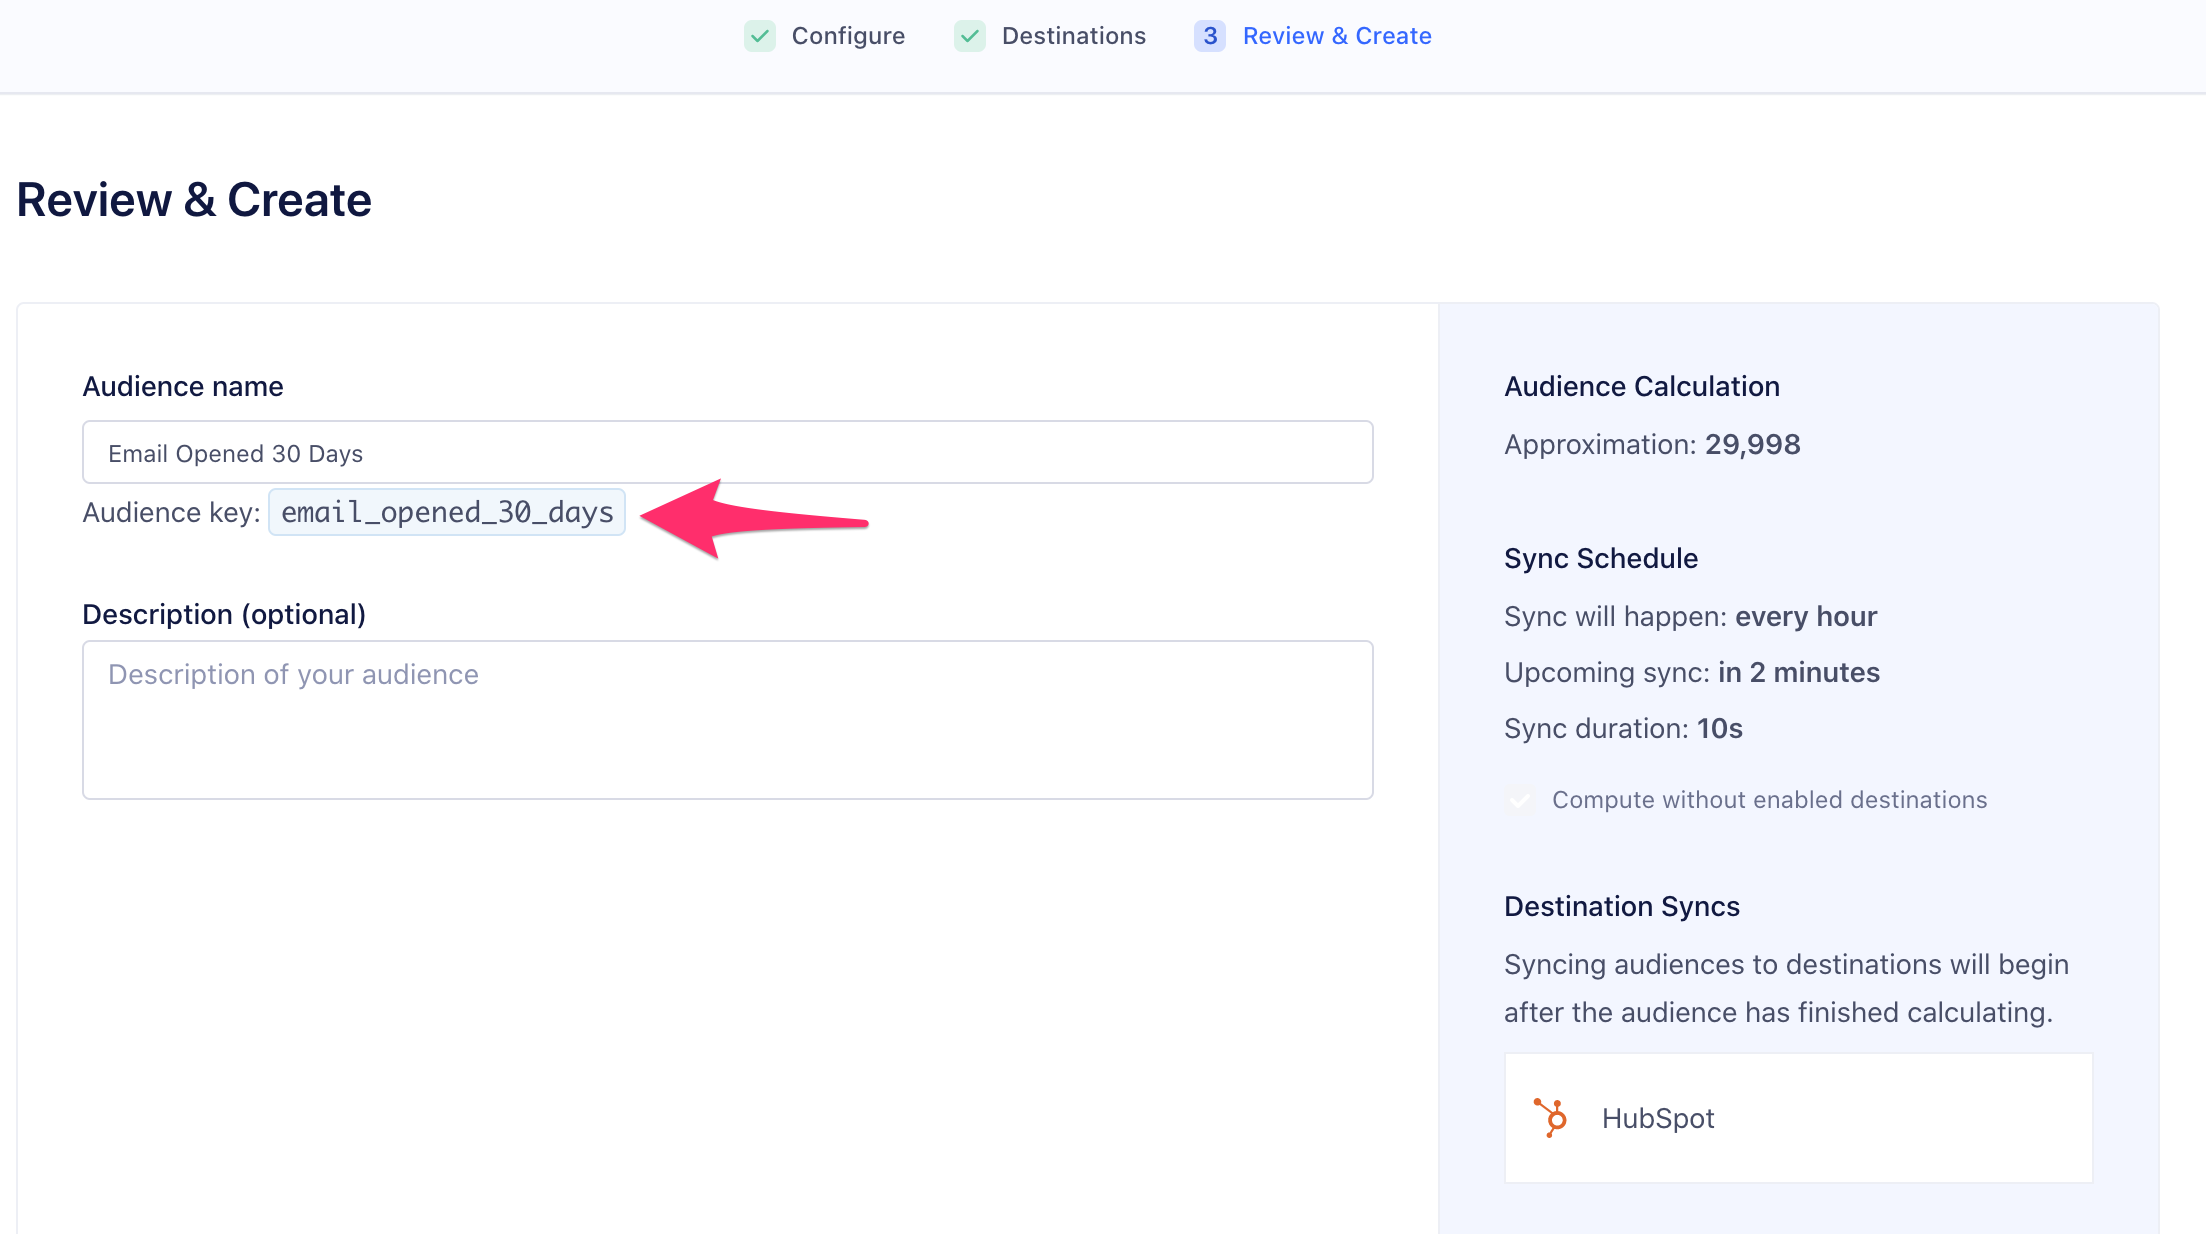
-
Enter a name for the audience, and a description. Write down the Audience key (you’ll need this to configure HubSpot in the next step), but don’t click Create Audience yet.
- Go to your HubSpot Settings.
-
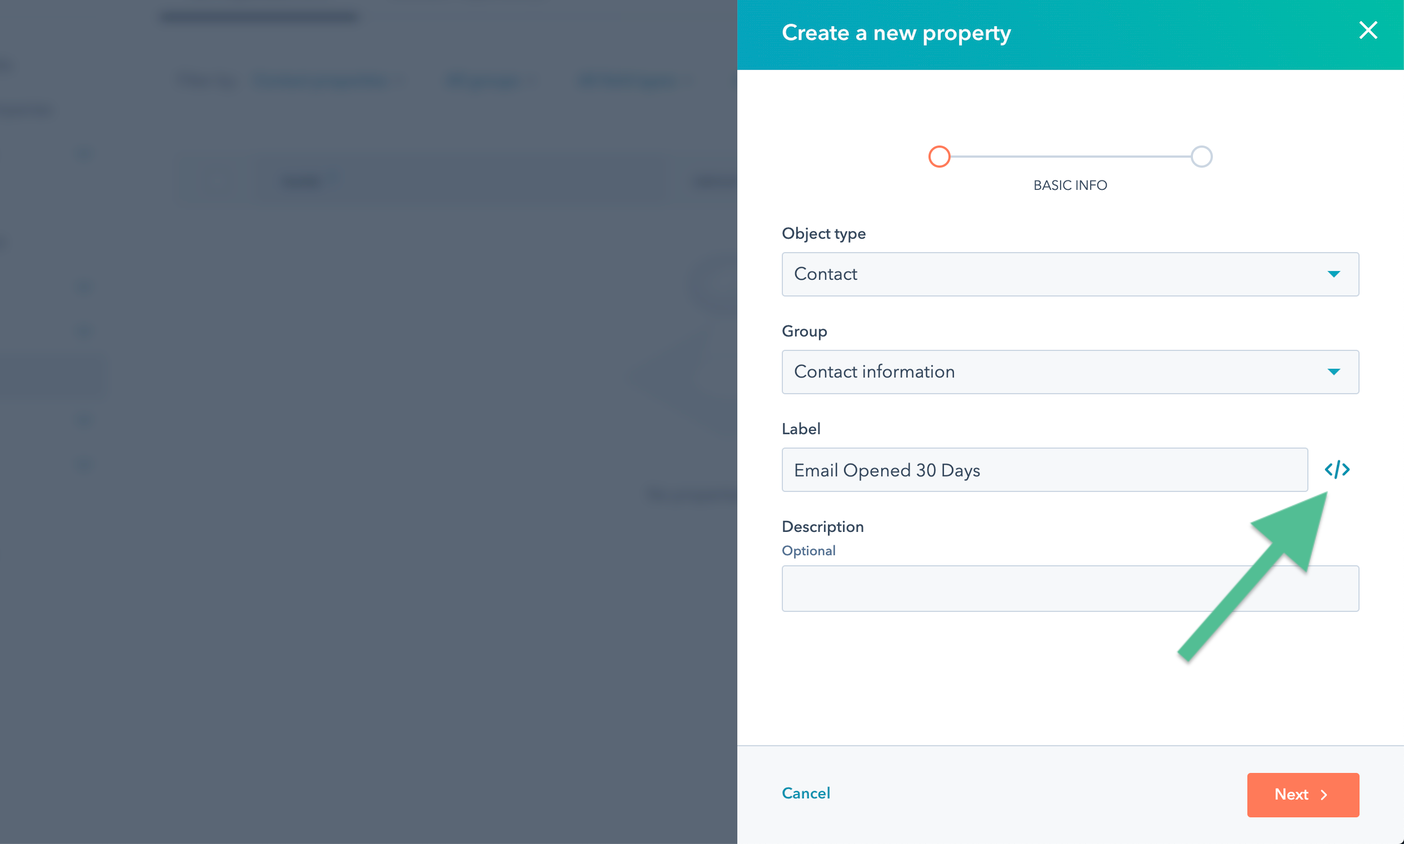
Create a new
propertyin HubSpot for each audience you want HubSpot to receive from Engage. This is required because HubSpot’s schema is explicitly defined. You must do this before you send any Engage data from Segment to HubSpot.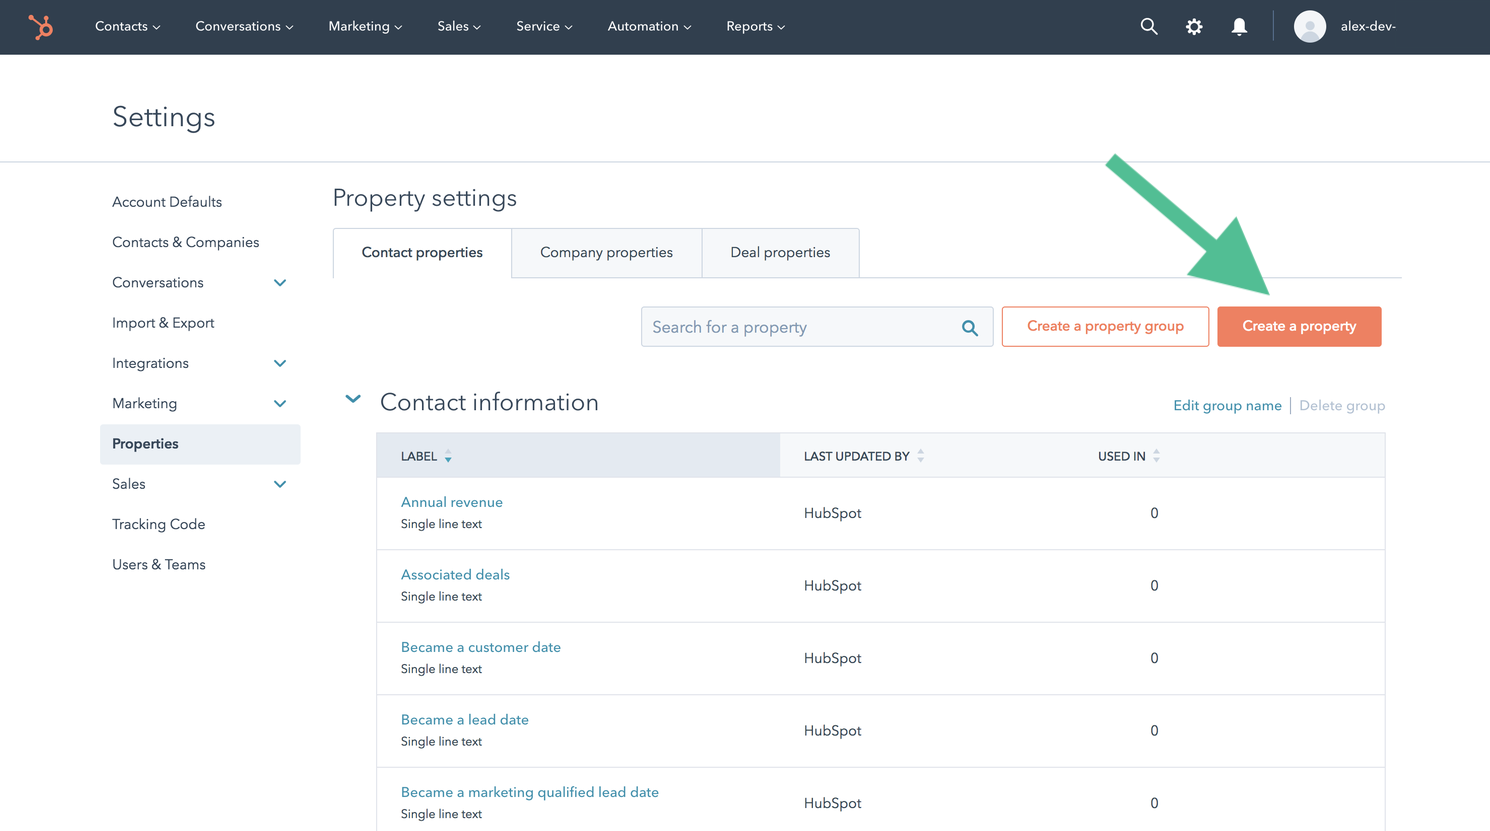
- Set the object type.
- For user-level Audiences, set the Object Type to
Contactand the Group toContact information. - For account-level Audiences, set the Object type to
Companyand the Group toCompany information.
- For user-level Audiences, set the Object Type to
- Enter the label for the custom property, and make sure it matches the Audience Key you wrote down from the Engage audience builder (see the tip below). Click Next.
The audience label’s “internal name” in HubSpot must exactly match the Segment audience key. You can check this by clicking the </> icon to the right of the Label field, and making corrections.
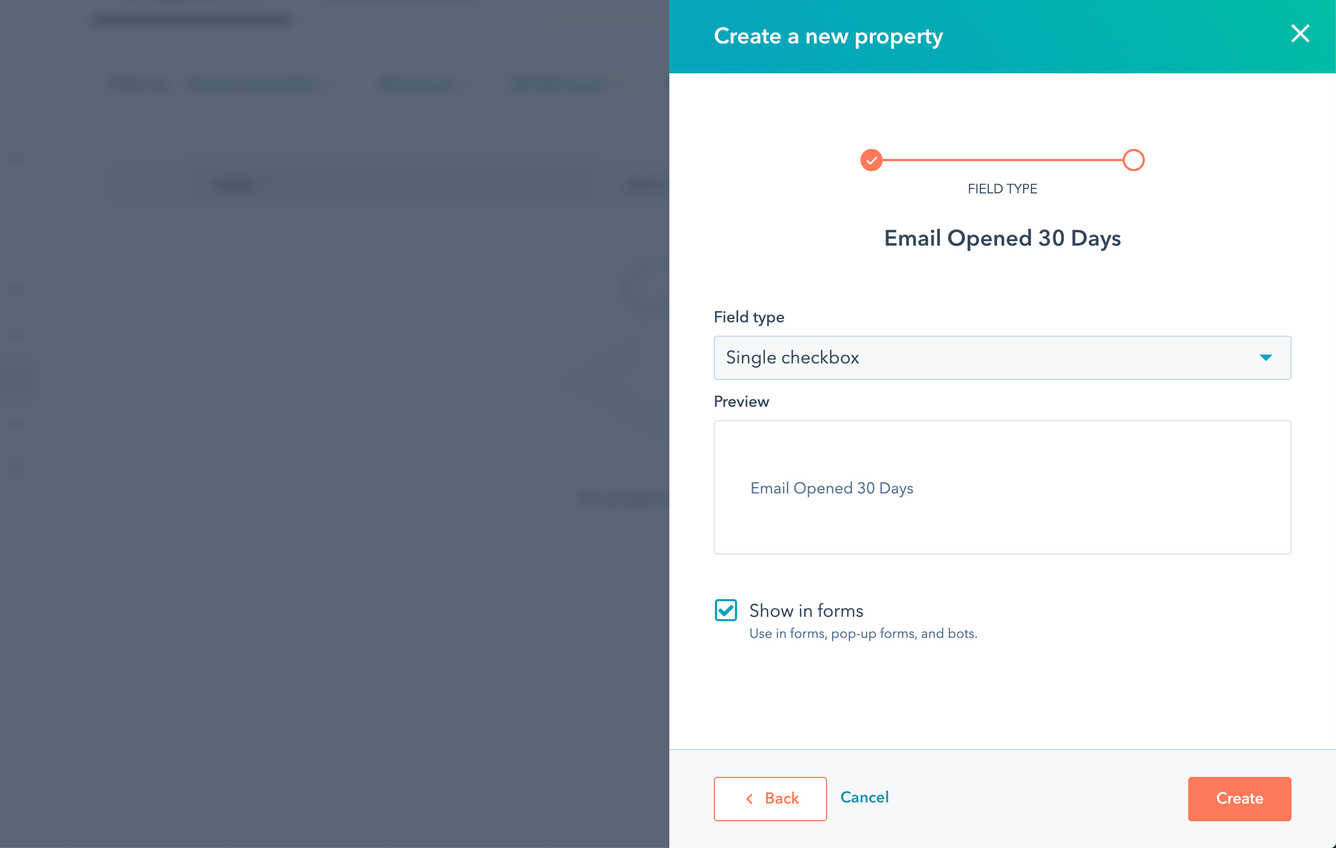
-
On the next screen, set the Field type for audiences to
Single Checkbox. (This represents a boolean value that indicates audience membership.) (For computed traits, depending on whether the output is a string or number, selectSingle-line textorNumber.)Click Create to finish adding the audience contact property.
-
Back in the Engage Audience builder, click Create Audience. Engage sends any users that meet the audience criteria to HubSpot immediately.
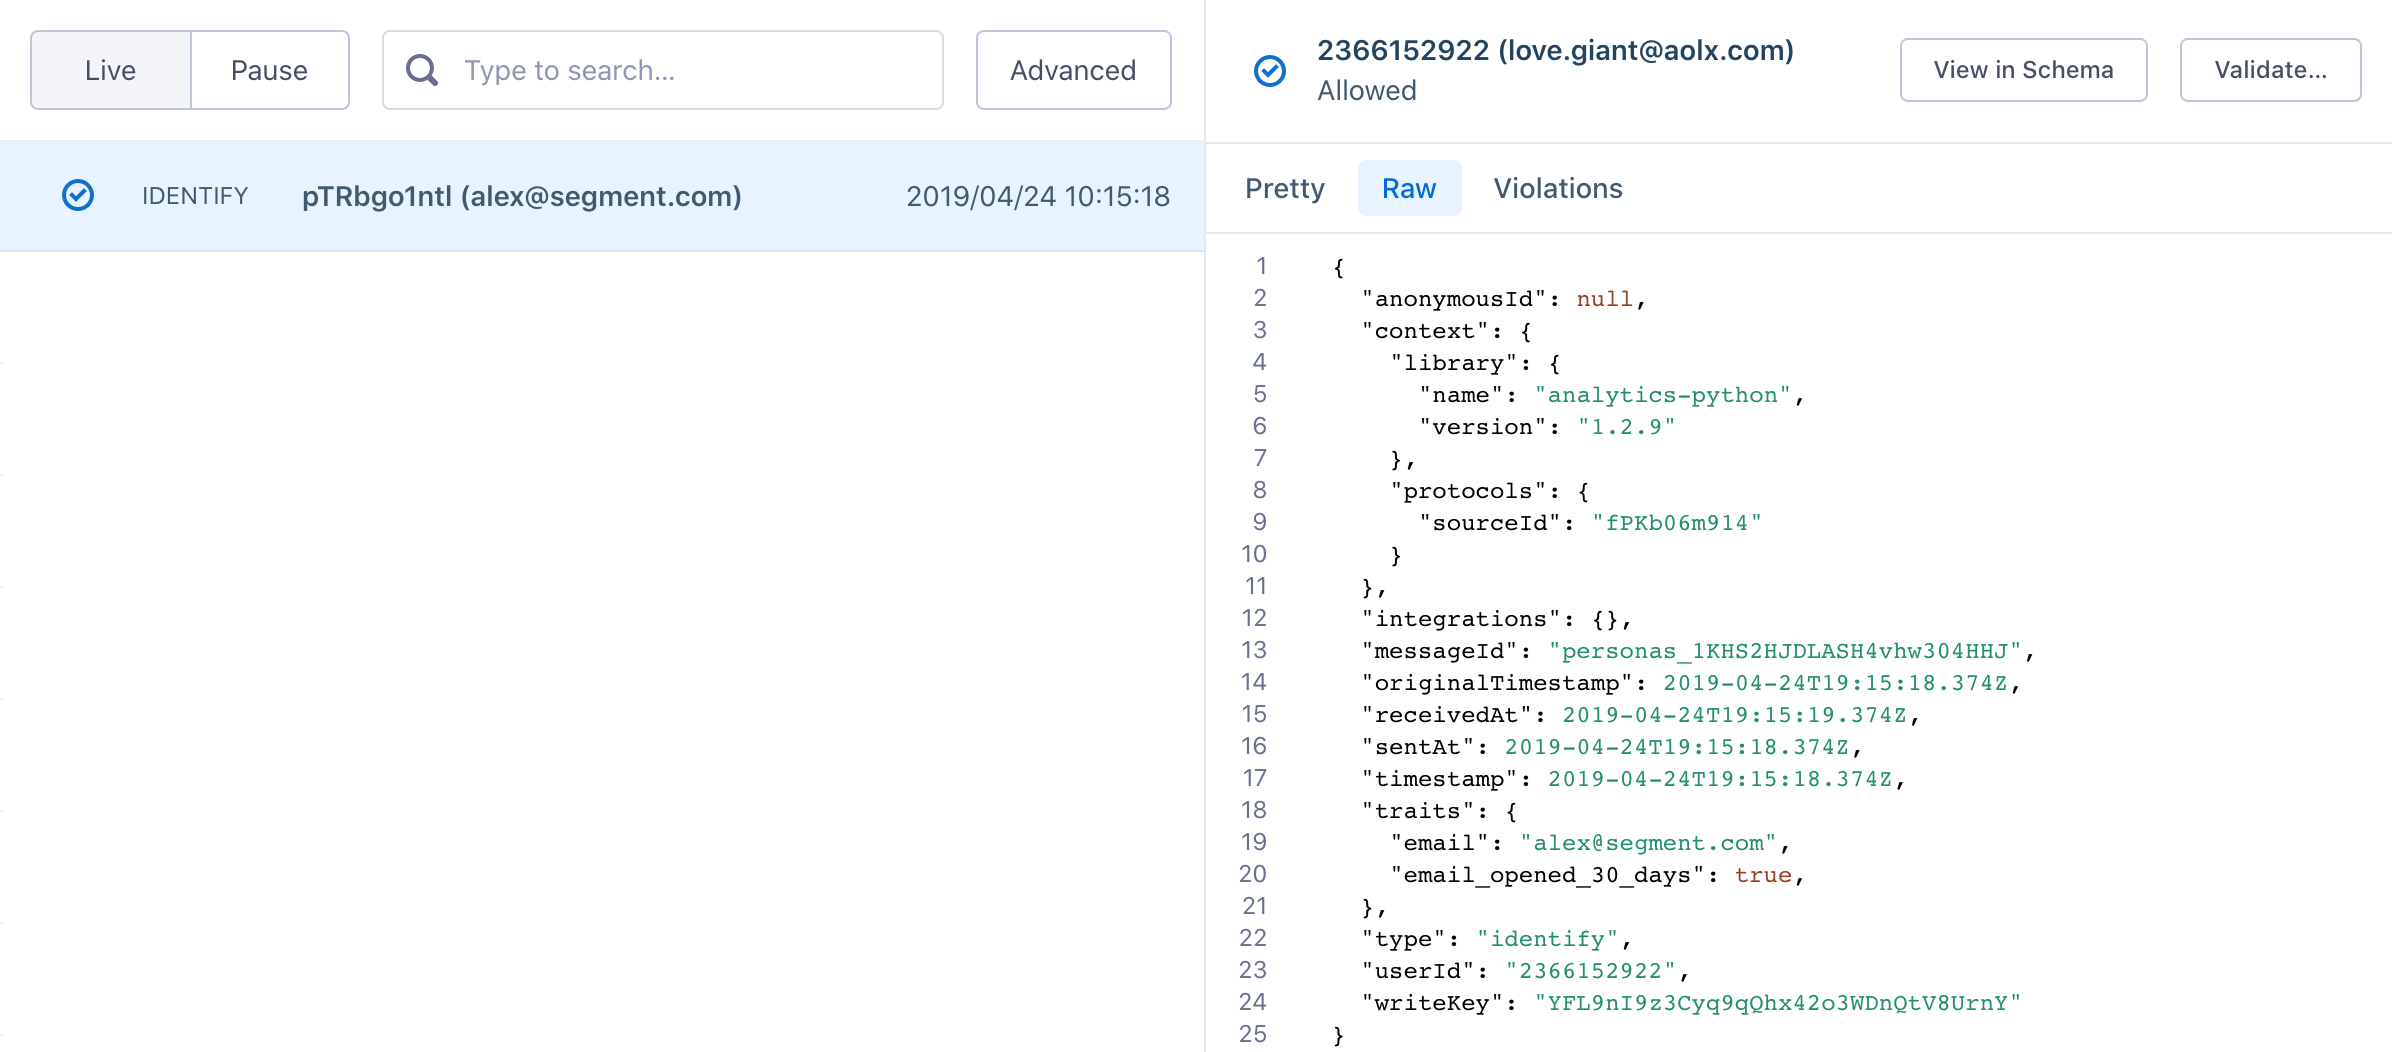
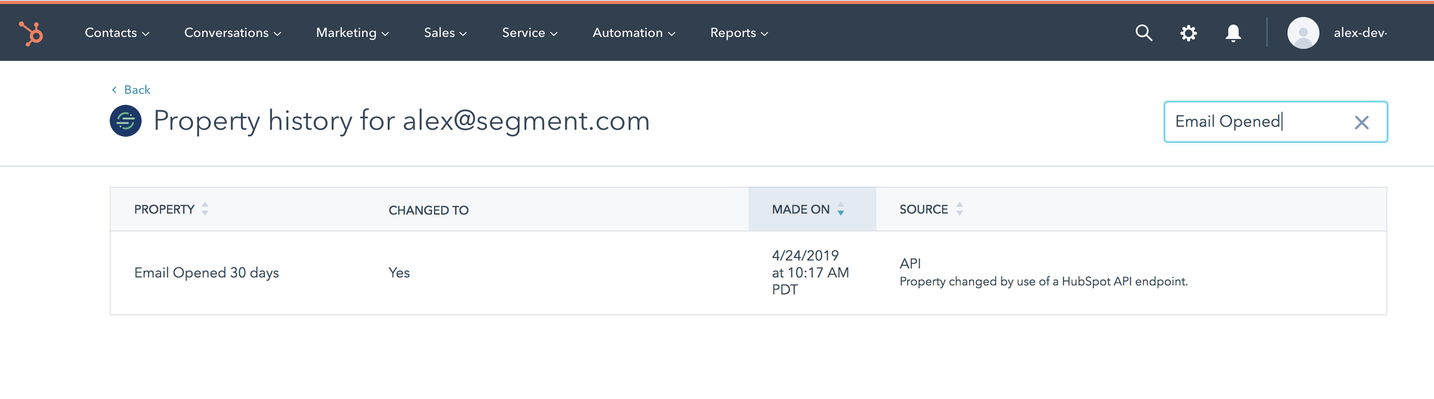
Verify the audience
You can use the Profiles Debugger to see the calls sent to HubSpot.
You can check back in HubSpot to see the audience boolean as a contact property. For the audience created in the example above, you could check individual contact profiles and see a contact property called Email Opened 30 Days = Yes.
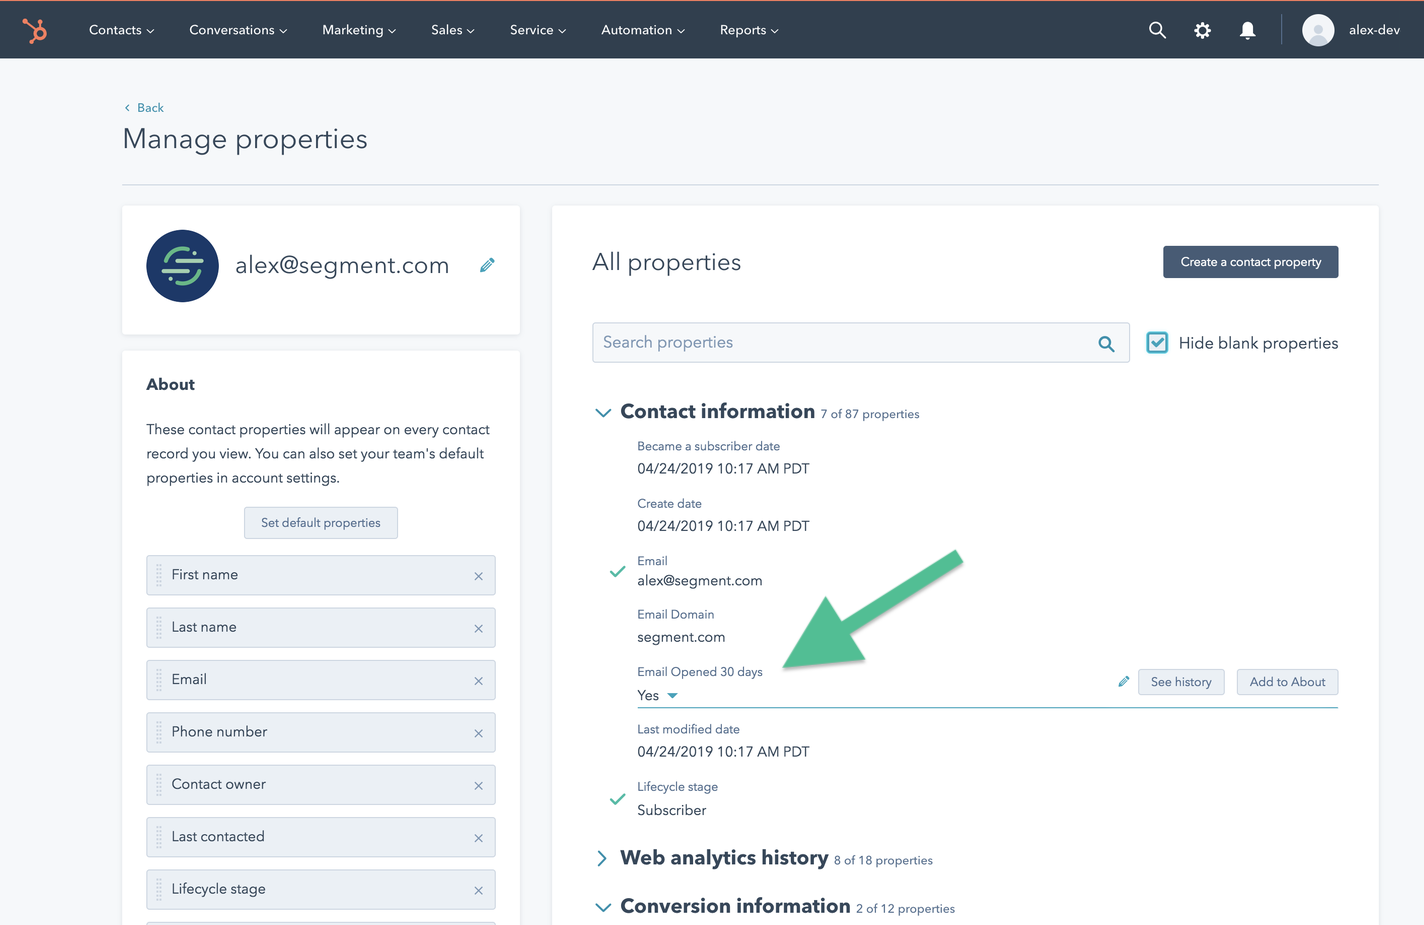
You can also see this in the contact property history for each user record.
HubSpot Engage Details
- Engage Destination type: Event Method (data is delivered to this Destination one-by-one on a realtime basis)
- Traits and Audiences created by: Identify calls add and update traits and audiences as traits on the user, Track calls send events for
Audience EnteredandAudience Exited. - Must create audience_name field before Engage can update those values?: Yes, you must manually create Contact properties in HubSpot before you send Custom Traits or Audiences.
- Audience appears as: A prose-text version of the audience name (for example,
Order Completed 30 Days: Yes) whereYesindicates that the user is in the audience. - Destination rate limit: Yes. HubSpot’s rate limit depends on what account tier you have in HubSpot, but is usually 100 calls per ten seconds, or 10 per second.
- Lookback window allowed: Unlimited
- Identifiers required :
UserIDoremail - Identifiers accepted :
UserIDandemail - Client or Server-Side Connection: Server-side
Settings
Segment lets you change these destination settings from the Segment app without having to touch any code.
| Setting | Description |
|---|---|
| API Key | string. Using an API Key for authentication was deprecated by HubSpot in July 2022. Existing API Keys entered here will continue to work, but in order to authenticate a new connection, please use the Private App Token setting instead. |
| Enable HubSpot API Endpoint for EU (Mobile/Server Only) | boolean, defaults to FALSE . Enable this option if you would like Segment to send mobile and server data to HubSpot’s API endpoint for EU data residency. Data will be sent to https://track-eu1.hubspot.com/v1/. This only applies to mobile and server sources connected to HubSpot. |
| Enable HubSpot SDK for EU (Web Only) | boolean, defaults to FALSE . Enable this option if you would like Segment to load the HubSpot SDK for EU data residency. This only applies to web (analytics.js) sources connected to HubSpot. |
| Load Forms SDK | boolean, defaults to FALSE . Select this option if you would like Segment to automatically load the HubSpot Forms SDK onto your site. This will offload the manual work required to add the embed code to your site’s header. Important: The Forms API expects that the script is loaded onto your page synchronously but analytics.js is loaded asynchronously. To prevent errors, please ensure you are interacting with the Forms API inside an analytics.ready callback. Non-HubSpot Forms SDK is not controlled by this setting, to disable them, please follow HubSpot guide here. |
| Hub ID (required) |
string. You can find your Hub ID on the Settings page of your HubSpot account. It should be a series of numbers, like 997086. |
| Private App Token | string. HubSpot now allows customers to use a Private App Token instead of an API Key for authorization. To generate a new Private App Token, from your HubSpot dashboard, navigate to Integrations > Private Apps. Segment requires the following scopes: business-intelligence, crm.objects.contacts.read, crm.objects.contacts.write, crm.schemas.contacts.read, crm.objects.companies.read, crm.objects.companies.write, crm.schemas.companies.read. The Private App Token should look something like this: cat-sa1-5290e38d-a910-4f5d-8bb1-8c81c39fdg6g |
This page was last modified: 18 Nov 2023
Need support?
Questions? Problems? Need more info? Contact Segment Support for assistance!