Mammoth Destination
Mammoth provides self-serve analytics for analysts, businesses, and developers who can use Mammoth’s data warehousing, data discovery & data preparation abilities to arrive at insights.
Mammoth allows you to blend your data from Segment with other sources of data such as databases and files. Using Mammoth, you can build multiple data pipelines, which are constructed by applying transforms through a no coding interface. Mammoth also allows for the visual discovery of the data and easy exports to databases such as MySQL, Elasticsearch, and PostgreSQL.
This destination is maintained by Mammoth. For any issues with Mammoth Destination, contact the Mammoth Support team.
Getting Started
There are three steps to get started using Mammoth with Segment. First, register for an demo with Mammoth.
- Create a webhook dataset in Mammoth, and copy the API key.
- Connect Segment to Mammoth.
- Use the Extract from JSON task to flatten data.
1. Create a webhook dataset on Mammoth.
Mammoth Segment destination requires that you have a dataset on Mammoth’s side. There are multiple types of datasets you can add. You should add a webhook type of dataset in Mammoth for your Segment integration.
- Log in to app.mammoth.io.
- First, create a new “webhooks” dataset. If you already have a dataset, click the green button in the data library, then click the Webhooks option. If you don’t have any datasets in your account yet, the data library shows a button to add a webhook dataset on the data library itself. Click that.
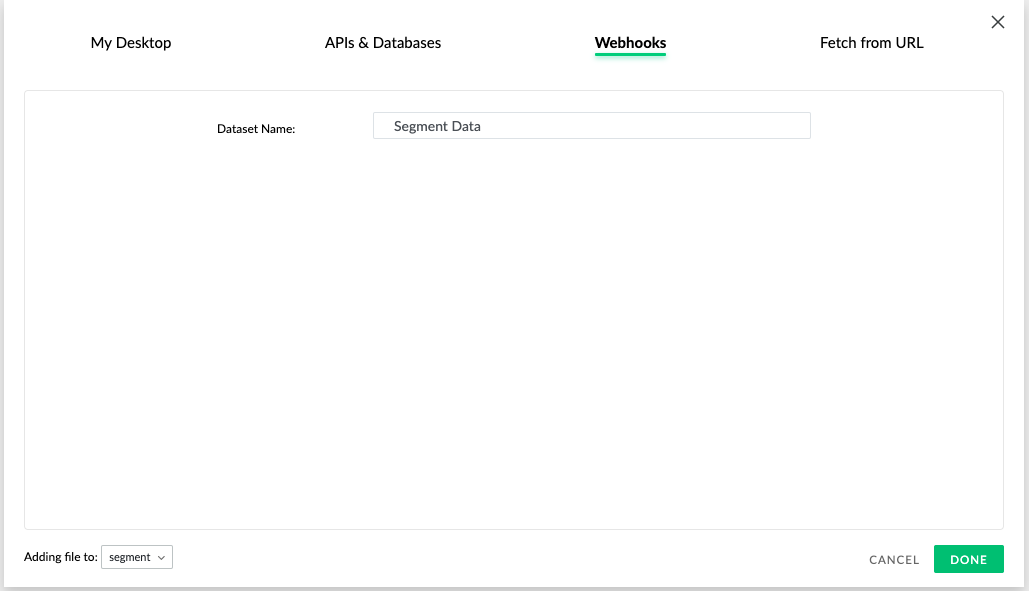
- The add dataset dialog opens. Make sure the option selected is Webhooks.
-
Give your dataset a name, and click Done. A new dataset appears in the data library.
The dataset you created shows an API KEY which you need to connect to Segment.
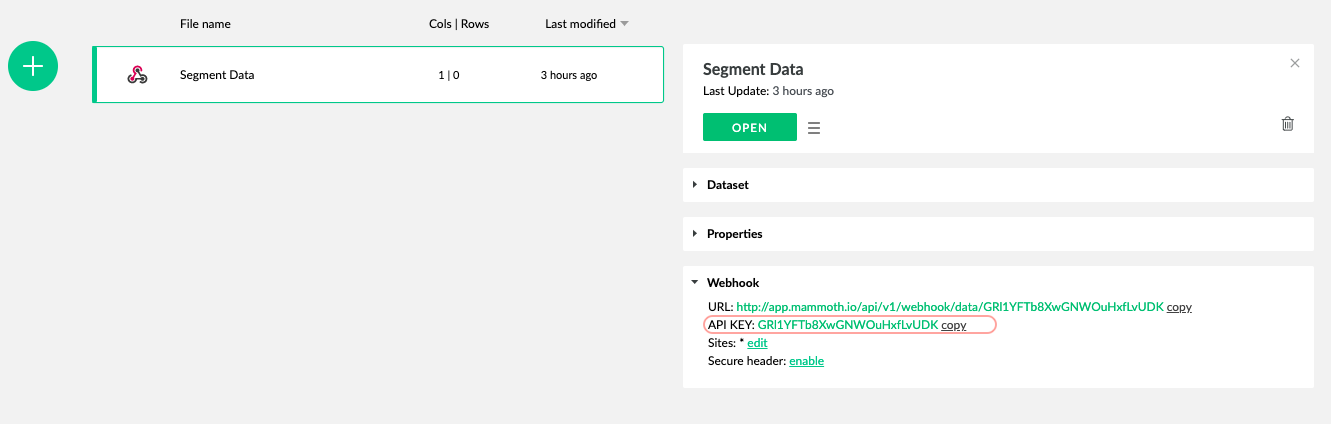
- Click the new dataset you created in the previous step.
- From the preview panel, click copy to copy the API key to your clipboard.
2. Connect Segment and Mammoth.
- In the Segment App, select Add Destination. Search for and select Mammoth.
- Paste the API KEY you copied in the previous step into the settings UI.
3. Use the Extract from JSON task to flatten data
Once you are configured according to the previous steps, data flows into Mammoth. Mammoth stores all the data received from Segment in this dataset. You can use the “Extract from JSON” task to flatten the data into rows and columns. Once you have the data in a flat format, you can use Mammoth to set up any number of pipelines you need.
- When Mammoth receives new data the
REFRESHbutton appears in the preview panel. Click it to add that data to the dataset from the staging area. - Select the dataset and click Open. The default View on the dataset appears. Look for one column of data called JSON.
- Now we want to flatten the JSON data. Open the ADD TASK menu and click Extract from JSON.
- Use the Extract from JSON task as needed to flatten the data. Extract from JSON task automatically suggests the correct options, and all you need to do is hit Apply. You can read more about the Extract from JSON task here.
- You may need to apply the Extract from JSON task multiple times if the data is nested.
Mammoth automatically refreshes the data about once an hour. You can also click REFRESH at any time to sync data immediately.
Hints and Tips
Tasks you create with Mammoth do not modify your original data from Segment. You can reuse the original data and set up multiple task pipelines by creating multiple views on the same dataset.
You may also want to use the Apply filter task along with Extract from JSON task to flatten only certain types of data.
Once you have converted the JSON data into a row vs. column format, you can
- Use the EXPLORE menu and explore the data in any of the columns.
- Use other tasks provided by the ADD TASK menu to arrive at insights and automate reports.
- Export the data to another system from Mammoth.
Mammoth recommends that you use the Save as Dataset task in the ADD TASK menu to save your flattened data as a new dataset. Using this method, you separate your JSON extractions from your analysis & reporting.
Page
If you’re not familiar with the Segment Specs, take a look to understand what the Page method does. An example call would look like:
analytics.page()
Page calls will be sent to the webhook dataset you created earlier. You can filter this data into a different view after you have set up JSON extract pipelines.
Screen
If you’re not familiar with the Segment Specs, take a look to understand what the Screen method does. An example call would look like:
[[SEGAnalytics sharedAnalytics] screen:@ "Home"];
Screen calls will be sent to the webhook dataset you created earlier. You can filter this data into a different view after you have set up JSON extract pipelines.
Identify
If you’re not familiar with the Segment Specs, take a look to understand what the Identify method does. An example call would look like:
analytics.identify('userId123', {
  email: 'john.doe@example.com'
});
Identify calls will be sent to the webhook dataset you created earlier. You can filter this data into a different view after you have set up JSON extract pipelines.
Track
If you’re not familiar with the Segment Specs, take a look to understand what the Track method does. An example call would look like:
analytics.track('Clicked Login Button')
Track calls will be sent to the webhook dataset you created earlier. You can filter this data into a different view after you have set up JSON extract pipelines.
Engage
You can send computed traits and audiences generated using Engage to this destination as a user property. To learn more about Engage, schedule a demo.
For user-property destinations, an identify call is sent to the destination for each user being added and removed. The property name is the snake_cased version of the audience name, with a true/false value to indicate membership. For example, when a user first completes an order in the last 30 days, Engage sends an Identify call with the property order_completed_last_30days: true. When the user no longer satisfies this condition (for example, it’s been more than 30 days since their last order), Engage sets that value to false.
When you first create an audience, Engage sends an Identify call for every user in that audience. Later audience syncs only send updates for users whose membership has changed since the last sync.
Real-time to batch destination sync frequency
Real-time audience syncs to Mammoth may take six or more hours for the initial sync to complete. Upon completion, a sync frequency of two to three hours is expected.
Settings
Segment lets you change these destination settings from the Segment app without having to touch any code.
| Setting | Description |
|---|---|
| API Key (required) |
string. You can find your API key in the webhook dataset’s preview panel. |
This page was last modified: 20 Mar 2024
Need support?
Questions? Problems? Need more info? Contact Segment Support for assistance!