Mailchimp Destination
Destination Info
- Accepts Identify calls.
- Refer to it as MailChimp in the Integrations object
Components
- Server
Connection Modes 
| Device-mode | Cloud-mode |
|---|---|
 Web Web |
 Web Web |
| Mobile |
Mobile |
| Server |
Server |
Mailchimp provides email marketing automation for e-commerce businesses. With Segment you can add people to your Mailchimp list with a single identify call.
Getting started
- From the Segment web app, navigate to Connections > Catalog and go to the Destinations tab of the catalog.
- Search for Mailchimp, select it, and click Configure Mailchimp.
- Choose the source to connect the destination to.
- In the destination settings, enter your Mailchimp “API key” into the connection settings. You should create a new API key for the Segment destination. Mailchimp restricts each API key to a maximum of 10 concurrent requests, so creating a dedicated one for Segment ensures maximum throughput for outgoing calls. You can read more about API keys on Mailchimp’s docs.
- Enter your Mailchimp “Audience ID” into the connection settings.
- Enter your Mailchimp “Datacenter ID” into the connection settings.
Identify
If you’re not familiar with the Segment Specs, take a look to understand what the Identify method does. An example call would look like:
analytics.identify('userId12345', {
  firstName: 'Bob',
  lastName: 'Dole',
  email: 'bob.dole@example.com'
});
Every time you call identify with an email address included, Segment:
-
First asks Mailchimp if that email exists and what their subscriber status is for the
listIdyou’ve provided in the destination settings. -
If they don’t exist, Segment subscribes that user to the list immediately. If you enabled the
doubleOptInsetting, it sends a confirmation email to that user before subscribing them, and that email won’t be tagged with a subscriber status ofpending. -
If they already have a subscriber status such as
pending,subscribed,unsubscribed, orcleaned, Segment doesn’t resubscribe them, but updates their usertraits.
So you no longer have to worry about the identify call resubscribing users unintentionally!
Segment recognizes firstName, lastName, and email as special traits, so Segment translates those for you to match the Mailchimp accepted field names. Mailchimp includes these fields by default when you create a list.
Recording custom user traits
If you want to view any other custom user traits in the Mailchimp list dashboard, you must create a custom merge field inside Mailchimp’s UI of the traits in your identify calls. Note that you don’t need to map all user.traits you’re sending inside Mailchimp. You only need to create custom merge fields of the traits you want to see in your list view.
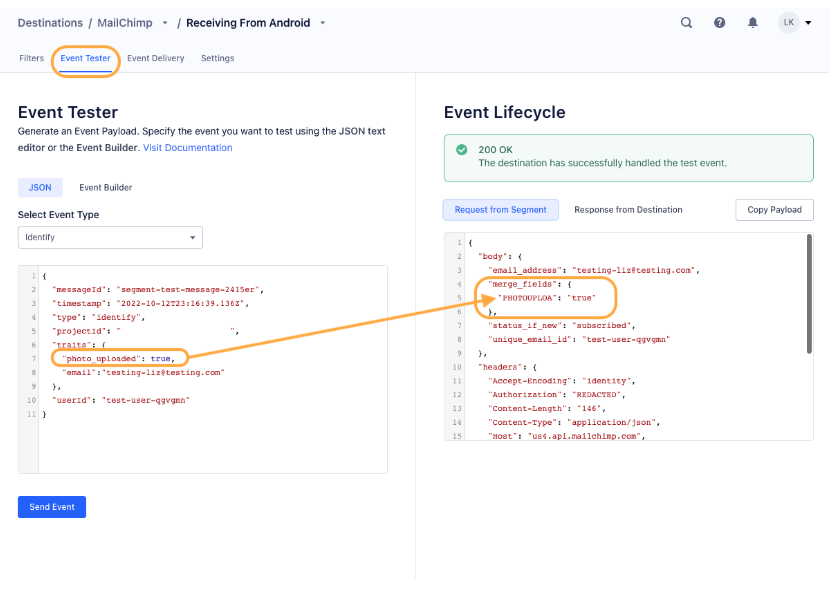
IMPORTANT: Mailchimp only supports merge tags that are 10 characters or shorter. For every user trait you send inside the .identify() call, Segment will trim it to be the first 10 characters and will send it in uppercase form to Mailchimp.
 It’s important that when you set up your merge tags in Mailchimp, your
 Merge Tags are the first 10 characters (excluding whitespace or special characters) of its Field Label (if it’s over 10 characters).
For example, if your Field Label was Way Too-Long123, your Merge Tag should be WAYTOOLONG. And the user.trait inside your .identify() call would be Way Too-Long123 since Segment converts that to WAYTOOLONG before sending it to Mailchimp.
If you’re going to send either a boolean or null object as a user.trait value, when creating the custom merge field for that trait inside Mailchimp, make sure to set the data type as TEXT since Segment will stringify all boolean or null objects to strings.
Also note that fields you specify in Mailchimp as date fields must receive dates. Passing non-date values will cause issues.
Custom merge fields
To send custom merge fields/user traits to Mailchimp you need to create the merge field first in Mailchimp for each trait you want sent to Mailchimp. Then when you call identify with keys that match those traits they will appear in your Mailchimp list.
For example, if you have a list in Mailchimp with these custom merge fields:
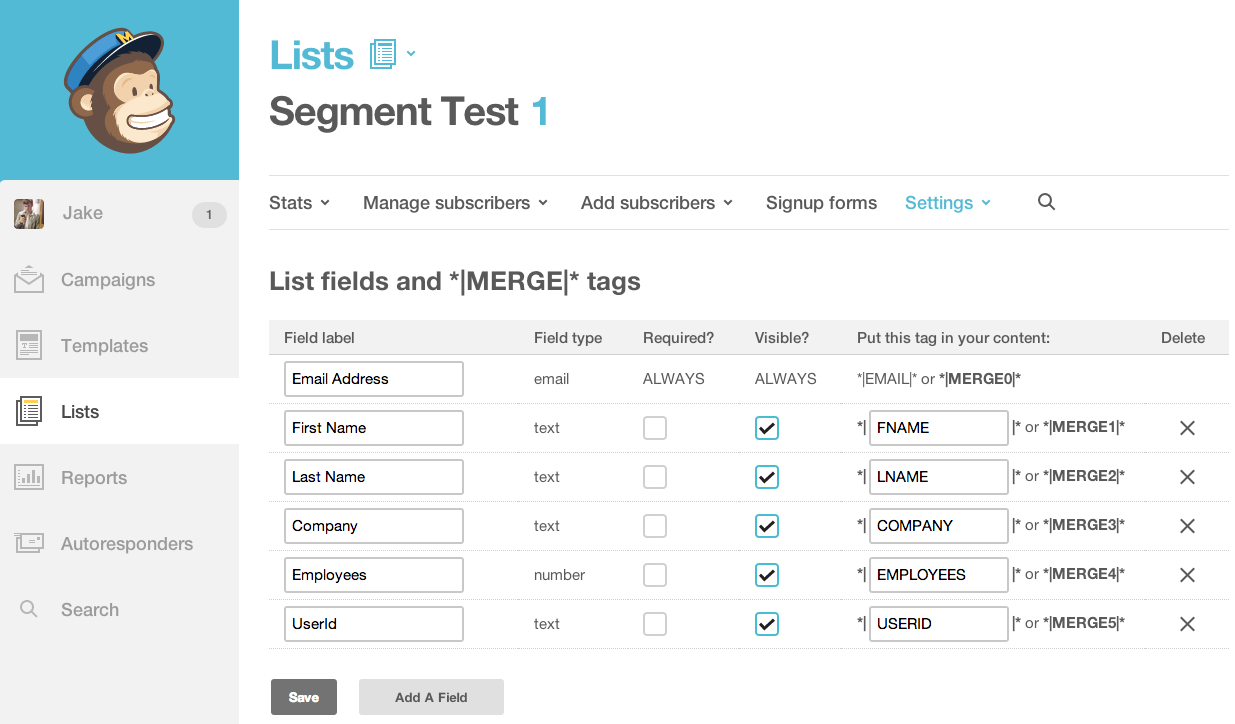
You can populate those fields using this identify call:
analytics.identify('userId12345', {
  firstName: 'Bob',
  lastName: 'Dole',
  email: 'bob.dole@example.com',
  company: 'Initech',
  employees: 234
});
For any other custom traits, add a Mailchimp custom merge field inside of Mailchimp with a tag that matches the key you’re using in your identify call. In the example, these traits are company and employees. They will be shown as COMPANY and EMPLOYEES in Mailchimp, but you can record them in lower-case to identify and they will still populate.
Don’t use underscores in your custom merge field names. When Segment maps to Mailchimp merge fields, Segment removes the underscores and capitalizes the entire field.
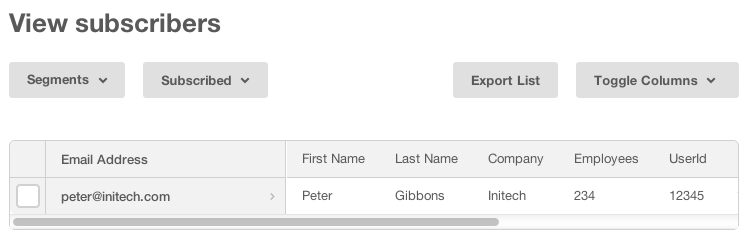
Once Mailchimp has processed the new subscriber you’ll see it show up in your list, like this:
Recording userId
To record a Segment userId in Mailchimp, pass the user ID as a trait on your identify() calls. Don’t pass the userId as a trait ID because the trait.id is a reserved trait. Instead, pass the userId in a trait name with the corresponding merge field in Mailchimp. Segment doesn’t automatically map the user ID to a Mailchimp property.
Overriding List ID (Also now referred to as Audience ID)
If you have multiple lists (audiences) that your users can subscribe to, you can override the default list (audience) ID. Simply send a listId parameter as an option for Mailchimp:
analytics.identify('userId12345', {
  firstName: 'Bob'
  }, {
    "MailChimp": {
      "listId": "ea7918abb6"
    }
  });
Manually updating user subscription status
If you’d like to manually update a user’s subscription status, you can do so by passing in subscriptionStatus property as an option for Mailchimp:
analytics.identify('userId12345', {
  firstName: 'Bob'
  }, {
  integrations: {
    "MailChimp": {
      "listId": "ea7918abb6",
      "subscriptionStatus": "unsubscribed"
    }
  }
});
Important: You must use the semantic property exactly as is, subscriptionStatus (case-sensitive) and the value of this property must be one of the four valid statuses supported by Mailchimp: pending, subscribed, unsubscribed, and cleaned (all lowercase).
Again, this will NOT work for new users. New users will always have their subscription status set as either pending or subscribed depending on your double opt-in setting.
Troubleshooting
Why are my calls with trait arrays not showing up in Mailchimp?
Mailchimp doesn’t support arrays as traits values. This can cause calls to not show up.
Engage
You can send computed traits and audiences generated using Engage to Mailchimp as a user property. To learn more about Engage, schedule a demo.
Segment sends an identify call to the Mailchimp destination for each user being added and removed. The Mailchimp destination requires an email field in all Identify payloads. If a profile doesn’t have an email identifier when the audience or trait is created in Segment, then the event will fail and will not be sent to Mailchimp.
Before creating audiences or computed traits with Engage, you must first create merge fields in Mailchimp. Learn more about recording custom user traits and sending custom merge fields to Mailchimp.
The property name is the snake_cased version of the audience name, with a true/false value to indicate membership. For example, when a user first completes an order in the last 30 days, Engage sends an Identify call with the property order_completed_last_30days: true. When the user no longer satisfies this condition (for example, it’s been more than 30 days since their last order), Engage sets that value to false.
When you first create an audience, Engage sends an Identify call for every user in that audience. Later audience syncs only send updates for users whose membership has changed since the last sync.
Real-time to batch destination sync frequency
Real-time audience syncs to Mailchimp may take six or more hours for the initial sync to complete. Upon completion, a sync frequency of two or three hours is expected.
Settings
Segment lets you change these destination settings from the Segment app without having to touch any code.
| Setting | Description |
|---|---|
| API Key (required) |
string. You create and copy-paste your MailChimp API Key from Account Settings > Extras > API Keys. |
| Datacenter ID (required) |
string. You can find your Datacenter ID in the MailChimp url in your browser when you’re logged in. It’s the ‘us1’ in ‘https://us1.admin.mailchimp.com/lists/’. |
| Double Opt-In | boolean, defaults to FALSE . An optional flag to control whether a double opt-in confirmation message is sent when subscribing new users. |
| Audience ID (required) |
string. You can find your Audience ID in your Mailchimp Settings pane under the Audiences tab. Go to Manage Audiences > Settings and click on Audience Name & Defaults. The Audience ID will be on the right side. |
This page was last modified: 20 Jun 2023
Need support?
Questions? Problems? Need more info? Contact Segment Support for assistance!