Marketo V2 Destination
Destination Info
- Accepts Page, Identify, and Track calls
- Refer to it as Marketo V2 in the Integrations object
Components
- Browser
- Server
Connection Modes 
| Device-mode | Cloud-mode |
|---|---|
 Web Web |
Web |
 Mobile Mobile |
Mobile |
| Server |
Server |
Getting Started
To start sending data to Marketo, there are two things you must do. Both of these steps require that you to log in with the Admin Marketo Account.
Enter your Marketo Credentials into your Destination settings
We’ll need your Munchkin Account ID, Client Secret, and Client ID.
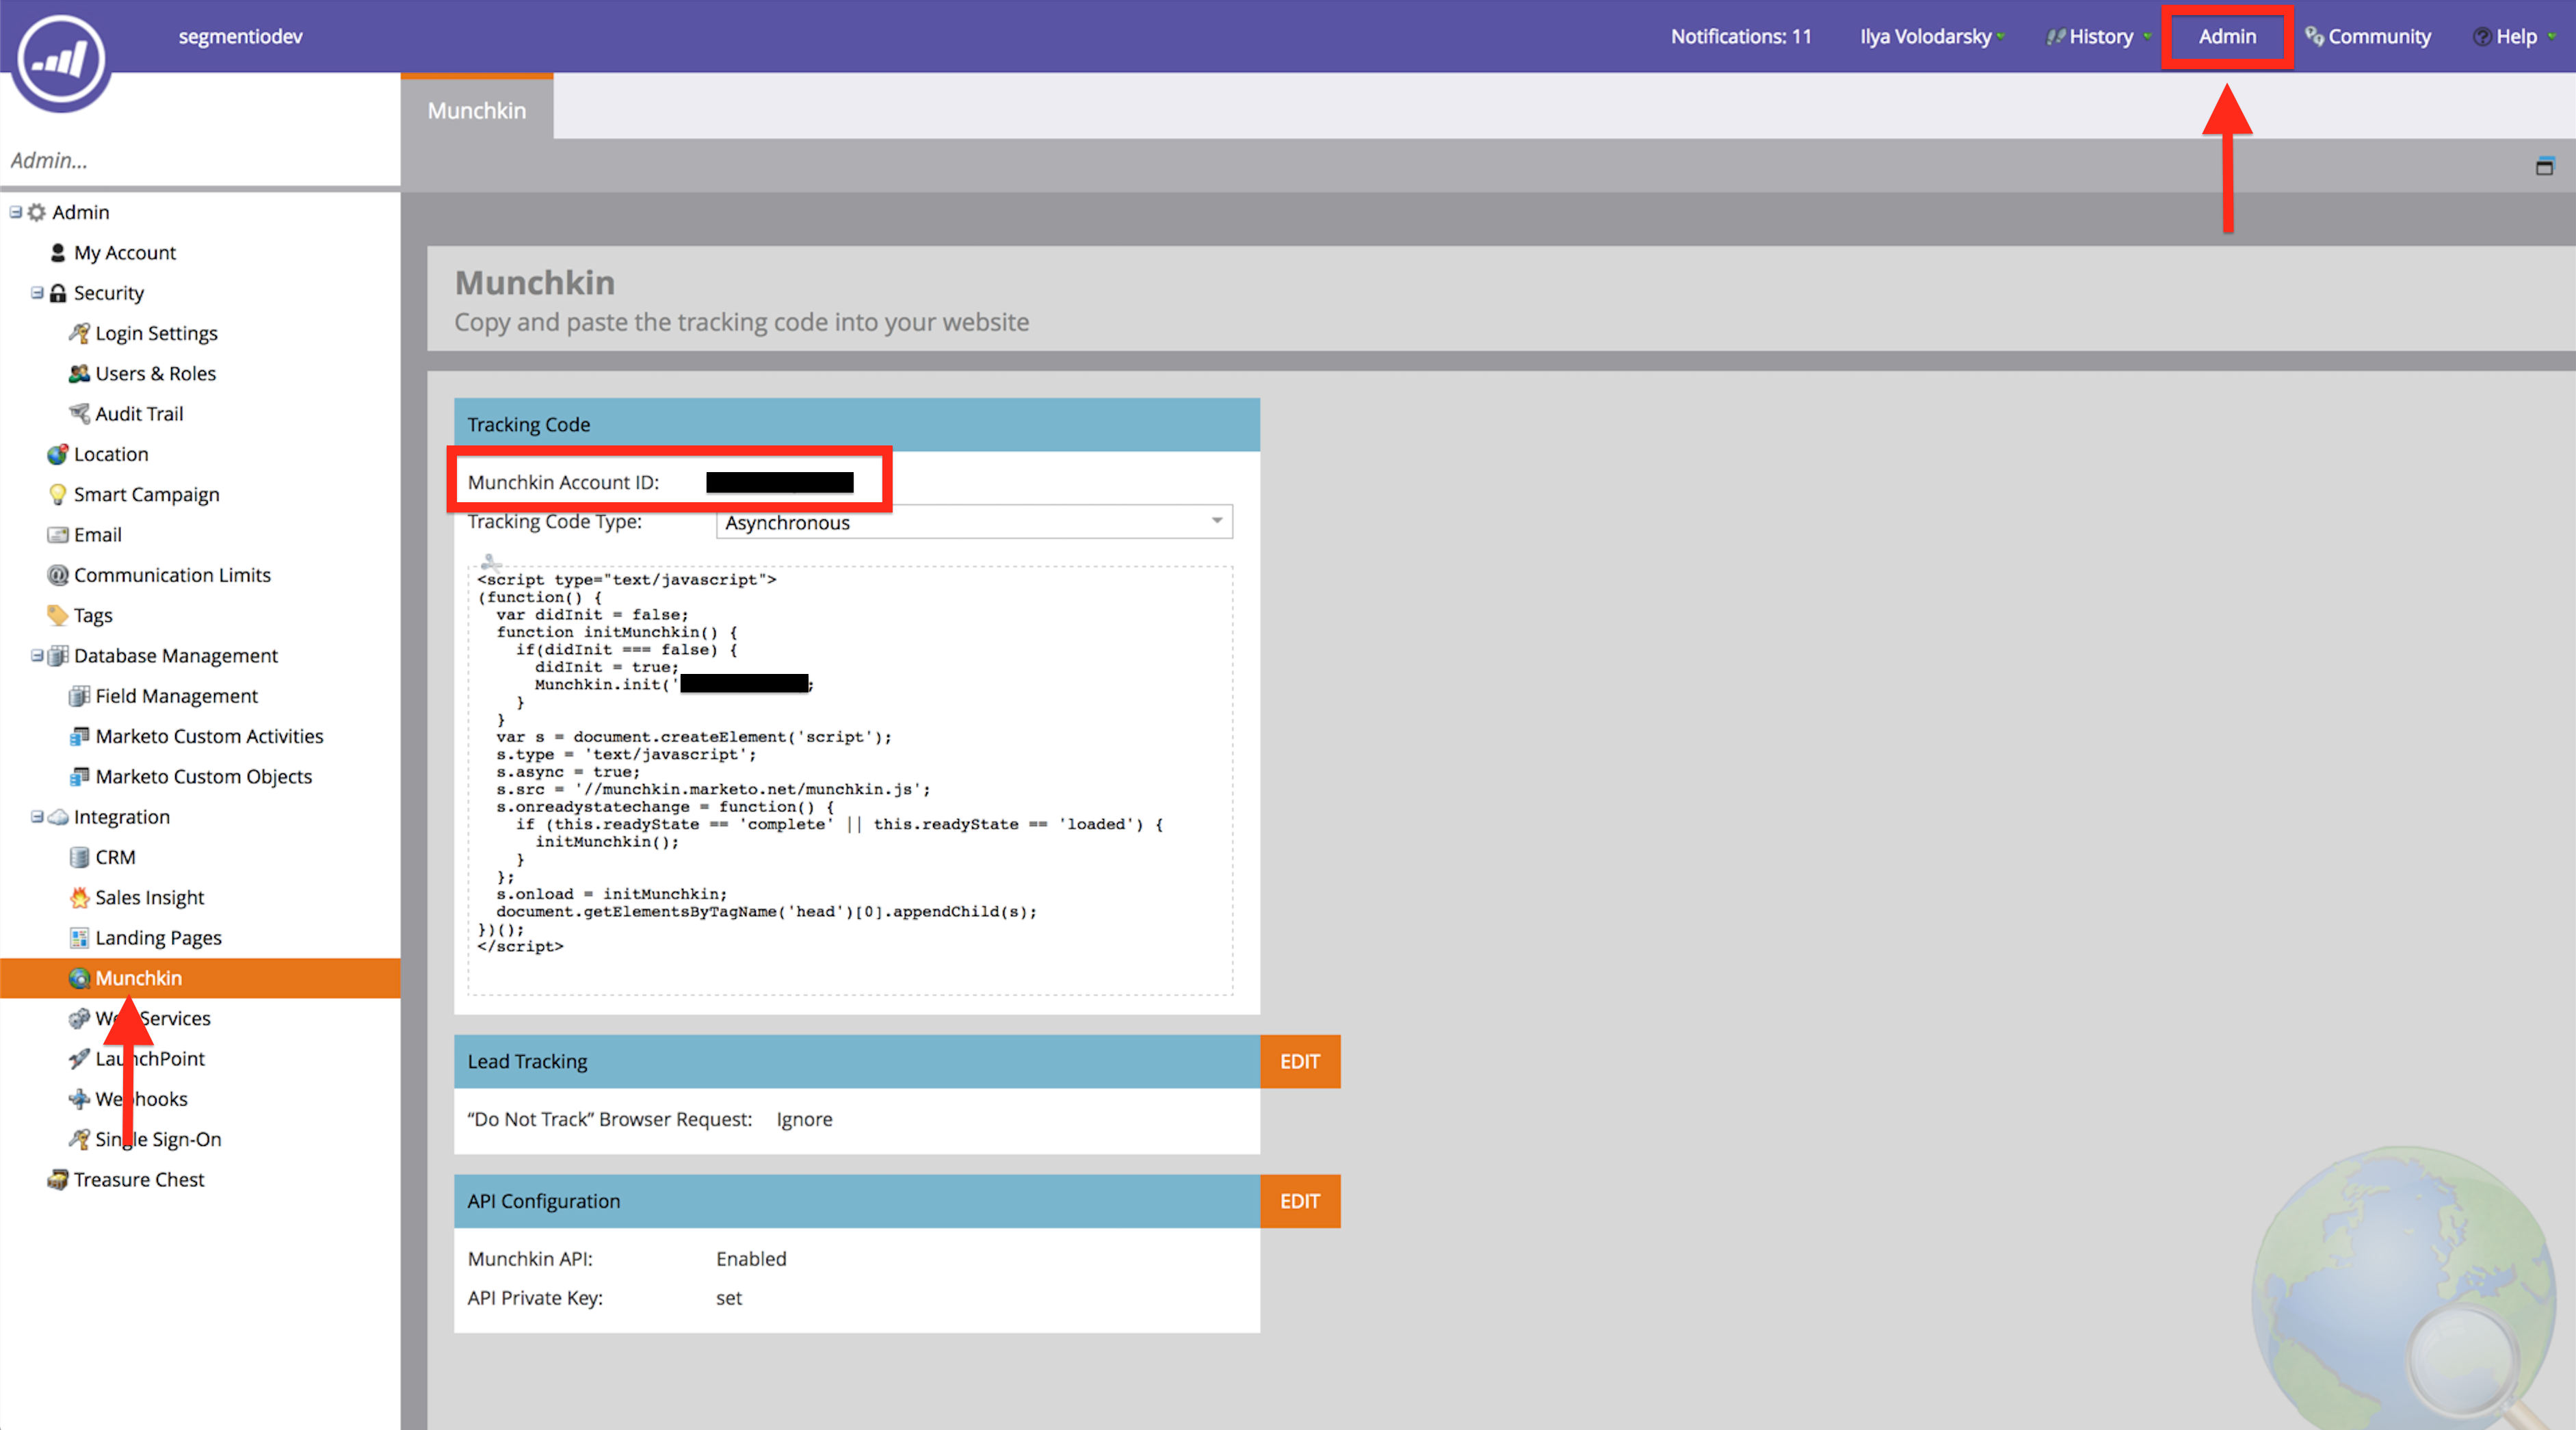
To get your Munchkin Account ID login to your Marketo account, click Admin in the top right corner, then click Munchkin on the left side bar.
To get your Client Secret and Client ID, you must create a role that has full API access, an API only user, and then create a Service in Marketo.
To create a role with full API access:
- Click Admin in the top right corner.
- Click Users & Roles on the left side bar.
- Click on the Roles tab.
- Click New Role. Name your role and check the API Access box to assign the user full API access. Click Create.
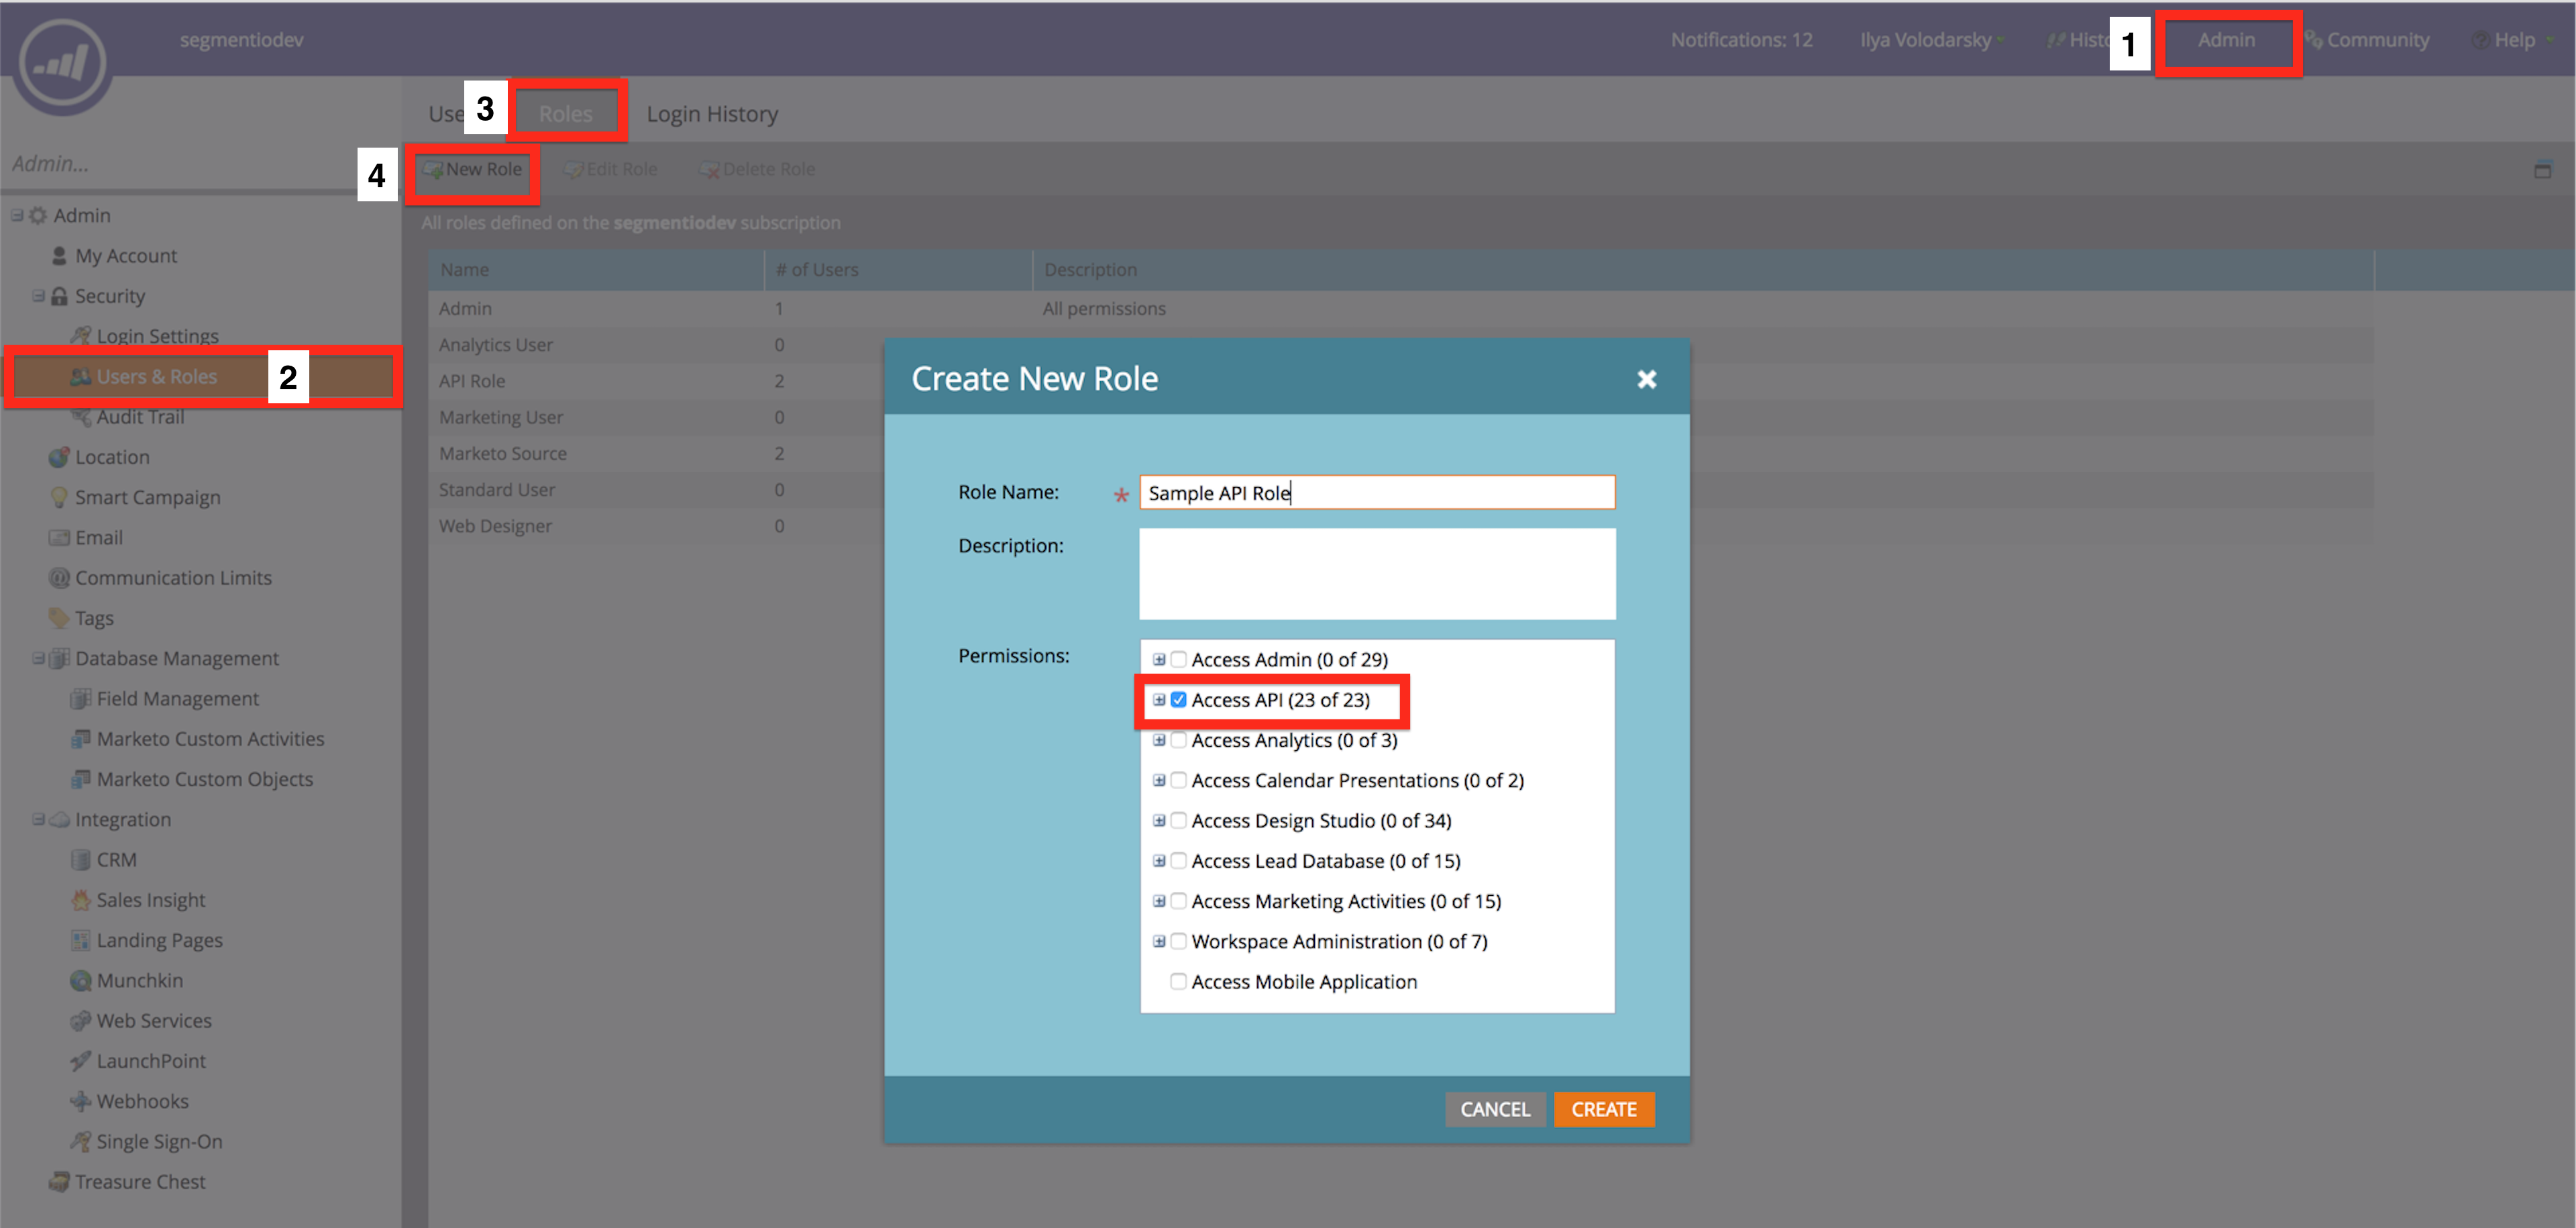
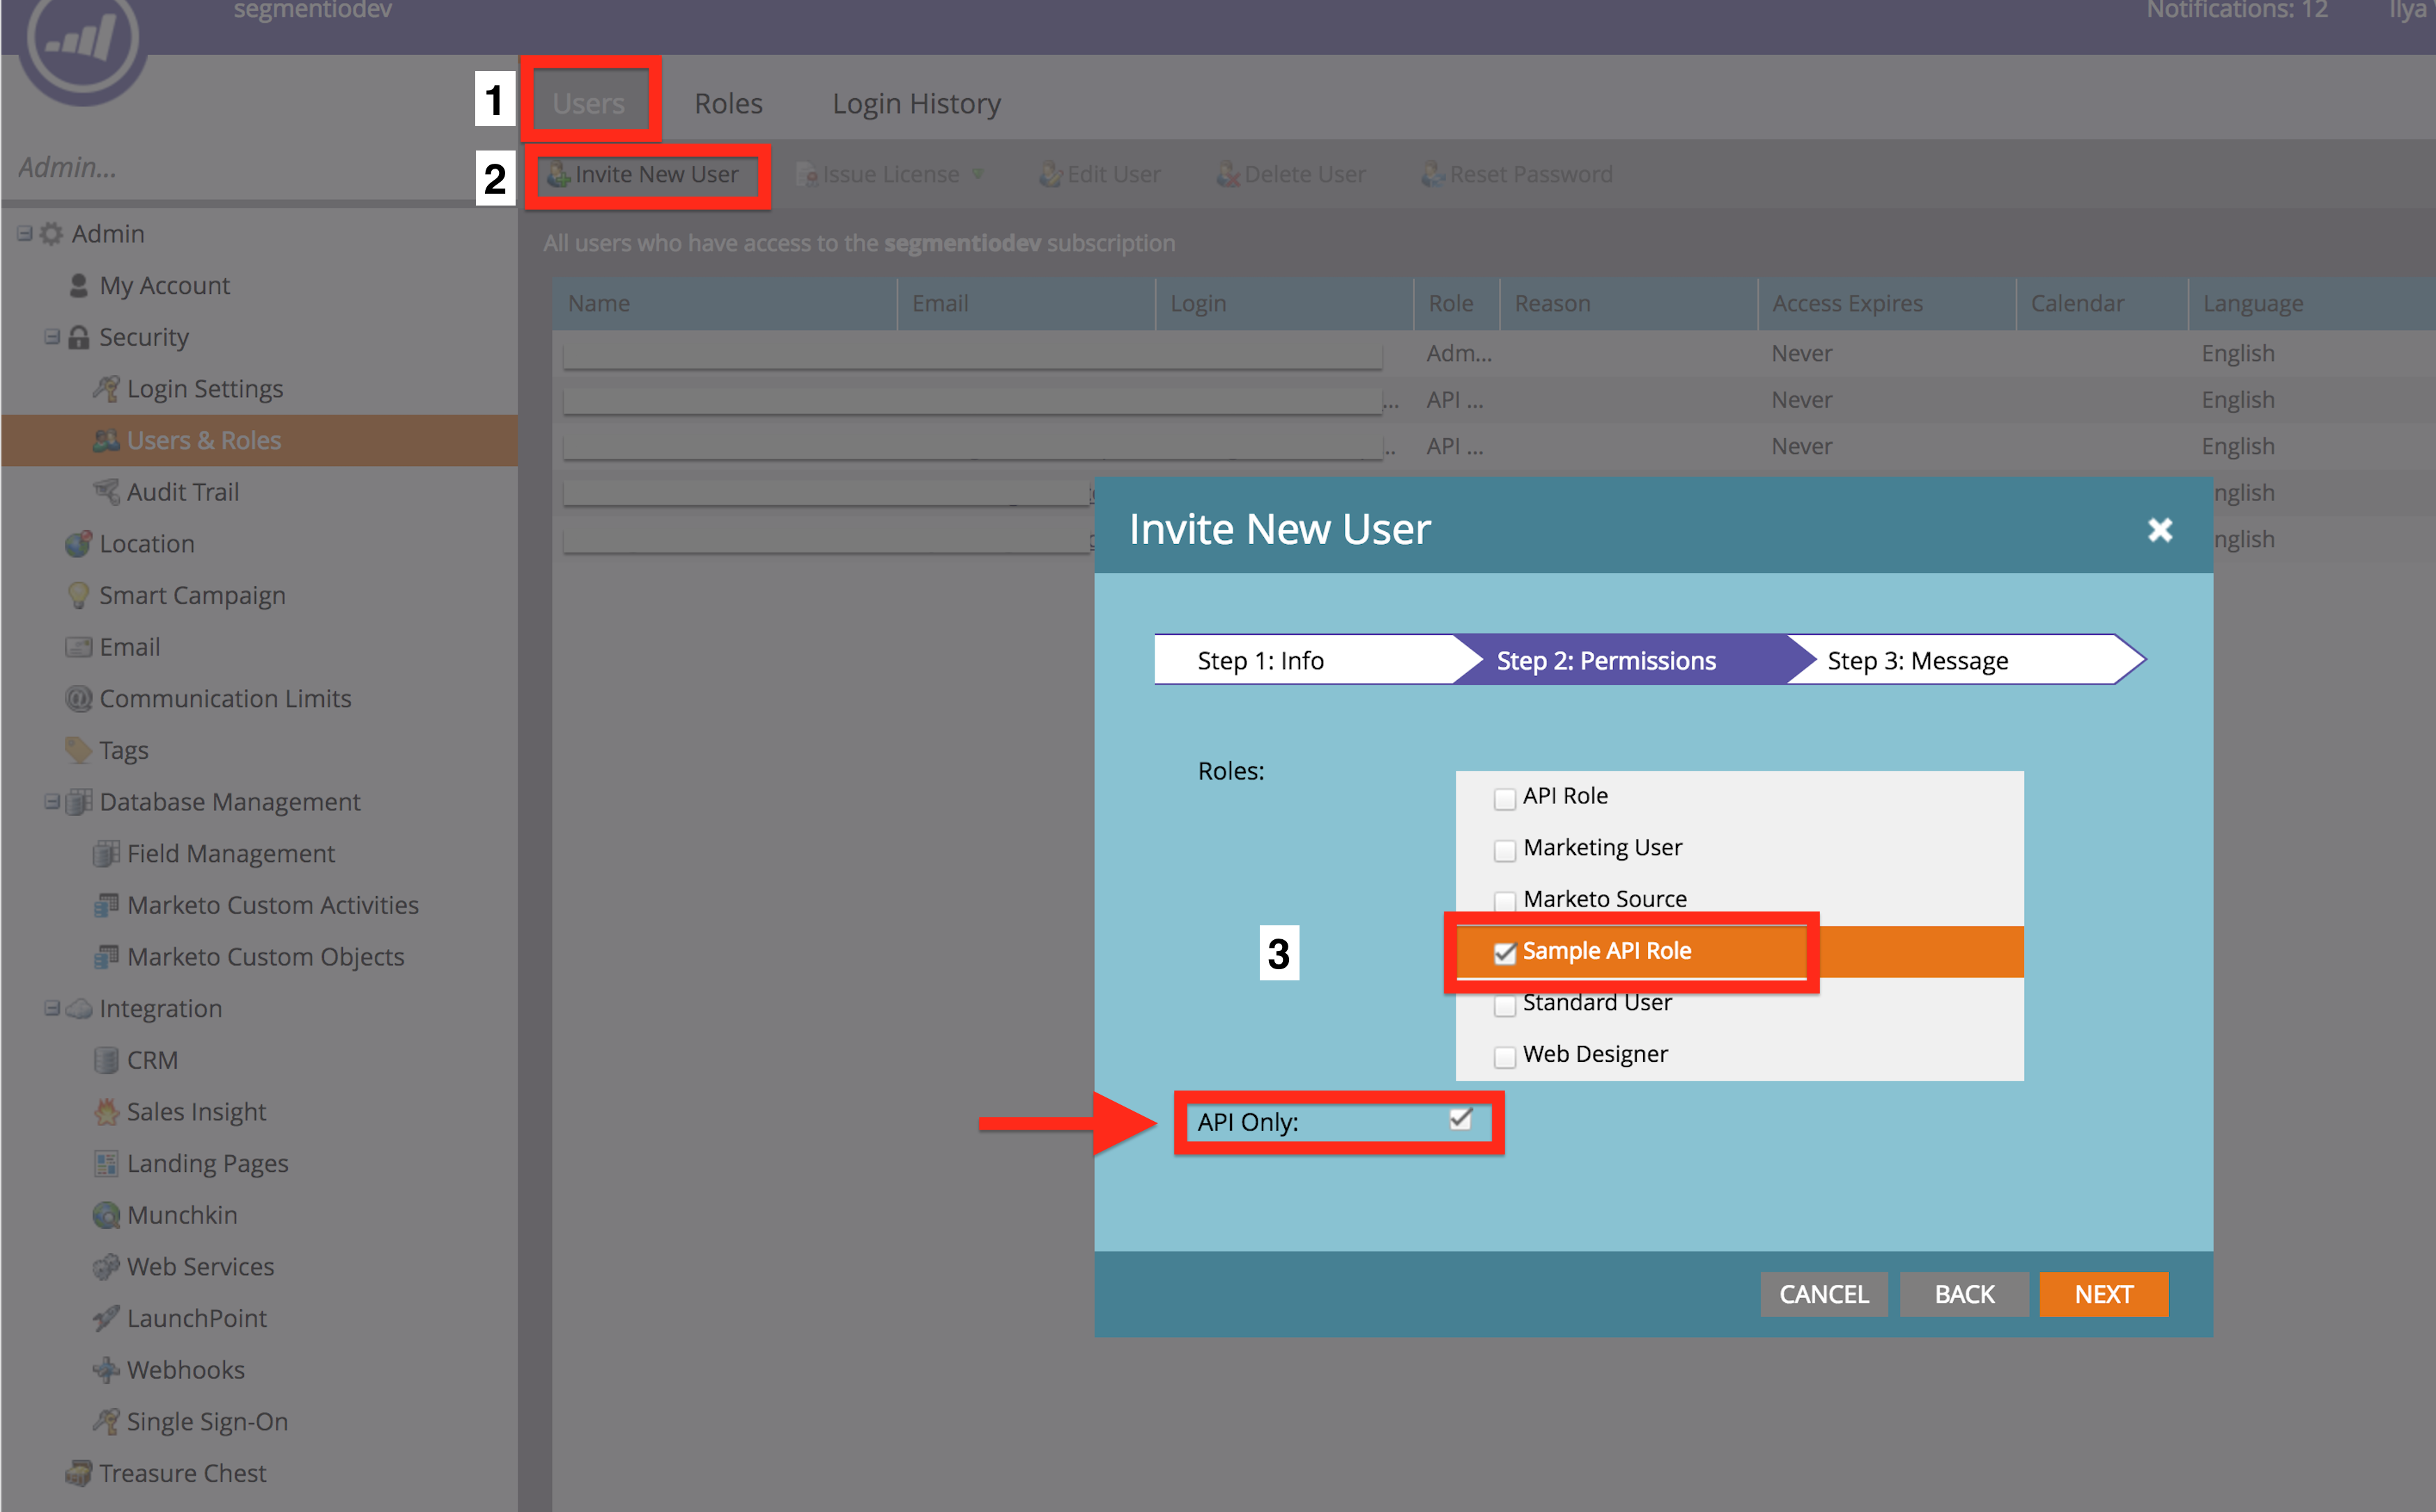
Now that you’ve created an API role, you have to assign that role to an API only user.
- Click the Users tab.
- Click Invite New User and fill out the necessary information in Step 1.
- Assign the new role you created to this user in Step 2 and check the API Only box. Click next then Send.
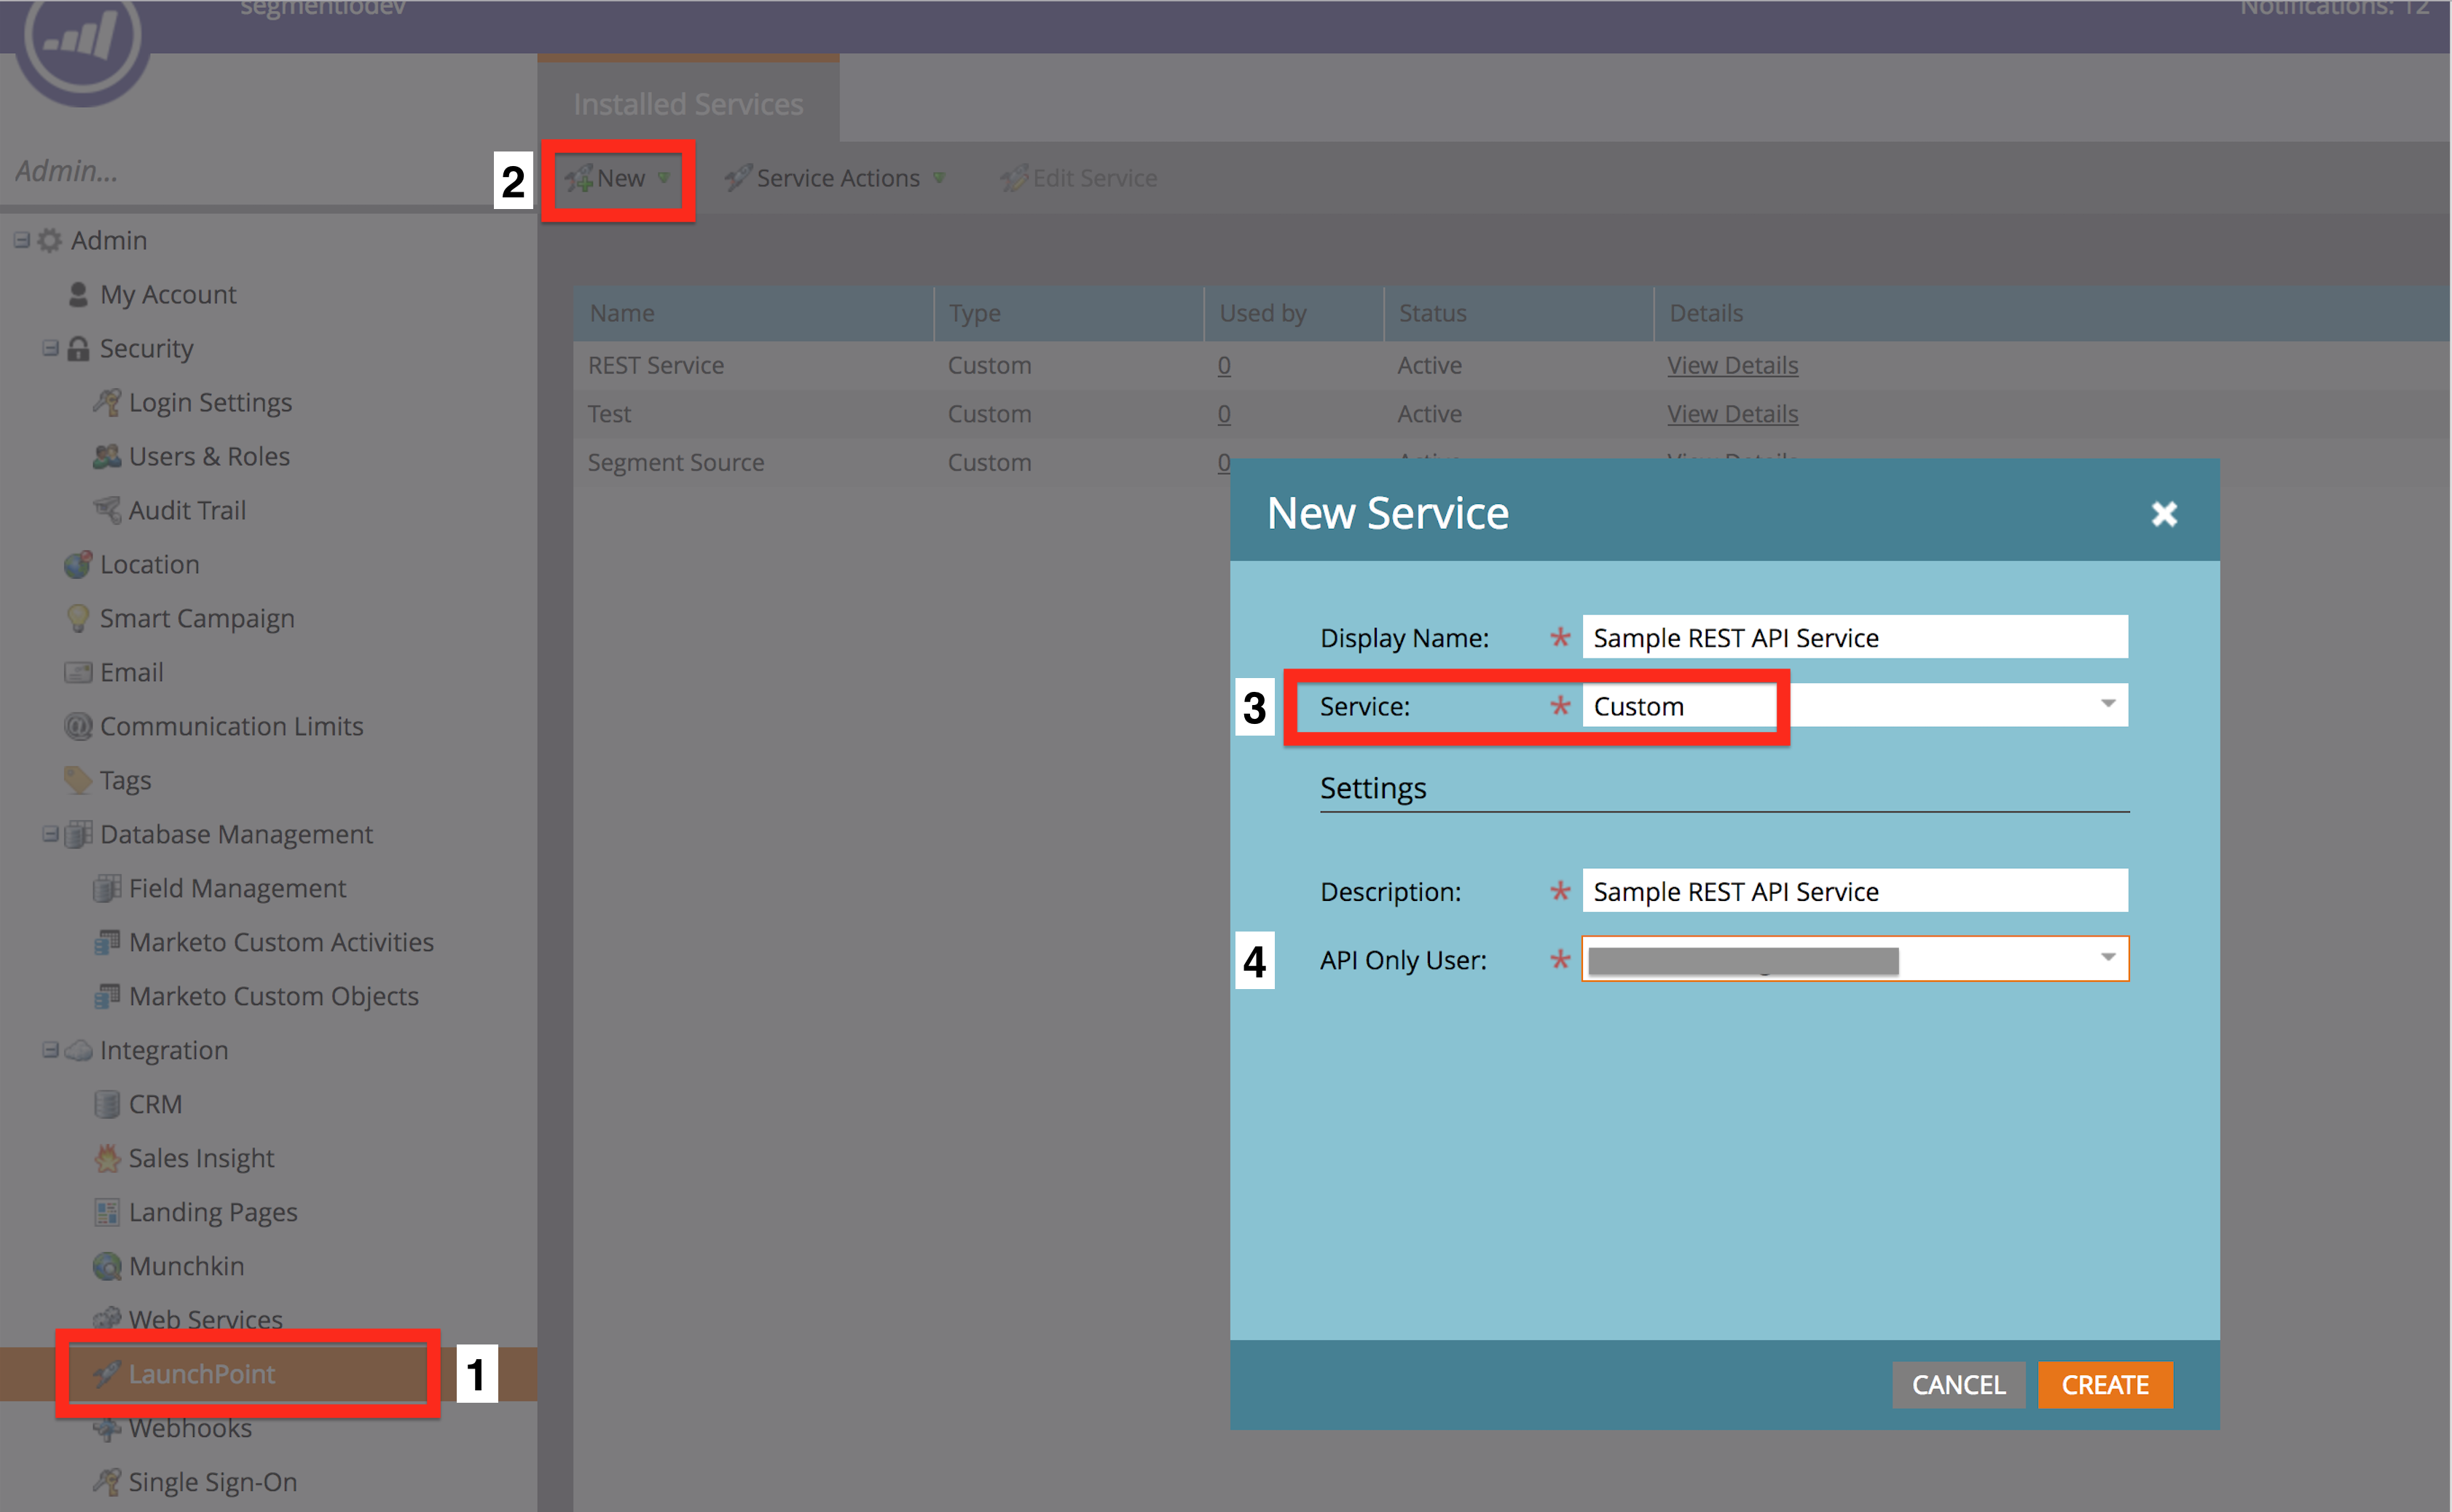
Next, create a Service and get Client Secret and Client ID from that Service.
- Click LaunchPoint on the left side bar.
- Click New and then New Service from the drop down.
- Select Custom for the Service from the drop down.
-
Select the new API Only user you invited. This User must be an API Only user and be assigned a role that has full API access.
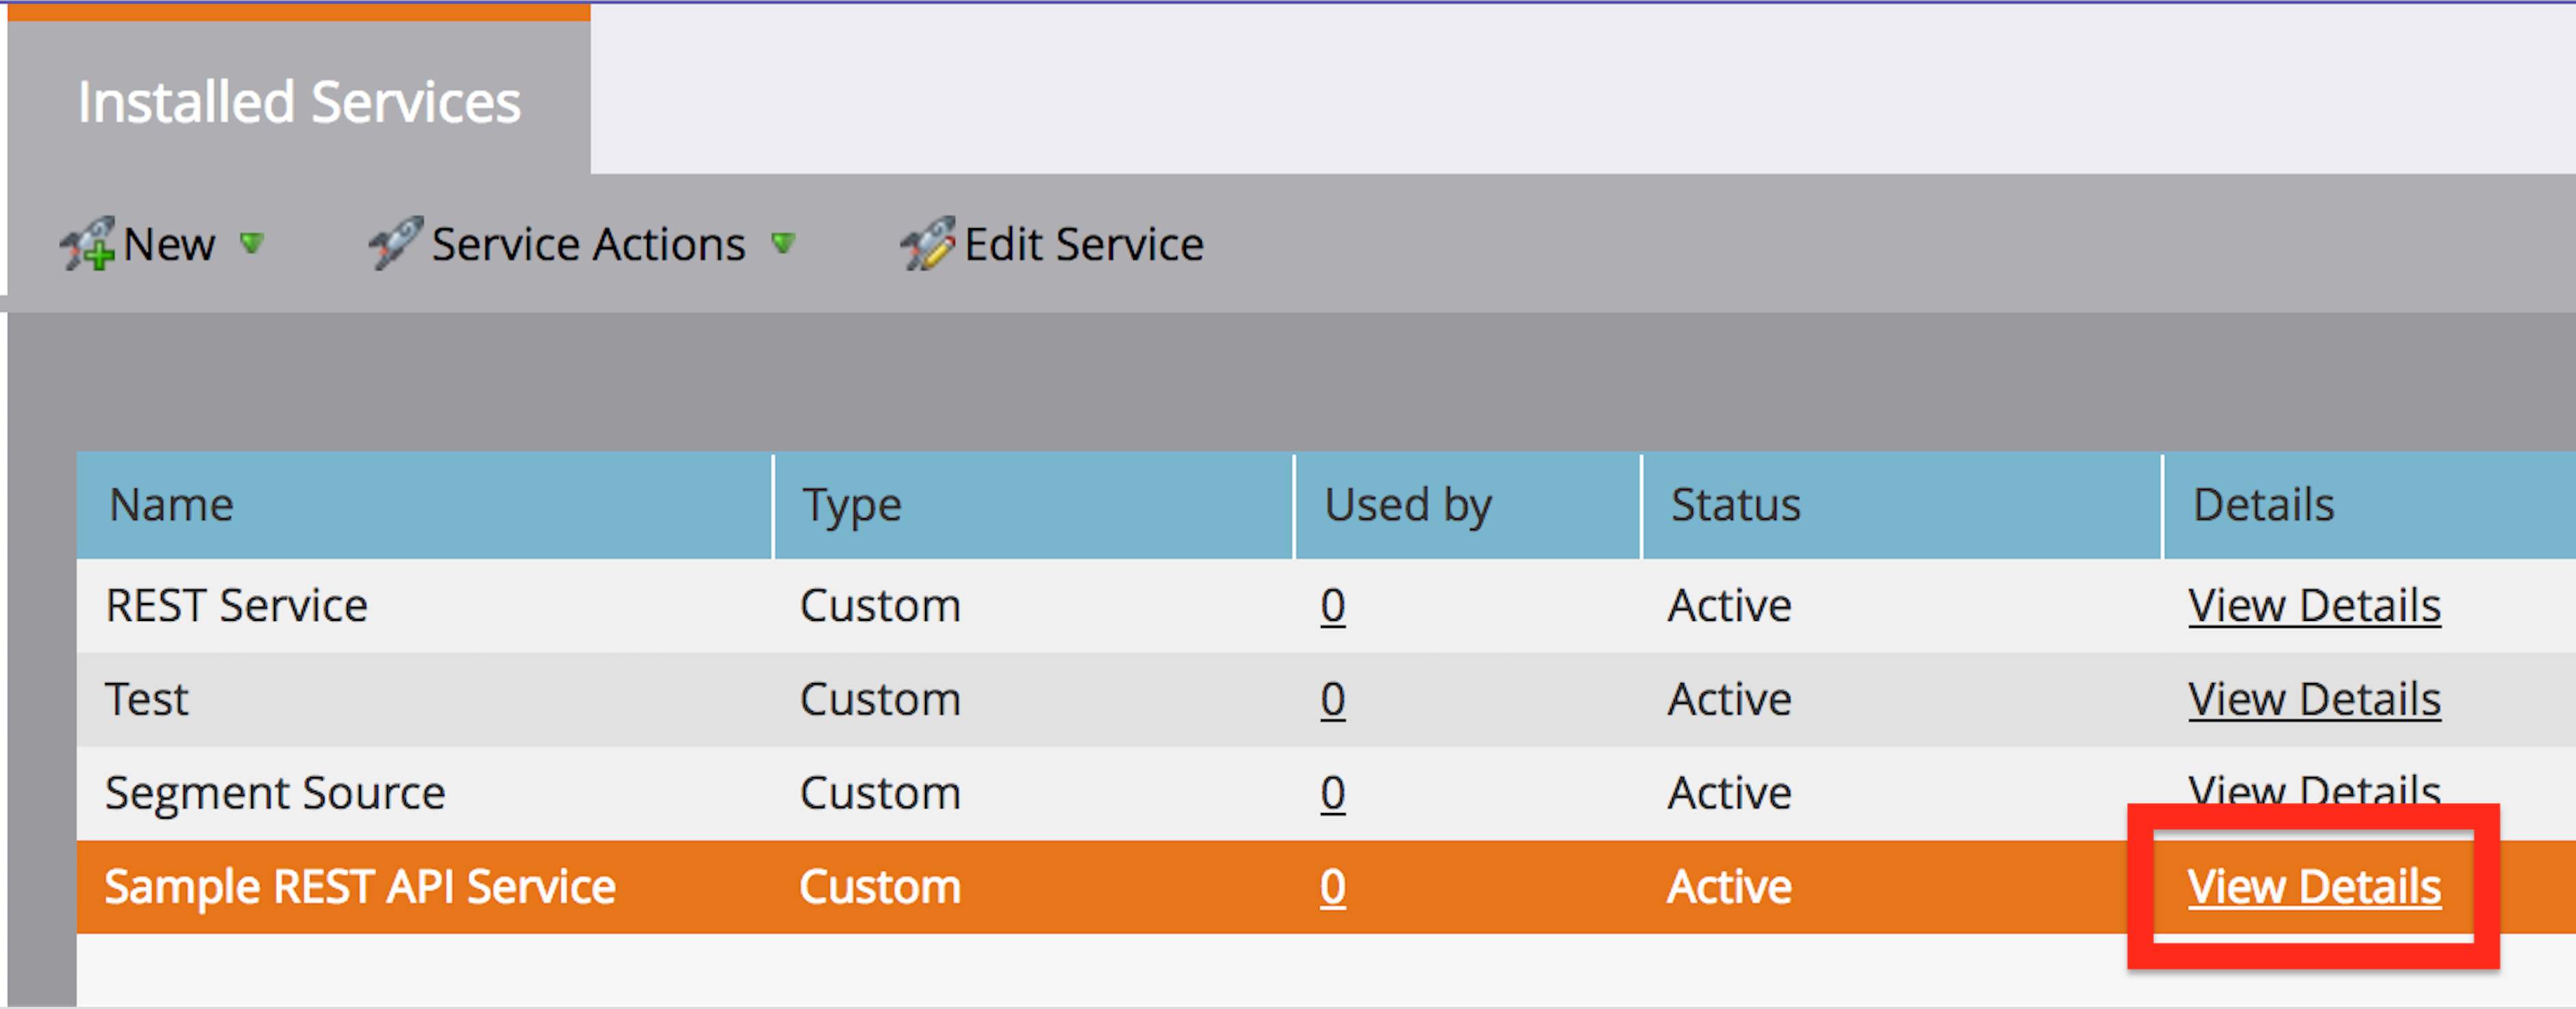
- Click View Details on the new service that you’ve created and a small window will display with your Client Secret and Client ID. Copy and paste them into your Destination’s Settings.
Create a User ID and an Anonymous ID field in Marketo
- Click Admin in the top right corner.
- Click Field Management on the left side bar.
- Click New Custom Field.
- Select String as the type.
- Name the field whatever you’d like.
- Set the API name to
userIdfor the user ID field and thenanonymousIdfor the anonymous ID field. Important: The API names for the user ID and anonymous ID fields must beuserIdandanonymousIdexactly. If anything in the API name is different, the destination will not work.
Identify
Cloud-mode
When you call Identify in Cloud-mode, Segment uses Marketo’s REST API to create and update leads server-side.
Device-mode
When you call Identify in Device-mode, Segment uses Marketo’s Background Form Submission to create and update leads client-side.
There are additional steps you must take to send .identify() calls in Device-mode.
- Create an empty form in Marketo. This form will always be hidden and can remain empty as long as the traits you need downstream are mapped in the Marketo Custom Fields Destination setting.
- Input the associated Marketo Form ID and Marketo Form URL in your Marketo V2 Destination settings. This information can be found in Form Actions > Embed Code in the Marketo Design Studio:
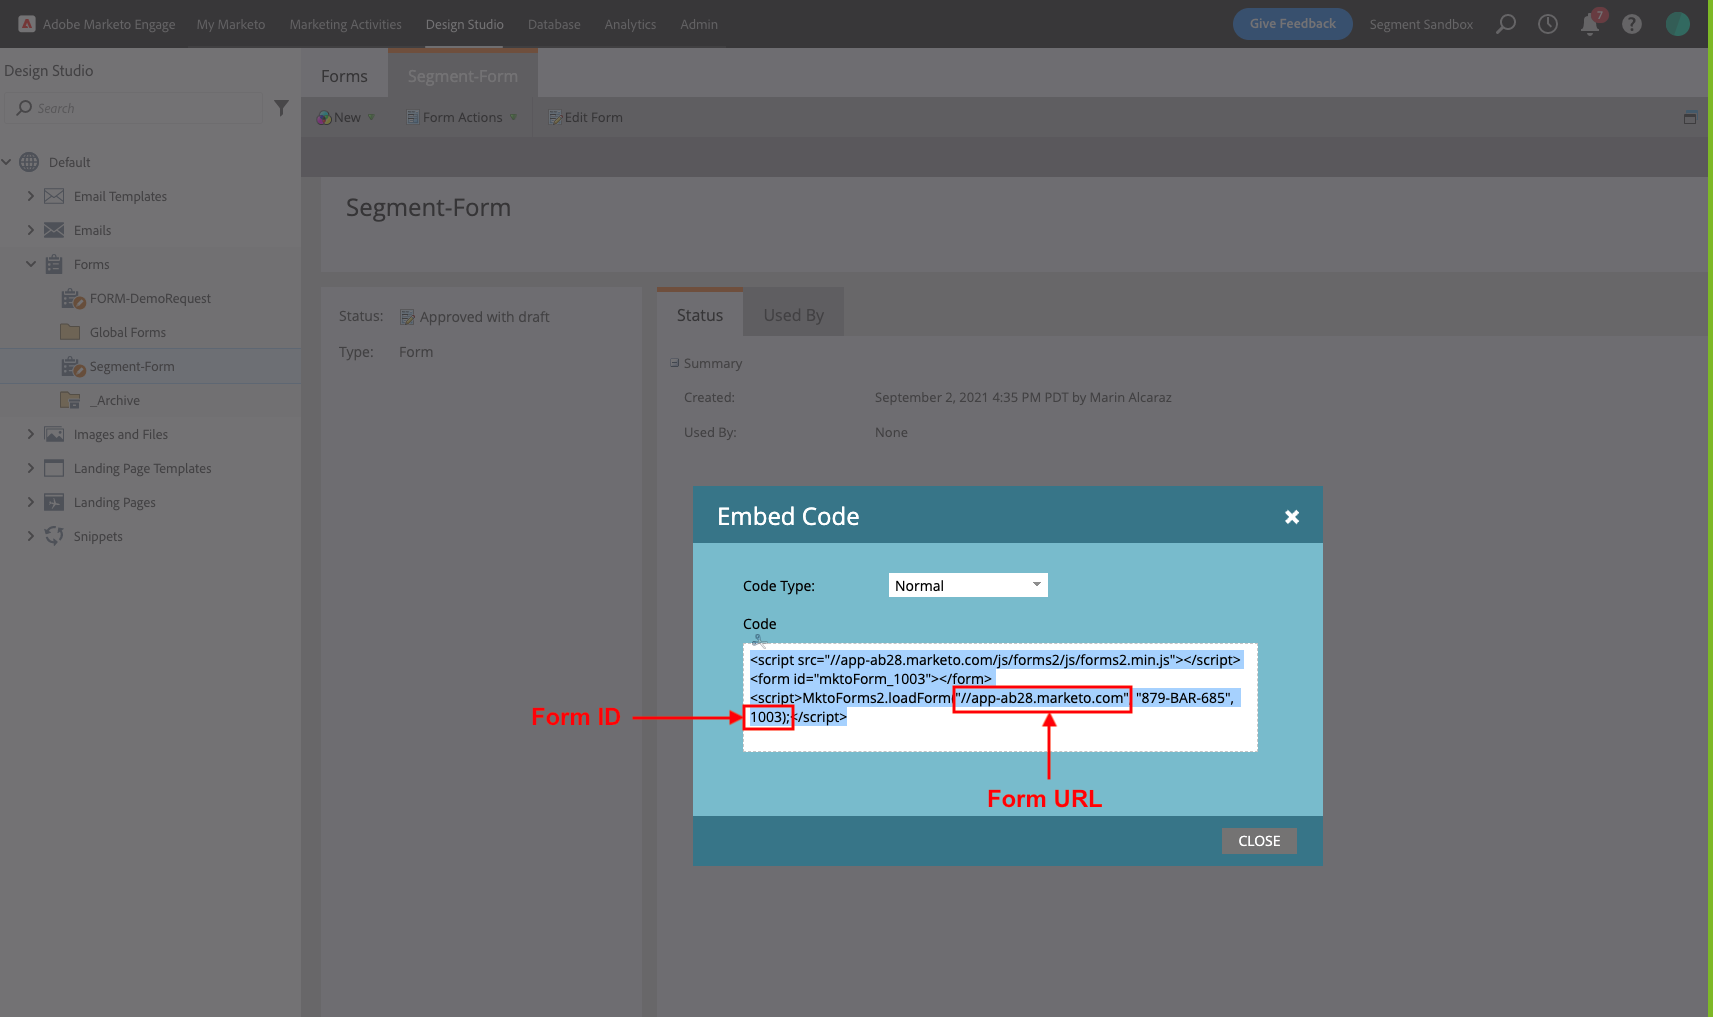
Marketo Form ID and Marketo Form URL are required fields for the Marketo SDK to initialize on your site. If these fields are left blank, the SDK will not initialize and data will not be sent downstream.
Traits
Regardless of connection mode, we’ll map the following spec’d Segment traits to Marketo’s standard fields:
| Segment Traits | Marketo Standard Fields |
|---|---|
address.city |
City |
address.country |
Country |
address.zip |
Postal Code |
address.state |
State |
birthday |
Date Of Birth |
company |
Company |
email |
Email |
firstName or name |
First |
gender |
Marketo Social Gender |
lastName or name |
Last |
phone |
Phone |
Here is a sample JavaScript Identify call with the all the standard traits:
analytics.identify('1234', {
  firstName: 'Robyn Rihanna',
  lastName: 'Fenty',
  email: 'rihanna@example.com',
  gender: 'woman',
  phone: '555-555-5555',
  company: 'Segment.com',
  birthday: '1988-02-20T00:00:00.000Z',
  createdAt: '2007-05-31T00:00:00.000Z',
  address: {
    city: "Eugene",
    country: "USA",
    postalCode: "97405",
    state: "Oregon"
  }
});
If you’d like any other traits from your .identify() call to update a field in Marketo, you must create custom fields in Marketo and map them in the Marketo Custom Fields Destination setting.
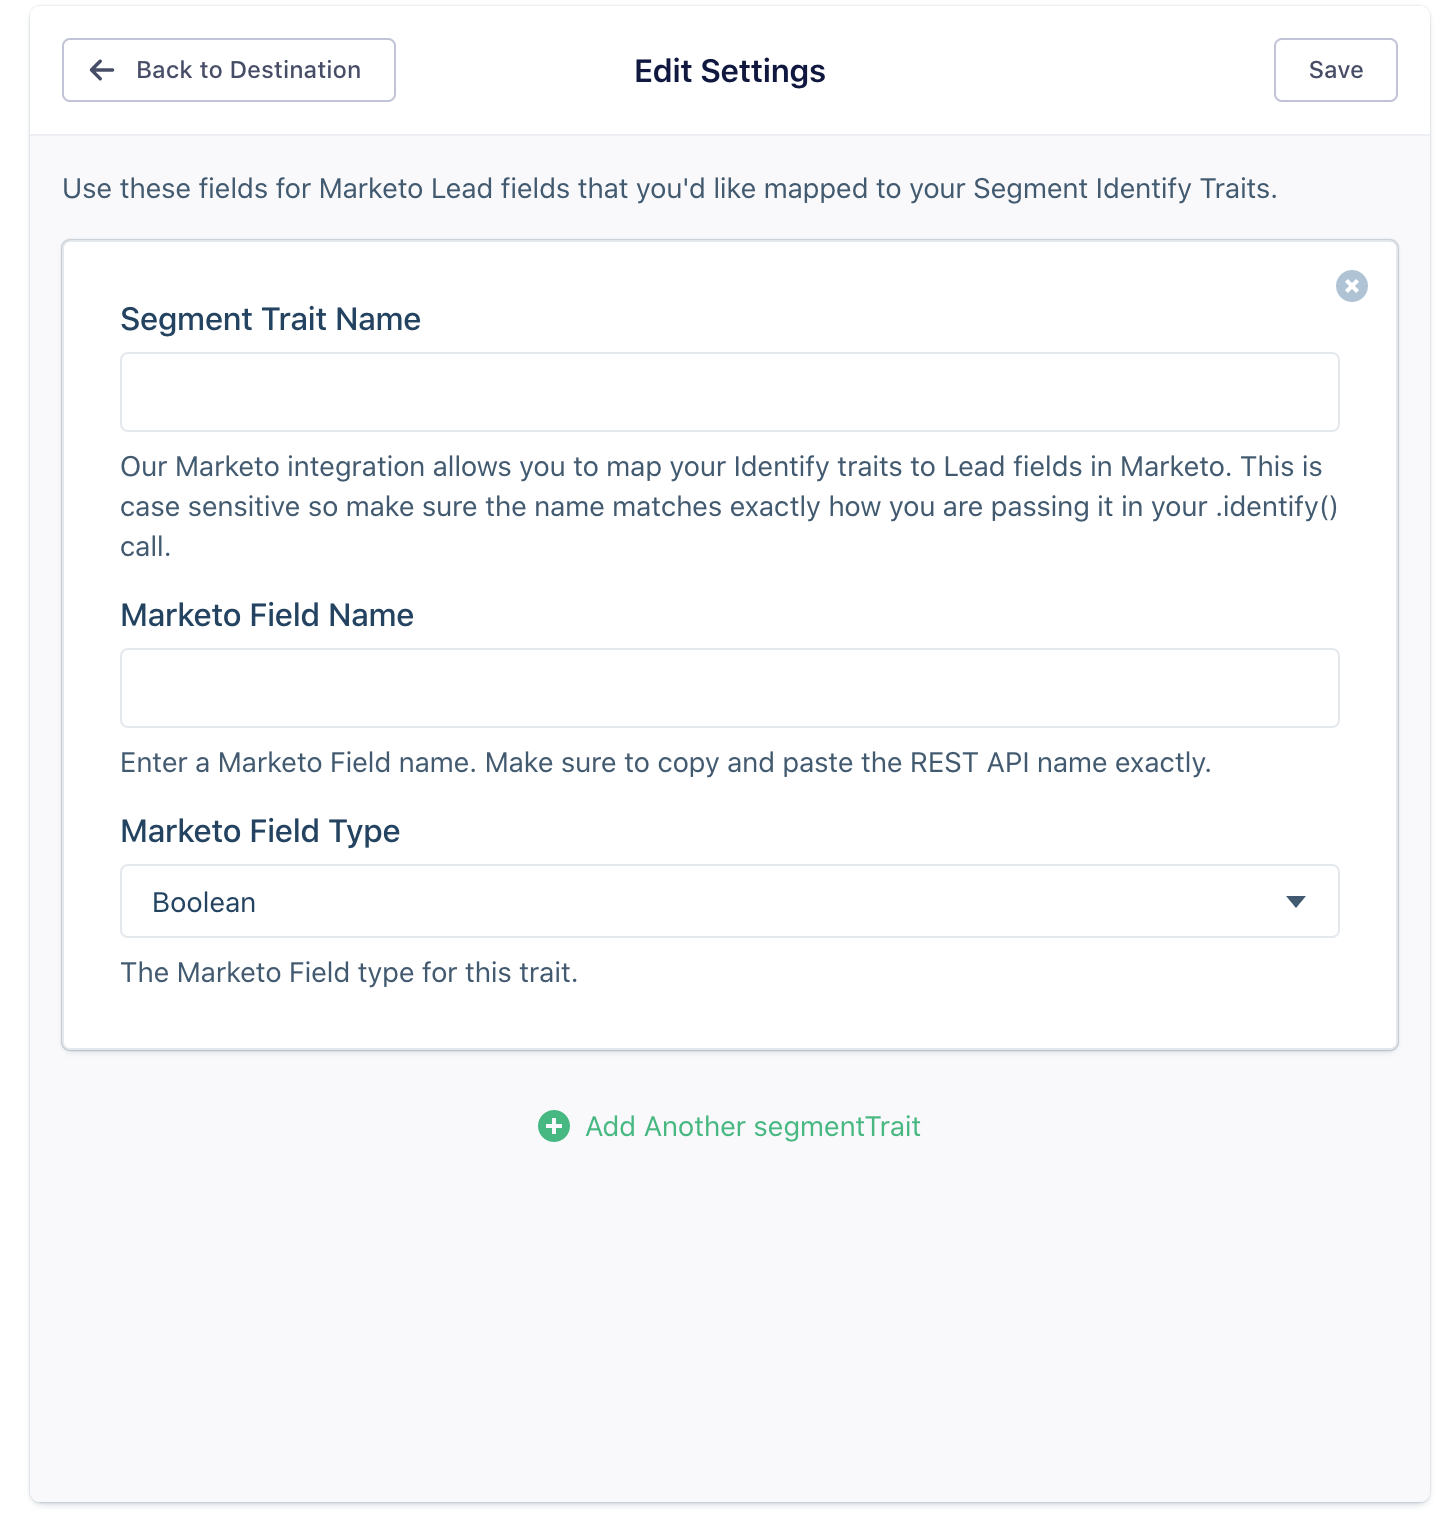
- Segment Trait. The name of the trait sent in your
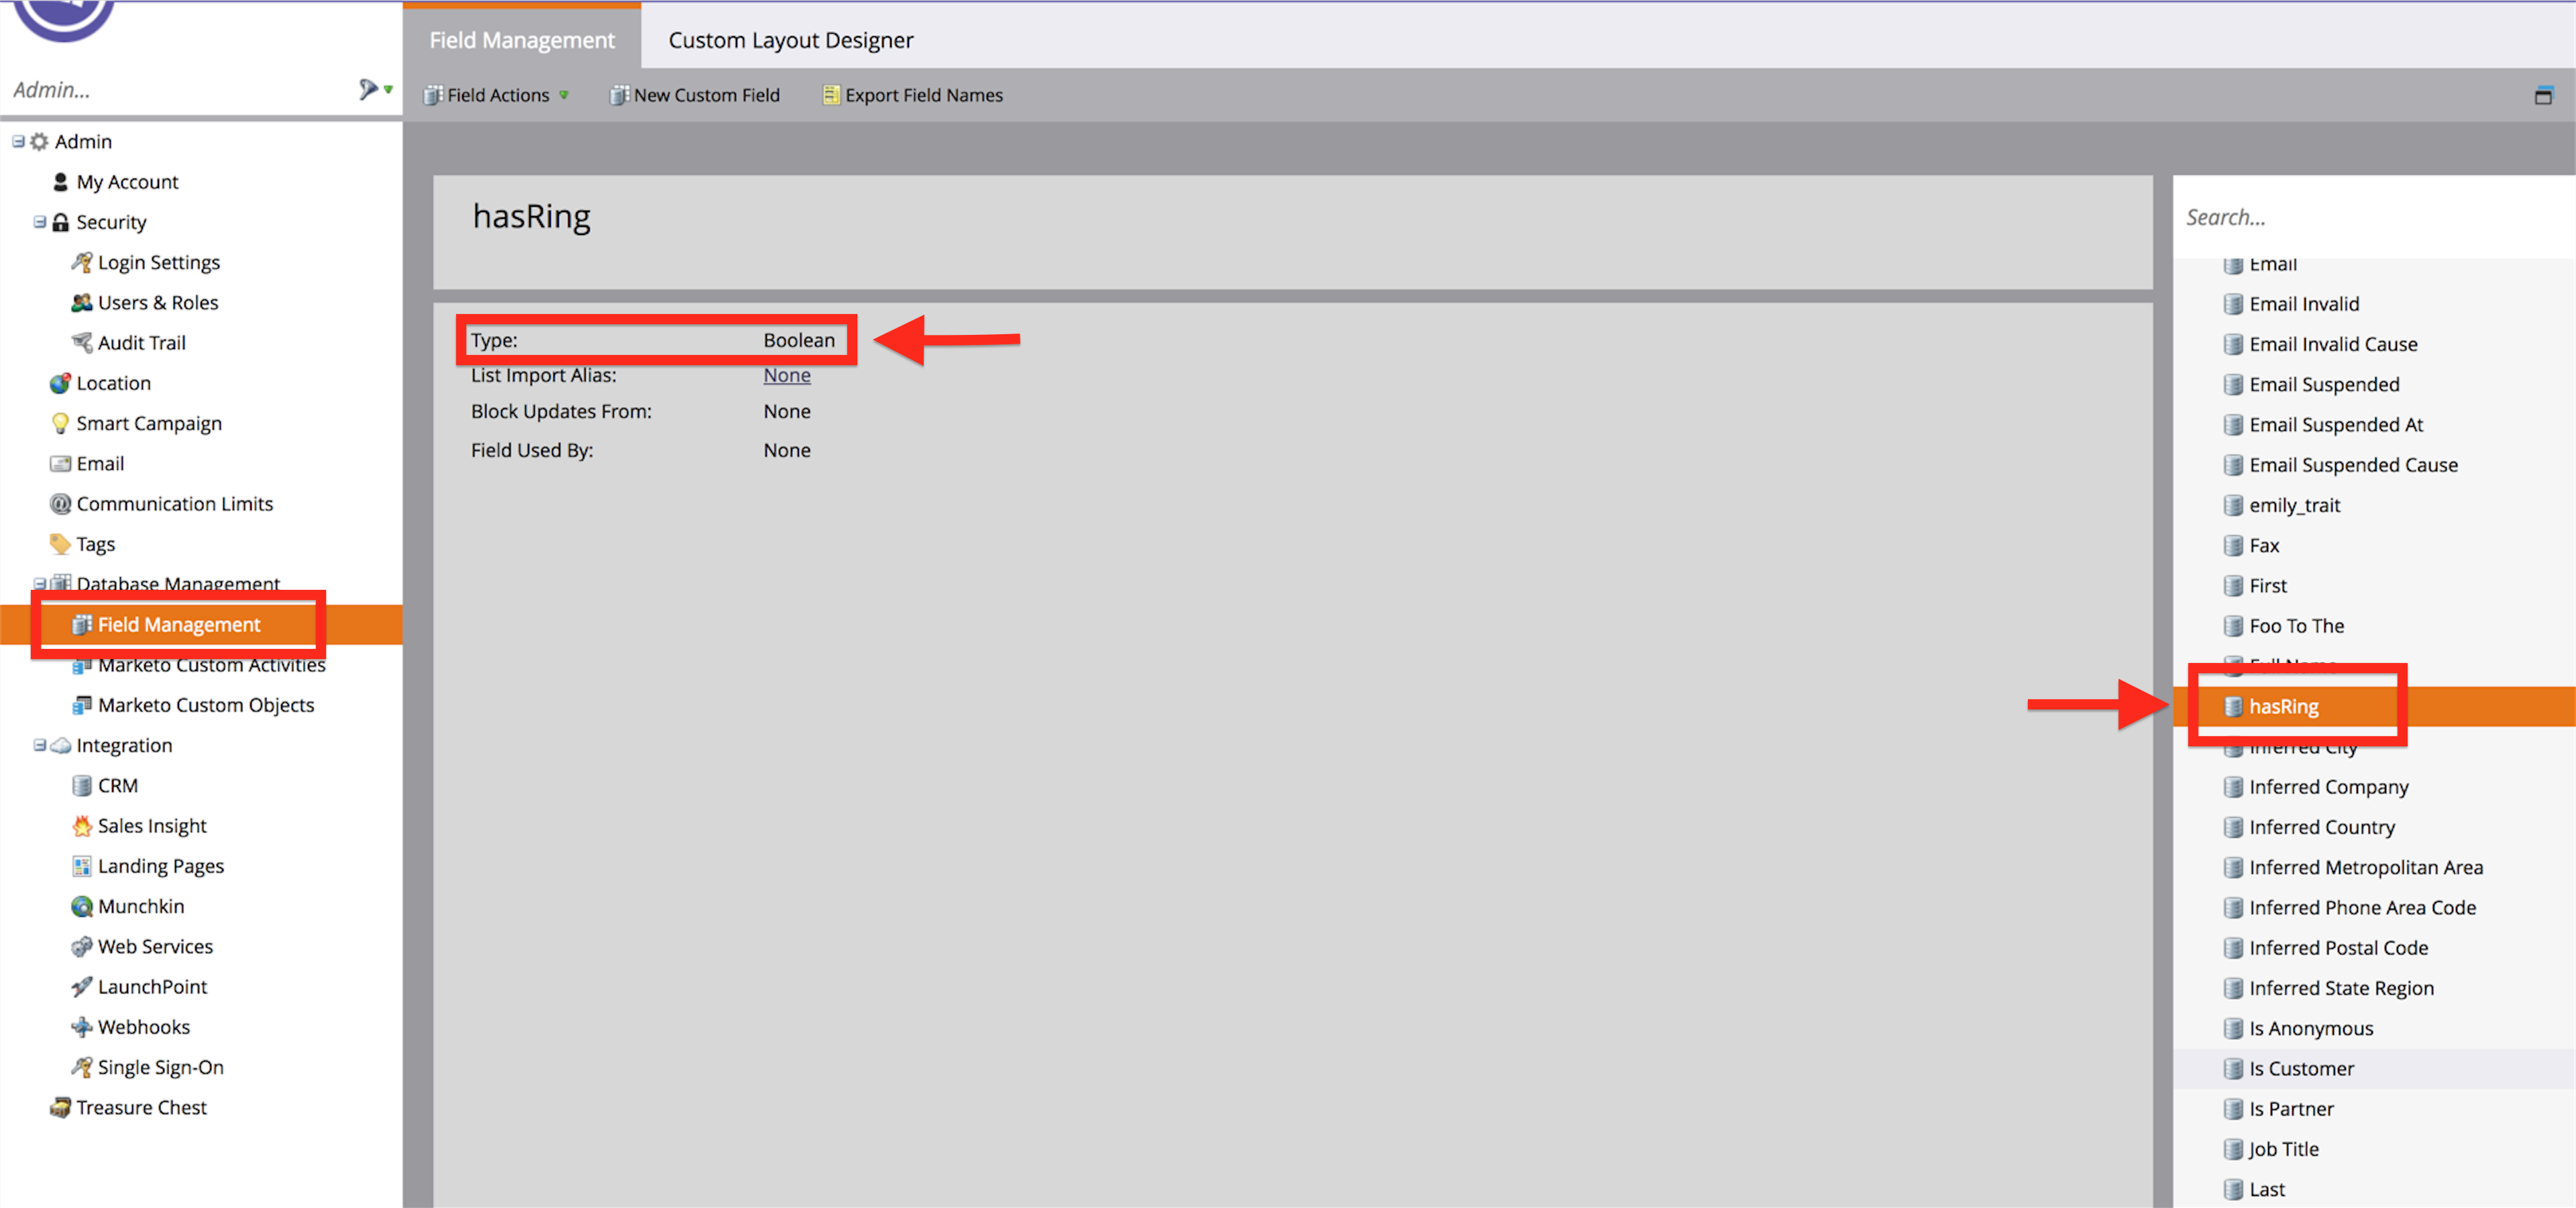
.identify()call. - Marketo Field Name. The Marketo REST API name for the field. To get the REST API name for your fields in Marketo, click Field Management, then Export Field Names. A spreadsheet will download and the first column is the REST API name for your Marketo fields. Make sure to copy and paste the REST API name exactly. This is case sensitive.
- Marketo Field Type. When you are in Field Management, click on the field name in the bar on the right and you’ll see the field type.
Note: Custom address traits must go in the top level traits object, not in the address object.
Track
When you call Track, Segment maps the event to a pre-defined Marketo Custom Activity. There are two important things to note when sending .track() calls to Marketo:
-
You must map them to your Marketo Custom Activities in your Destination Settings. If you do not map a track call to a Custom Activity in your Destination Settings, we will not send the event to Marketo to help limit the amount of API calls made to Marketo.
-
You must either:
- Enable Cloud-mode
- Enable Device-mode and enable the Send Track Events Server Side setting
- Send track events from one of our server side libraries
Here is a sample Ruby .track() event:
Analytics.track(
  event: 'Segment Event',
  properties: {
    firstName: 'Alex'
  }
)
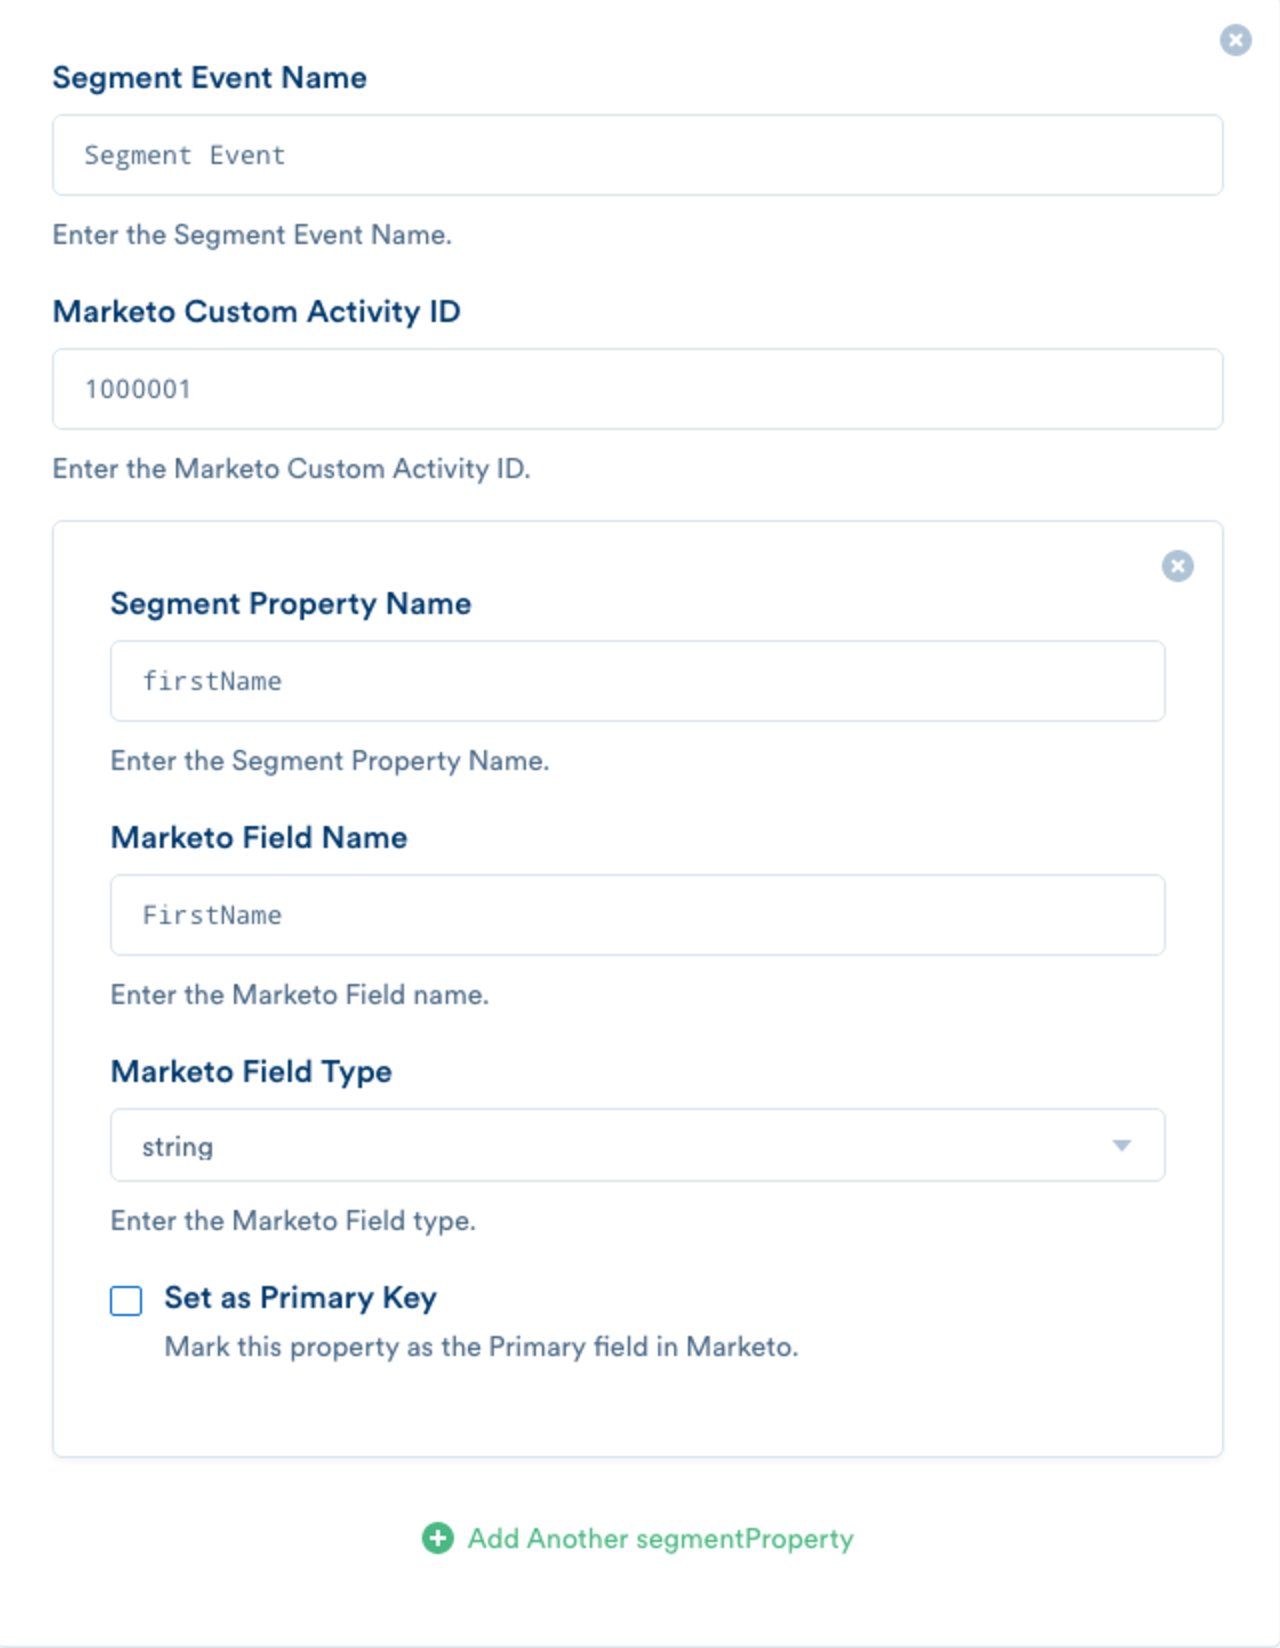
- Segment Event Name. Your Segment Event name.
-
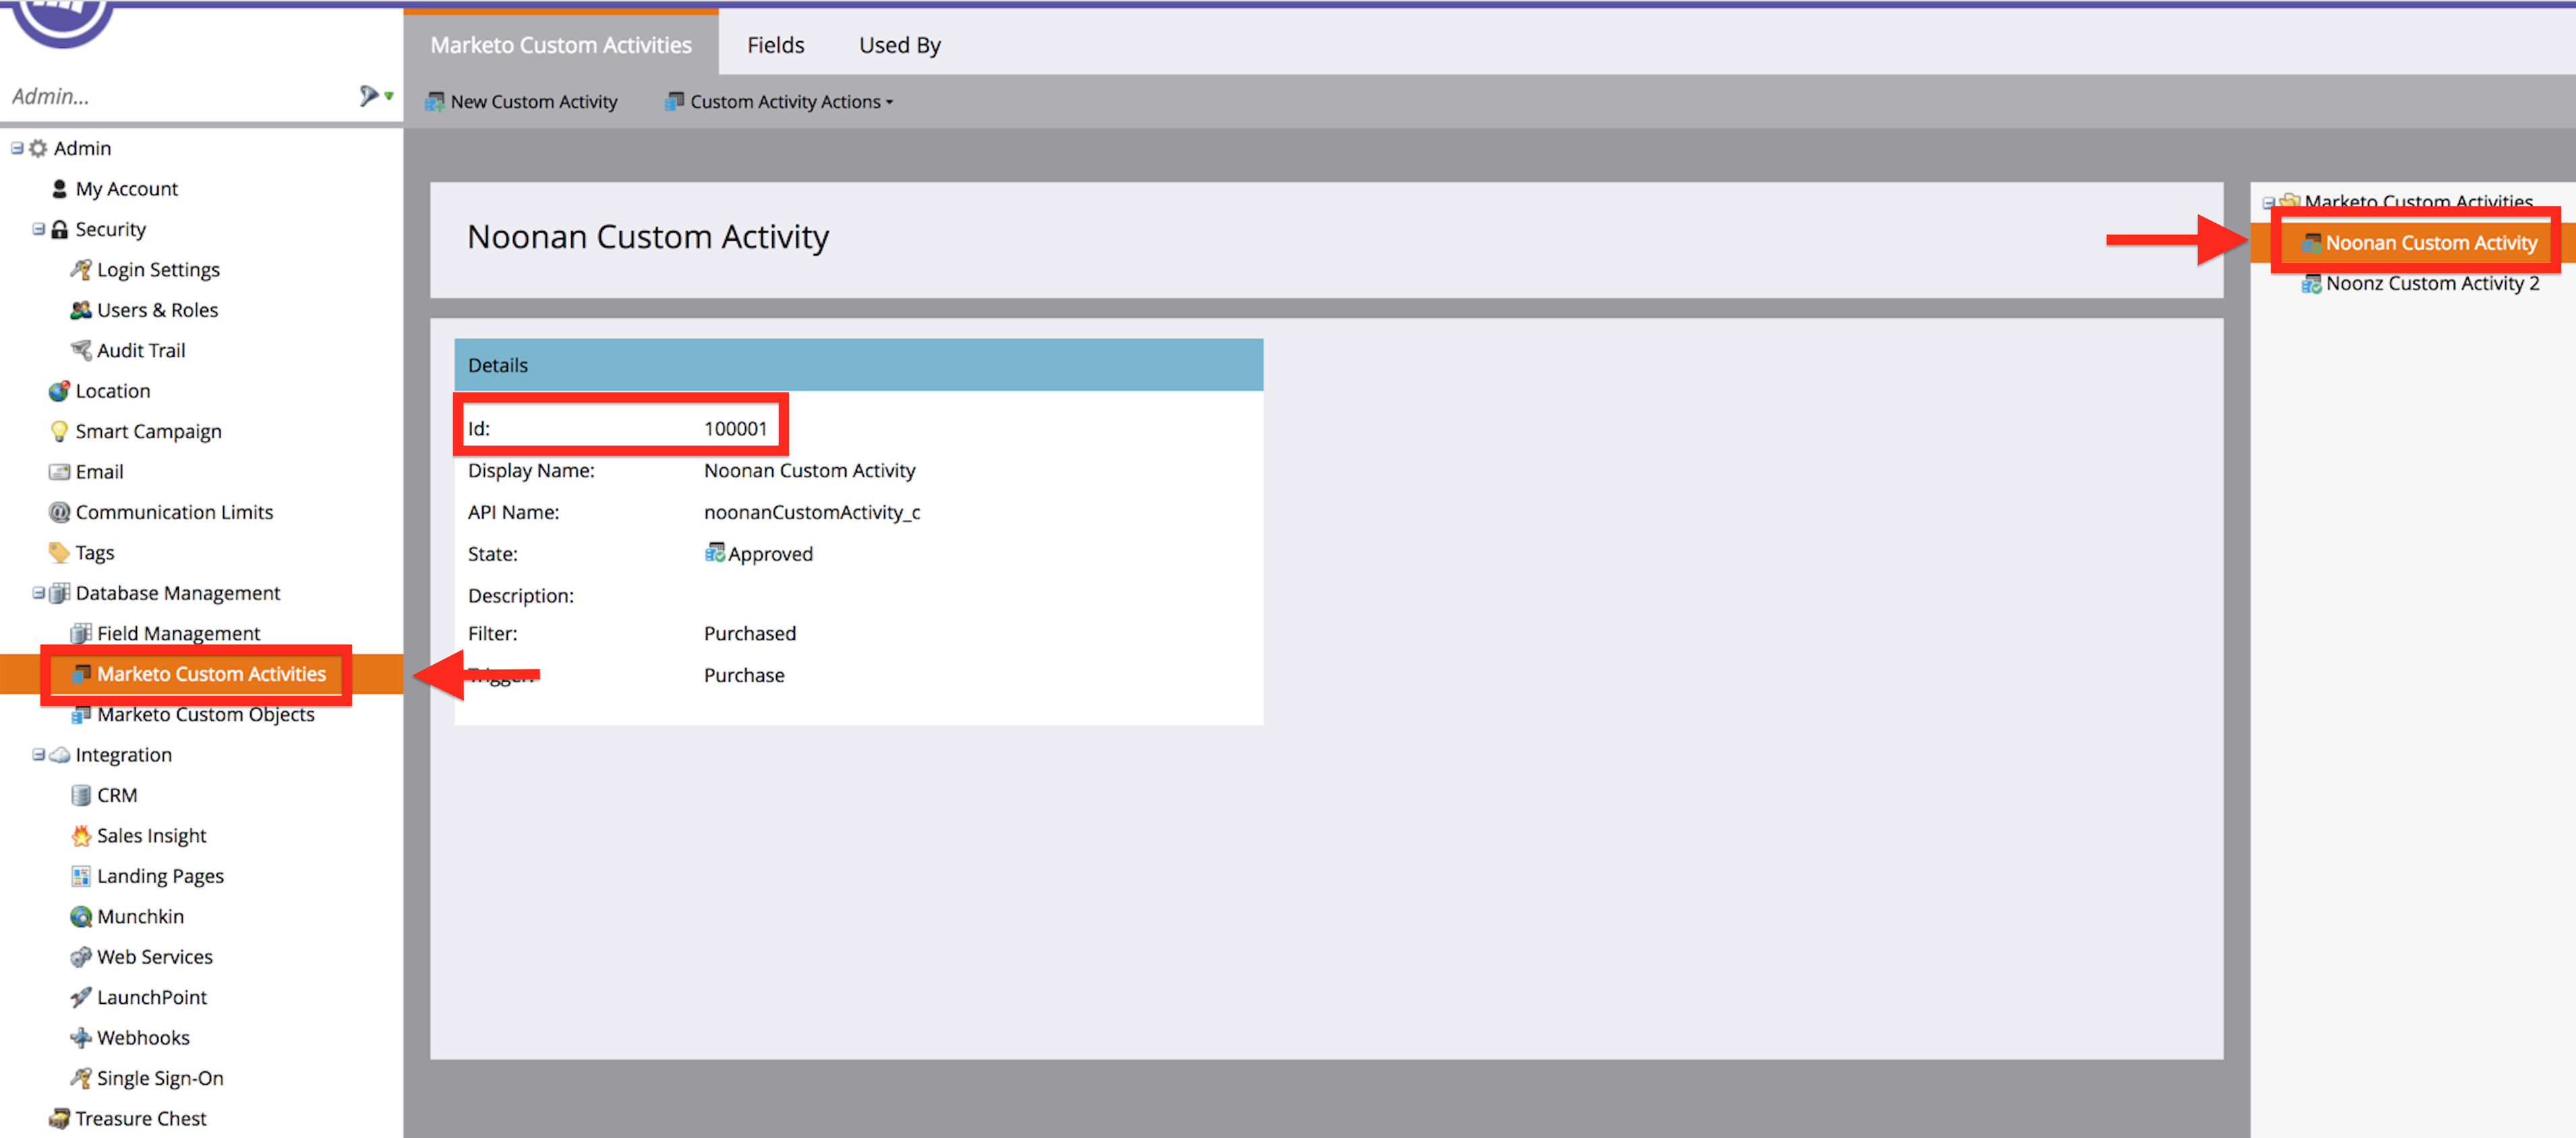
Marketo Activity ID. When you are in Marketo Custom Activities, click on the Marketo Activity in the right side bar that you’d like to map your Segment Track event to. Copy and paste the ID into your Destination Settings.
- Segment Property Name. The name of the property in your
.track()call. This is case sensitive so make sure the name matches exactly how you are passing it in your.track()call. -
Marketo Field Name. The name of the Marketo Attribute for your Custom Activity. The Attribute names for a given Custom Activity can be found in the Fields tab of Marketo Custom Attributes. Click on the Custom Activity in the right side bar and a list of your Attributes for that Custom Activity will appear. Make sure to copy and paste the API Name for your field exactly as it appears in Marketo. This is case sensitive.
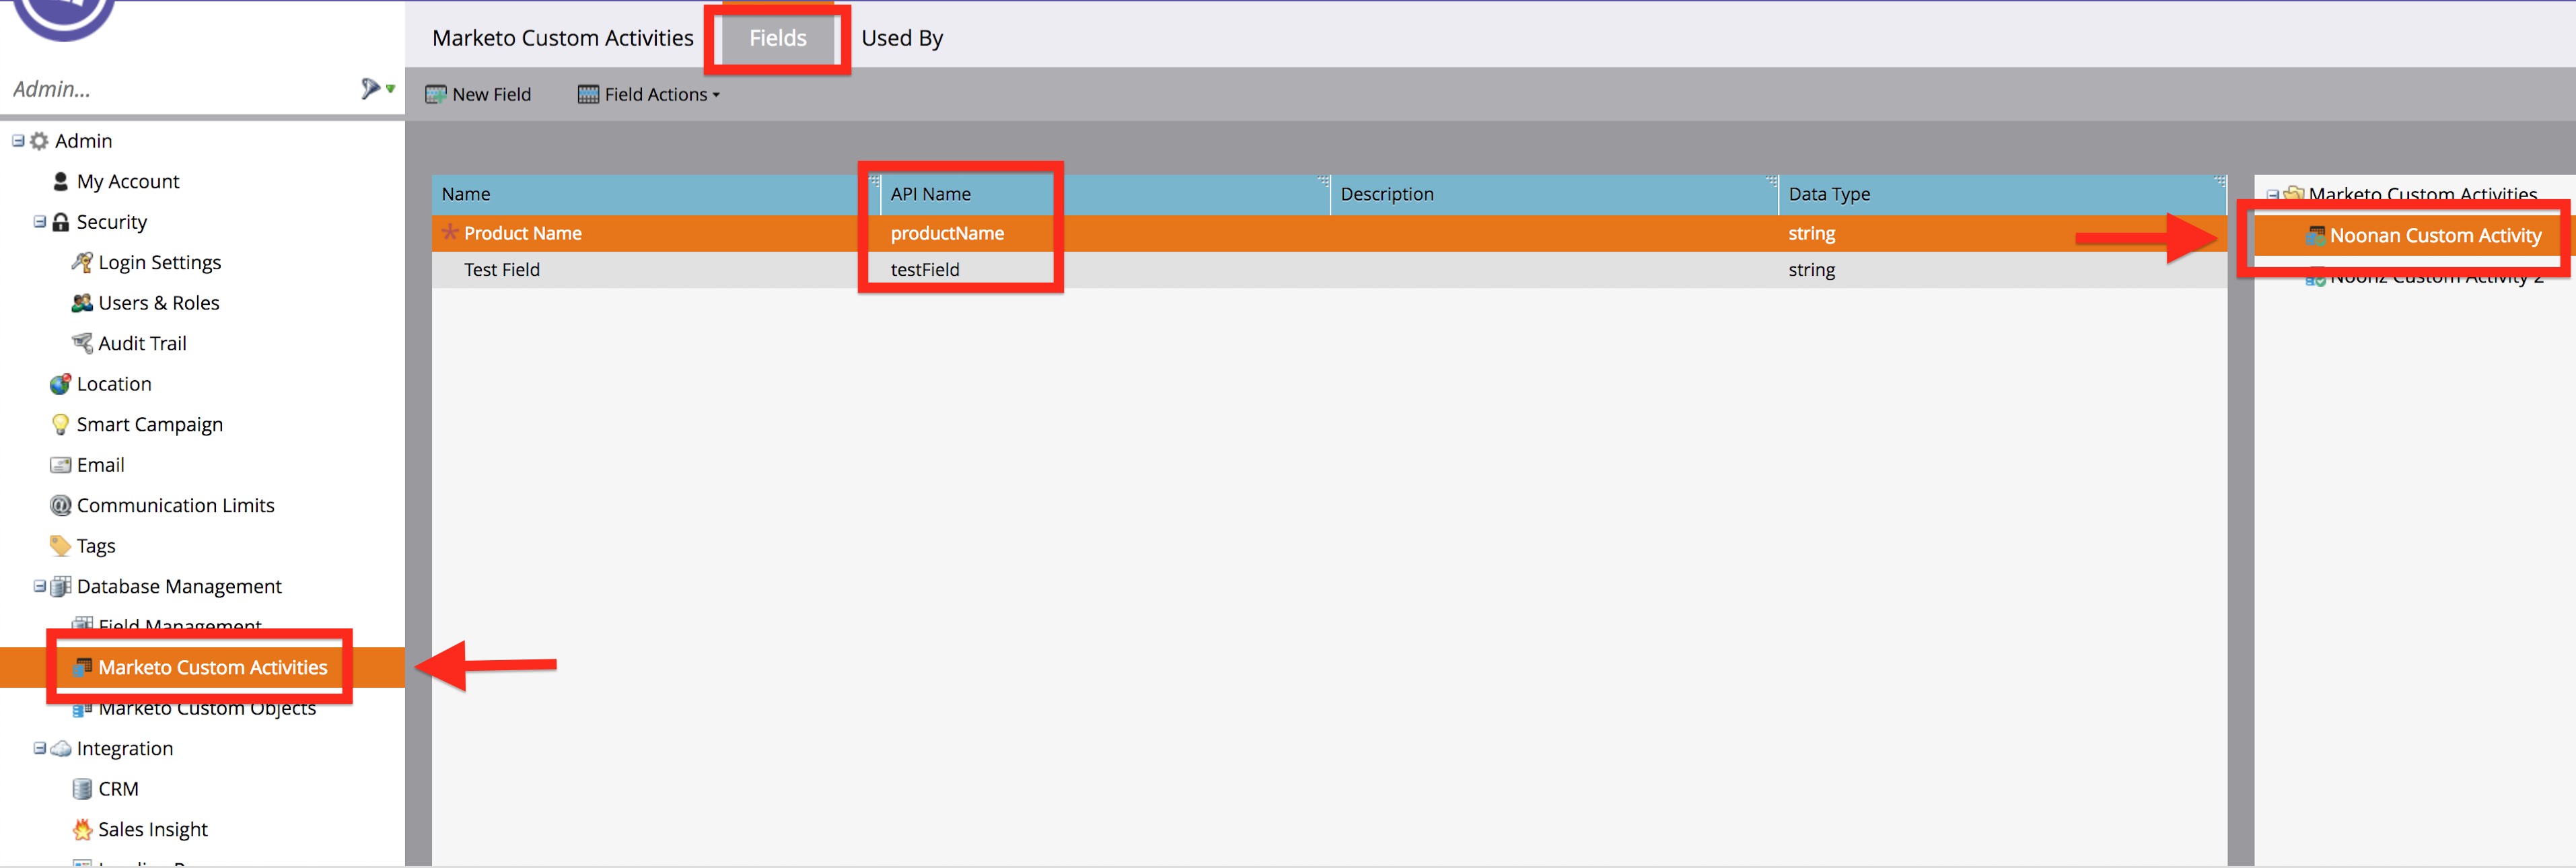
-
Marketo Field Type. The type of the Marketo Attribute. The Attribute type can be found in the Fields tab of Marketo Custom Attributes. Click on the Custom Activity in the right side bar and a list of your Attributes for that Custom Activity will appear.
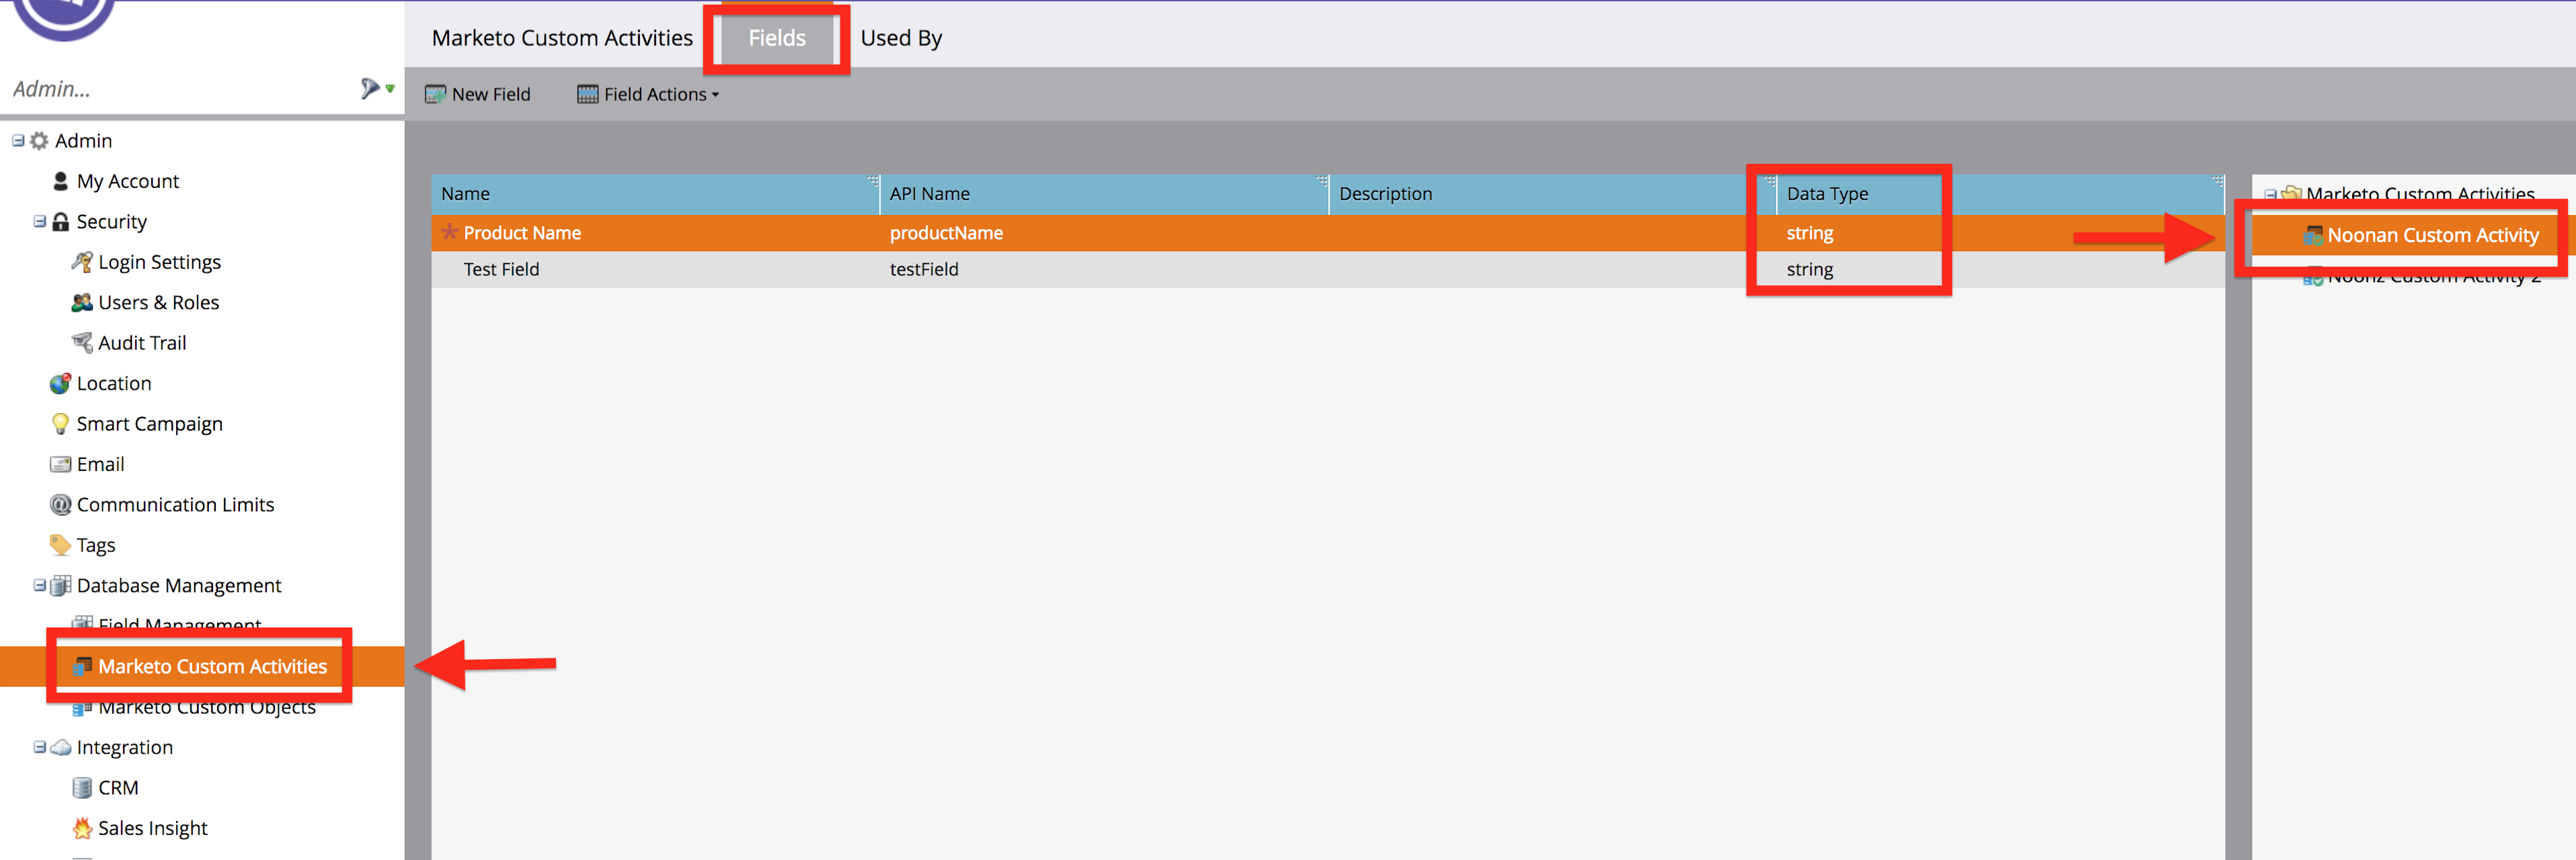
- Primary Field. When creating a Custom Activity in Marketo, you have to set a Primary Field. If you are unsure which field was set as the primary field, when you are looking at the list of fields for your Custom Activity in Marketo, there will be a red star next to your Primary Field.
Page
When you call Page, Segment uses Marketo’s Munchkin.js visitWebPage method. The URL is built from your .page() event and properties object into the form Marketo expects, so no need to worry about doing that yourself.
Marketo’s visitWebPage method requires a URL and a user agent. Any calls that are missing either of these fields will not be sent to Marketo. User agent is automatically collected Client-side but if you are sending .page() calls from the server, make sure to set the user agent.
Here is a sample Node .page() event:
    analytics.page({
      userId: '019mr8mf4r',
      category: 'Docs',
      name: 'Node.js Library',
      properties: {
        url: '/docs/connections/sources/catalog/libraries/server/node',
        path: '/docs/connections/sources/catalog/libraries/server/node/',
        title: 'Node.js Library - Segment',
        referrer: 'https://github.com/segmentio/analytics-node'
      },
      context: {
        userAgent: "Mozilla/5.0 (Macintosh; Intel Mac OS X 10_9_5) AppleWebKit/537.36 (KHTML, like Gecko) Chrome/40.0.2214.115 Safari/537.36"
      }
    });
Tracking Anonymous Activity in Marketo
If you would only like to track known users in Marketo, set your Track Anonymous Activity setting to false. There are a couple things to note when this setting is false:
- Any call without a User ID will be rejected.
- No anonymous activity will be sent to Marketo. Even after the user becomes known, none of their previous anonymous activity will be sent to Marketo.
If you’d like to track anonymous activity but don’t want to have to parse through or view unknown leads, Marketo lets you create Smart Lists that will filter your leads (i.e. if you’d only like to view leads that have a user ID or an email). To do this, when you are in your Lead Database, click All Leads, then New. From the drop down, click New Smart List. Select the folder you’d like the Smart List to live in. After you’ve created the Smart List, select what field you’d like to filter by on the right side bar, drag it to the filters and then select what you’d specifically like to filter by for that field.
Marketo API Limits
We do our best to limit the amount of API calls that we are making to Marketo but if you are hitting your 50k/day limit, we’d recommend only sending events to Marketo that you need. To prevent an event from being sent to Marketo, you can select destinations by doing the following:
    analytics.identify({
      userId: '97234974',
      traits: {
        firstName: 'Alex'
      },
      integrations: {
        'Marketo V2': false,
        'Google Analytics': true
      }
    })
Hybrid Device/Cloud-mode
Another option is to use Marketo in Device-mode (assuming you are tracking events from a Website). Marketo does not limit API calls that originate from their Web SDK but it also only supports capturing Identify and Page events. If you would also like to capture Track events, you can choose to have these be routed through our server-side integration.
To enable this “Hybrid” mode, select the Send Track Events Server Side setting and follow the instructions for mapping Track events defined above.
Preventing Duplicate Leads
Marketo allows you to upsert leads based on any field. We use email and userId as well as anonymousId if you are tracking anonymous activity. We will first use email since that is the field Marketo recommends is unique for your leads. However, many .track() and .page() calls don’t include an email address so then we will use the userId or anonymousId passed in your .track() and .page() calls to associate these events to leads in Marketo.
You can do one of the following to prevent duplicate leads:
- Recommended: Upload a CSV adding your userId to all your leads in Marketo before enabling the destination. After you create the userId field in Marketo, you can upload a list of all your users with an email column and a userId column. Your CSV should look like this:
| userId | |
|---|---|
| alex@email.com | ABC1234 |
| natasha@email.com | XYZ9876 |
To upload a list to Marketo, when you are in Lead Database, click All Leads. Then click “New”, then “Import List” from the drop down. Select your CSV, then click “Next”. Make sure “Email Address” and “userId” are the Marketo Fields selected then click “Next”. Name your list or select a pre-existing list. Select “None” for Acquisition Program. Then Click “Import”.
- Manually merge leads in Marketo. Follow these instructions to merge any duplicate leads found in Marketo after enabling the destination.
- Make sure to call identify first. This is already a recommended best practice as part of our spec.
- Pass an email in your
.track()and.page()calls.
Migrating from Marketo to Marketo V2
There are a few necessary steps that have to be taken to migrate from Segment’s legacy Marketo v1 destinations, to Marketo V2.
Important: Make sure you disable Marketo once you are done getting set up with Marketo V2. If you leave both enabled, there will likely be duplicate data in your Marketo account.
- Your Marketo credentials in your Segment Destination settings need to be updated. Our Marketo Destination used Marketo’s SOAP API and Marketo V2 uses Marketo’s REST API which requires different credentials. Check out the Getting Started guide for what credentials you’ll need.
- Two custom fields must be created in Marketo: userId and anonymousId. Check out Getting Started for exact details on how to create these custom fields in Marketo.
Trackcalls must be mapped in your Destination settings. Our Marketo Destination senttrackcalls as a Munchkin Visit WebPage event in Marketo. In Marketo V2, we’ll send your track calls to your Marketo Custom Activities. Detailed instructions here.- If there are any custom Lead fields that you’d like sent to Marketo in your
Identifycalls, you must create custom fields in Marketo and add them in your Destination settings. In addition, if you are connecting Marketo V2 in Device-mode, an empty form must be created in Marketo to create and update leads. Detailed instructions here. -
Update anything in Marketo that rely on the way V1 sends
.track()events to be triggered by your custom activities. For example, our V1 Marketo destination sent track events as a “Visit Web Page” event with/event/<your_event_name>. So if you a workflow that is triggered by a “Visit Web Page” event where the web page contains/event/<your_event_name>, you’ll have to swap out the “Visit Web Page” event trigger you have with your Custom Attribute Trigger. In the right side bar, click the “Custom” folder under “Triggers” and select the trigger that you set for your custom activity: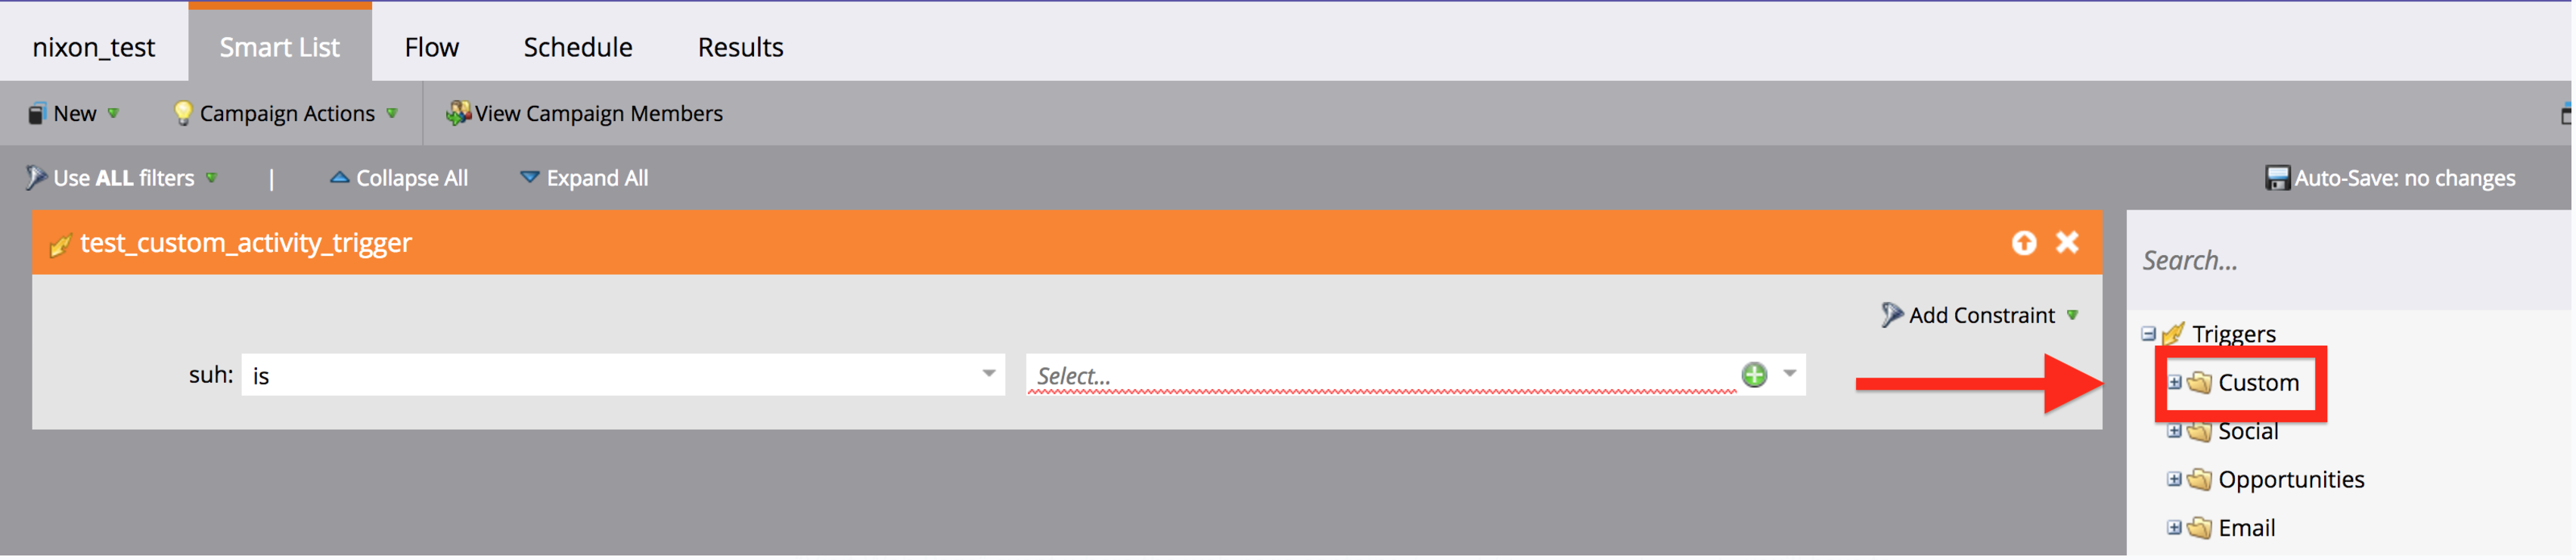
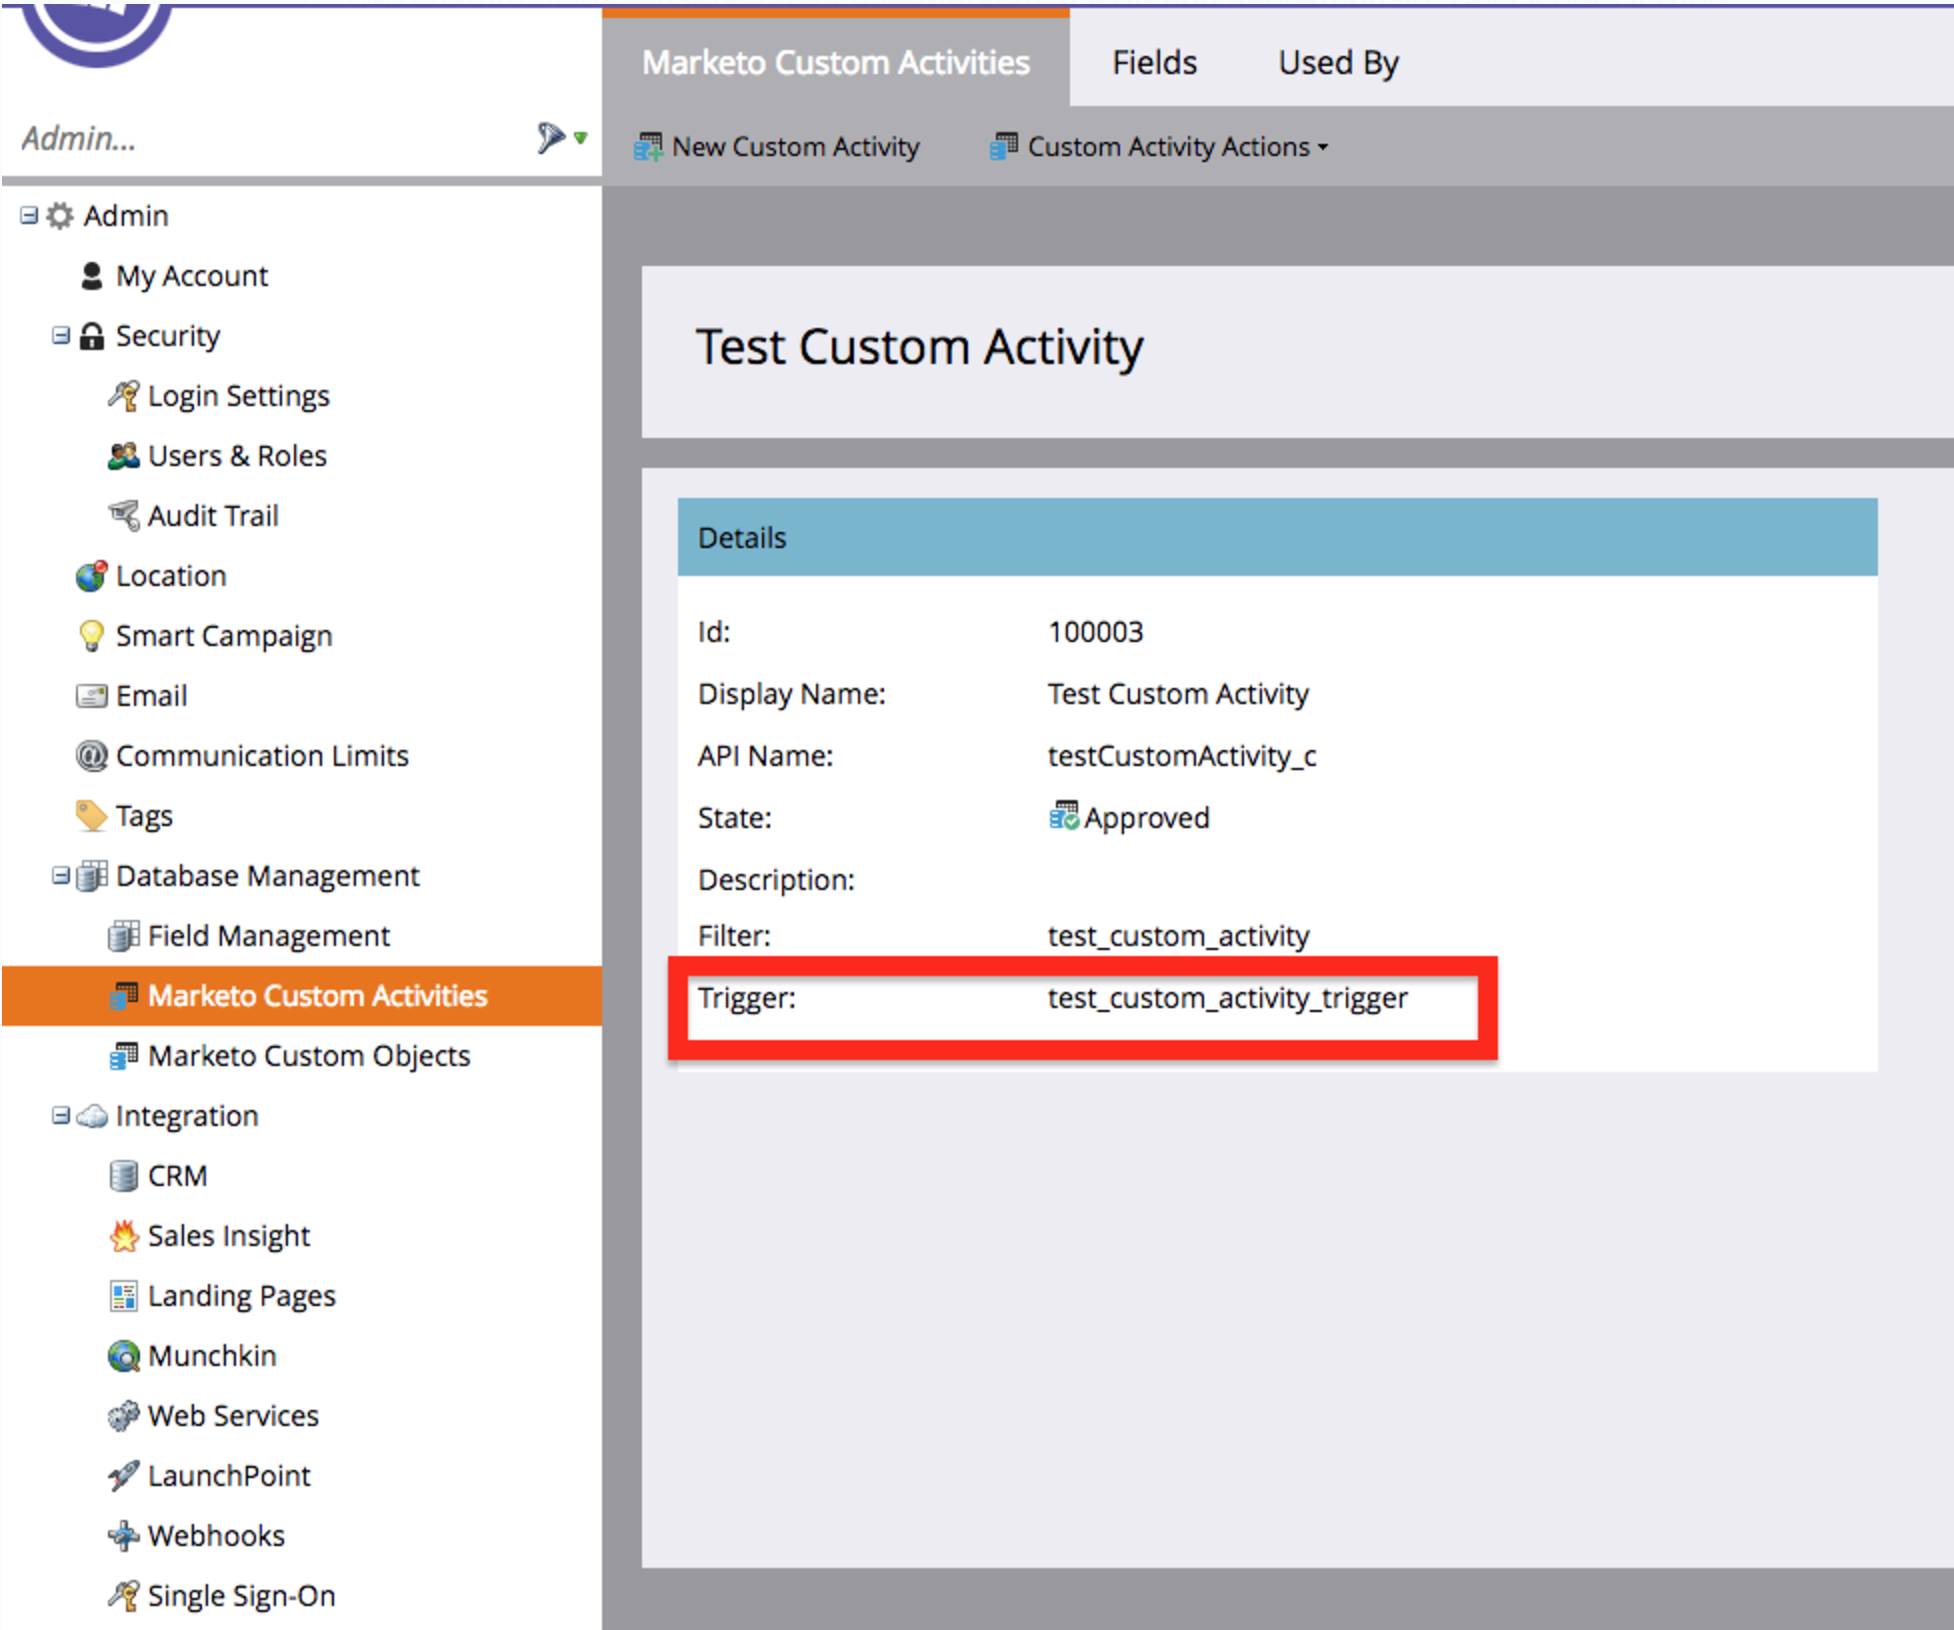
To figure out what the trigger name for that Custom Activity is, navigate to the admin section of Marketo > Marketo Custom Activities > Click on your activity from the side bar and you’ll see the trigger name:
- When enabling Marketo V2, because of the way Marketo’s API works, there is potential to create duplicate leads, especially when the first enabling the destination. For ways to prevent this, check out the Preventing Duplicate Leads.
Send a single source’s data to multiple Marketo V2 workspaces
Segment doesn’t support multiple instances of Marketo V2 for any source in Segment (for both Device-Mode and Cloud-Mode). If you need a single source’s data sent to multiple Marketo V2 workspaces, follow the instructions on configuring a Repeater destination to route your source’s data through the Repeater destination into a new source and new Marketo V2 destination instance. To create a Repeater destination, new source, and second Marketo V2 destination:
- Create and connect a new Repeater destination to your source and select the intended source.
- Click Add destination, name the destination, and select Fill in settings manually.
- Create a new source, then navigate to Settings > API Keys and copy the Write Key value.
- From the Repeater destination’s Settings page, you’ll find Write Keys in the Connection Settings. This is where your second source’s write key from step 4 will go.
- Navigate back to your Repeater destination and paste in the source’s
writeKeyinto the write key setting. - Add a Marketo V2 destination to your new source with the desired configuration settings.
- Enable the Repeater destination, new source, new Marketo V2 destination.
- You’ll begin seeing data transmitted from your originating source to the Repeater Destination (Event Delivery), then to the new source (Debugger), and finally to the Marketo V2 destination (Event Delivery).
Engage
You can send computed traits and audiences generated using Engage to this destination as a user property. To learn more about Engage, schedule a demo.
For user-property destinations, an identify call is sent to the destination for each user being added and removed. The property name is the snake_cased version of the audience name, with a true/false value to indicate membership. For example, when a user first completes an order in the last 30 days, Engage sends an Identify call with the property order_completed_last_30days: true. When the user no longer satisfies this condition (for example, it’s been more than 30 days since their last order), Engage sets that value to false.
When you first create an audience, Engage sends an Identify call for every user in that audience. Later audience syncs only send updates for users whose membership has changed since the last sync.
Real-time to batch destination sync frequency
Real-time audience syncs to Marketo V2 may take six or more hours for the initial sync to complete. Upon completion, a sync frequency of two to three hours is expected.
Settings
Segment lets you change these destination settings from the Segment app without having to touch any code.
| Setting | Description |
|---|---|
| Munchkin Account ID (required) |
string. You can find your Account ID under Admin > Integration > Munchkin > Tracking Code in your Marketo account. |
| Track Anonymous Activity | boolean, defaults to FALSE . Cloud Mode Only: Our Marketo Integration allows you to choose whether you’d like to track anonymous Leads in Marketo. If you don’t want to track anonymous Leads in Marketo, you must pass a User ID in your event. |
| Send Track Events Server Side | boolean, defaults to FALSE . Applicable only if you are using Marketo in Device Mode. This setting will route all of your Track events through our server-side integration with Marketo’s REST API. Page and Identify events will still be sent using our client side integration with the Marketo JavaScript SDK. |
| Client ID (required) |
string. Your Marketo REST API Client ID. |
| Client Secret (required) |
string. Your Marketo REST API Client Secret. |
| Marketo Custom Activities | mixed, defaults to . Cloud Mode Only To send track calls to Marketo, you must either be in Cloud Mode or send track events from one of our server side libraries. Use these fields to map your Segment track event names to Marketo Custom Activities. We’ll only send events that you specify. |
| Marketo Form ID | string. Device Mode Only: The ID of the form you will use to capture your Segment Identify traits. You can find the form ID under Design Studio > Forms > Select Form > Form Actions > Embed Code. Only include the digits after mktoForm_. |
| Marketo Form URL | string. Device Mode Only: The URL of the form you will use to capture your Segment Identify traits. You can find the form URL under Design Studio > Forms > Select Form > Form Actions > Embed Code. It will be the first argument in the MktoForms2.loadForm script, starting with //. Please include the entire URL including the //. |
| Marketo Custom Fields | mixed, defaults to . Use these fields for Marketo Lead fields that you’d like mapped to your Segment Identify traits. |
This page was last modified: 01 Feb 2024
Need support?
Questions? Problems? Need more info? Contact Segment Support for assistance!