ActiveCampaign Destination
Destination Info
- Accepts Page, Identify, and Track calls
- Refer to it as ActiveCampaign in the Integrations object
ActiveCampaign is an integrated email marketing, marketing automation, and small business CRM. It allows you to send beautiful newsletters, set up behavioral based automations, and benefit from sales automation.
This destination is maintained by ActiveCampaign. For any issues with the destination, contact the ActiveCampaign support team.
Getting Started
- From your Segment UI’s Destinations page click on “Add Destination”.
- Search for “Active Campaign” in the Catalog, select it, and choose which of your sources to connect the destination to.
- Add your API URL and API Key which can be found in your ActiveCampaign UI Settings page under the Developer tab.
- Since the Segment ActiveCampaign destination integration is 100% handled through Segment, you don’t need to install ActiveCampaign site tracking or event tracking JavaScript code.
Page
If you’re not familiar with the Segment Specs, take a look to understand what the Page method does. An example call would look like:
analytics.page();
NOTE: A Page call will only work if Site Tracking is enabled. You can enable this by visiting the Tracking tab on the Settings page in your ActiveCampaign account.
When you call page, we will send that event to ActiveCampaign as a site tracking event. The referrer and url parameters will be tracked for the contact with the email parameter.
Identify
If you’re not familiar with the Segment Specs, take a look to understand what the Identify method does. An example call would look like:
analytics.identify('ze8rt1u89', {
  firstName: 'Jane',
  lastName: 'Kim',
  email: 'jane.kim@example.com'
});
If the contact you are passing in doesn’t already exist in your ActiveCampaign account, they will automatically be added through this method. If the contact does already exist, they will simply be updated.
Note: A new contact will only be created if the identify call has a name (firstName OR lastName) AND an email trait.
Basic Fields
When you identify a contact, we’ll pass that contact’s information to ActiveCampaign with userId as ActiveCampaign’s External User ID. ActiveCampaign accepts these basic fields from Segment.
firstNamelastNameemailphone
Tags
You can add tags to a contact by passing in a trait called tags. If you would like to delete all tags currently on a contact, you can pass in a trait called tagsReset with a value of 1. You can pass both tags and tagsReset if you wish, or just one of the two. If you pass both, all tags will be deleted and then any new tags will be added.
analytics.identify('ze8rt1u89', {
  firstName: 'Jane',
  lastName: 'Kim',
  email: 'jane.kim@example.com',
  tags: [
      'checkout',
      'abandoned'
  ],
  tagsReset: 1
});
Custom Fields
ActiveCampaign also supports updating a contact’s custom fields with this integration. To send custom fields to ActiveCampaign you need to create the custom field first in ActiveCampaign for each custom field you want to send. Then when you call identify with keys that match those traits, those custom fields for the contact will be updated.
For example, if you have a contact in ActiveCampaign with these custom fields:
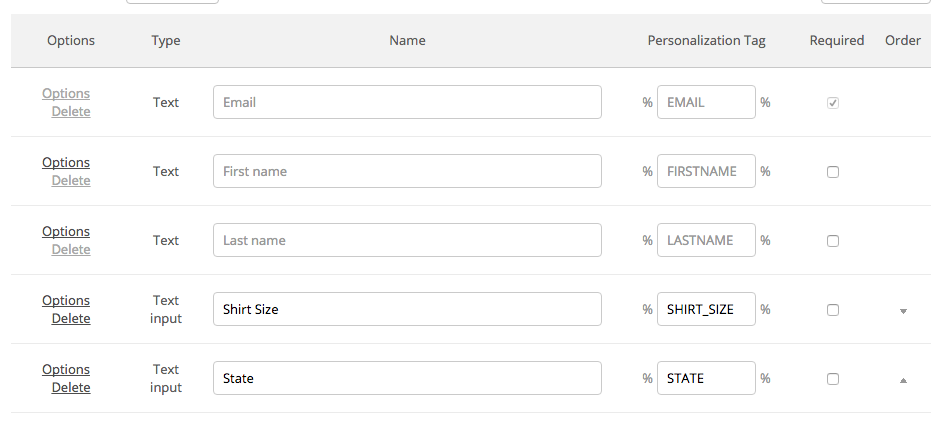
You can update those fields using this identify call:
analytics.identify('ze8rt1u89', {
  firstName: 'Jane',
  lastName: 'Kim',
  email: 'jane.kim@example.com',
  shirtSize: 'medium',
  state: 'California',
  multiChoice: [Value1,Value2]
});
In the example these traits are shirt size, state, and multiChoice. They will be shown as %SHIRT_SIZE%, %STATE%, and %MULTI_CHOICE% in ActiveCampaign, but you can record them in lower-case to identify and they will still be populated. The multiChoice field applies to listbox or checkbox custom fields in ActiveCampaign (where more than one option value is allowed).
If your custom field has the same name as a reserved trait, that custom field will not be updated.
Lists
You can add a contact to or unsubscribe a contact from any number of lists by passing in a trait called lists. As shown in the example below, this trait should be an array, with each element having an id and a status. The value of status must be either active or unsubscribed.
analytics.identify('ze8rt1u89', {
  firstName: 'Jane',
  lastName: 'Kim',
  email: 'jane.kim@example.com',
  lists: [
     {
       id: 1,
       status: 'active'
     },
     {
       id: 7,
       status: 'unsubscribed'
     }
  ]
});
Track
If you’re not familiar with the Segment Specs, take a look to understand what the Track method does. An example call would look like:
analytics.track('Clicked a button', {
  properties: {
    acValue: 'Signup button'
  }
})
NOTE: A Track call will only work if Event Tracking is enabled. You can enable this by visiting the Tracking tab on the Settings page in your ActiveCampaign account.
When you call track, we will send that event to ActiveCampaign as an event tracking event. The event parameter will be tracked for the contact with the email parameter. If you want to pass a value for that event, you can pass the value in as the acValue property of properties. In the example above, the event name is Clicked a button and the value for the event is Signup button.
Engage
You can send computed traits and audiences generated using Engage to this destination as a user property. To learn more about Engage, schedule a demo.
For user-property destinations, an identify call is sent to the destination for each user being added and removed. The property name is the snake_cased version of the audience name, with a true/false value to indicate membership. For example, when a user first completes an order in the last 30 days, Engage sends an Identify call with the property order_completed_last_30days: true. When the user no longer satisfies this condition (for example, it’s been more than 30 days since their last order), Engage sets that value to false.
When you first create an audience, Engage sends an Identify call for every user in that audience. Later audience syncs only send updates for users whose membership has changed since the last sync.
Real-time to batch destination sync frequency
Real-time audience syncs to ActiveCampaign may take six or more hours for the initial sync to complete. Upon completion, a sync frequency of two to three hours is expected.
Settings
Segment lets you change these destination settings from the Segment app without having to touch any code.
| Setting | Description |
|---|---|
| API Key (required) |
string. Your API key can be found by navigating to your Active Campaign account and clicking on My Settings > API. It should look something like 5292218aadbe410acf66c44164c4be2de4bbf184c509ef699d85a0e8da1d9fabeda175df |
| API url (required) |
string. Your API url can be found by navigating to your Active Campaign account and clicking on My Settings > API. It should look something like https://<account-name>.api-us1.com |
This page was last modified: 30 Aug 2023
Need support?
Questions? Problems? Need more info? Contact Segment Support for assistance!