Amazon Personalize Destination
Destination Info
- Accepts Page, Alias, Group, Identify, and Track calls
- Refer to it as Amazon Personalize in the Integrations object
Components
- Server
Connection Modes 
| Device-mode | Cloud-mode |
|---|---|
 Web Web |
 Web Web |
| Mobile |
Mobile |
| Server |
Server |
Segment makes it easy to send your data to Amazon Personalize (and lots of other destinations). Once you collect your data using Segment’s open source libraries, Segment translates and routes your data to Amazon Personalize in the format it can use. Amazon Personalize is a machine learning service that makes it easy for developers to create individualized recommendations for customers using their applications. AWS Personalize enables:
- Media companies to provide recommended content for viewers based on their viewing history
- Retailers to provide personalized product recommendations based on shopping behavior
- Any company to provide personalized search results and targeted marketing promotions based on the latest machine-learning capabilities developed at Amazon
Developing the machine-learning capabilities necessary to produce these recommendation systems has been beyond the reach of most organizations today due to the complexity of developing machine learning functionality. Amazon Personalize allows developers with no prior machine learning experience to build sophisticated personalization capabilities into their applications, using machine learning technology perfected from years of use on Amazon.com.
Getting Started
These are the pre-requisites you need before getting started:
- Segment data flowing into an S3 destination, a Snowflake warehouse, or Amazon Redshift warehouse.
- You have the ability to create AWS Glue jobs (only required if using S3 to train your model)
- You have the ability to deploy Lambda functions in Amazon Web Services
- You have access to AWS Personalize
If you don’t have S3, Redshift warehouse, or Snowflake warehouse configured, you can read more about setting up S3, Redshift, and Snowflake.
If you’re a Segment business tier customer, contact your Success contact to initiate a replay to S3 or your Warehouse.
There are three main parts to using Amazon Personalize with Segment:
- Train your model on historical data in S3 or a Warehouse.
- Create a Personalize Dataset Group and Campaign
- Connect Recommendations and Live Event Updates to your Campaign and Segment
Train Your Model
S3 Bucket Permissions
Whatever method you choose to train your model will result in placing a CSV into an S3 bucket. Be sure to update the policies of the bucket to include these permissions to allow Personalize to access your CSV:
{
    "Version": "2012-10-17",
    "Id": "PersonalizeS3BucketAccessPolicy",
    "Statement": [
        {
            "Sid": "PersonalizeS3BucketAccessPolicy",
            "Effect": "Allow",
            "Principal": {
                "Service": "personalize.amazonaws.com"
            },
            "Action": [
                "s3:GetObject",
                "s3:ListBucket"
            ],
            "Resource": [
                "arn:aws:s3:::bucket-name",
                "arn:aws:s3:::bucket-name/*"
            ]
        }
    ]
}
Define a Schema
To train a Personalize model, you’ll need to define the event schema for the event names and properties that your model uses as features. For the examples below, Segment is using the following Personalize Dataset schema to train the model. You’ll want to modify this to suit your use cases. You can learn more about Personalize schemas.
{
    "type": "record",
    "name": "Interactions",
    "namespace": "com.amazonaws.personalize.schema",
    "fields": [
        {
            "name": "USER_ID",
            "type": "string"
        },
        {
            "name": "ITEM_ID",
            "type": "string"
        },
        {
            "name": "EVENT_TYPE",
            "type": "string"
        },
        {
            "name": "TIMESTAMP",
            "type": "long"
        }
    ],
    "version": "1.0"
}
The examples show how multiple Segment track events are mapped into this schema and used to train a Personalize solution.
From Redshift
If you already use Redshift, training your model on the data in your warehouse is the simplest way to get up and running.
Unload Data from Redshift to S3
Assuming you have a Personalize schema like that described below, you can use the following query to pull out all the date from your Order Completed, Product Added, and Product Viewed events.
unload ('
  select
    user_id as USER_ID,
    products_sku as ITEM_ID,
    event as EVENT_TYPE,
    date_part(epoch,"timestamp") as TIMESTAMP
  from prod.order_completed
  UNION
  select
    user_id as USER_ID,
    products_sku as ITEM_ID,
    event as EVENT_TYPE,
    date_part(epoch,"timestamp") as TIMESTAMP
  from prod.product_added
  UNION
  select
    user_id as USER_ID,
    products_sku as ITEM_ID,
    event as EVENT_TYPE,
    date_part(epoch,"timestamp") as TIMESTAMP
  from prod.product_viewed
')
to
's3://mybucket/my_folder'
credentials 'aws_access_key_id=AWS_ACCESS_KEY_ID;aws_secret_access_key=AWS_SECRET_ACCESS_KEY;token=AWS_SESSION_TOKEN'
HEADER
REGION AS '<your-region>'
DELIMITER AS ','
PARALLEL OFF;
Note: Use date_part(epoch,"timestamp") as TIMESTAMP because Personalize requires timestamps to be specified in UNIX/epoch time.
Verify the Output file
Browse to the S3 service page in the AWS console and navigate to the bucket path specified in the unload command. You should see the output file.
From Snowflake
There are a few ways to load a CSV into S3 from your Snowflake warehouse. This example shows loading the data directly into an S3 bucket.
Assuming you have a Personalize schema like that described below, you can use the following query to pull out all the date from your Order Completed, Product Added, and Product Viewed events.
Unload Data from Snowflake to S3
    copy into
    s3://mybucket/my_folder/my_file.csv
    from
    (
      select
      user_id as USER_ID,
      products_sku as ITEM_ID,
      event as EVENT_TYPE,
      date_part(epoch,"timestamp") as TIMESTAMP
      from prod.order_completed
      UNION
      select
      user_id as USER_ID,
      products_sku as ITEM_ID,
      event as EVENT_TYPE,
      date_part(epoch,"timestamp") as TIMESTAMP
      from prod.product_added
      UNION
      select
      user_id as USER_ID,
      products_sku as ITEM_ID,
      event as EVENT_TYPE,
      date_part(epoch,"timestamp") as TIMESTAMP
      from prod.product_viewed
    )
    file_format=(type=csv)
    single = true -- Personlize requires a single CSV file
    credentials = (aws_key_id='xxxx' aws_secret_key='xxxxx' aws_token='xxxxxx');
This example uses temporary S3 credentials, which are generated by AWS STS and expire after a specific period of time. Temporary credentials are recommended to protect access to the bucket.
Verify the Output file
Go to the S3 service page in the AWS console and navigate to the bucket path specified in the unload command. You should see the output file.
From S3
Historical Data Preparation
Segment’s S3 destination contains a copy of all of the source data you configured to go to S3. In your S3 bucket there’s a folder called /segment-logs. Under this folder is another folder for each source of data you connected to your Segment S3 destination.
Note that this step is not required unless you plan to do batch data extraction from S3.
Your Glue ETL job will need to crawl each source folder to extract the backup data that forms your training set. Analysis of this data set is beyond the scope of this document. It is strongly recommended you familiarize yourself with the types of events that can be sent through Segment. Segment’s event structure is described in detail here.
The following examples show how to configure an AWS Glue job to convert Segment historical data into the Apache Avro format that Personalize wants to consume for training data sets.
Create AWS Glue ETL Job
To create an AWS Glue ETL Job:
- Create a new AWS service IAM role using the following execution policies. These policies give your Glue job the ability to write to your S3 bucket:
- Policy 1:
{ "Version": "2012-10-17", "Statement": [ { "Effect": "Allow", "Action": [ "glue:*", "s3:GetBucketLocation", "s3:ListBucket", "s3:ListAllMyBuckets", "s3:GetBucketAcl", "ec2:DescribeVpcEndpoints", "ec2:DescribeRouteTables", "ec2:CreateNetworkInterface", "ec2:DeleteNetworkInterface", "ec2:DescribeNetworkInterfaces", "ec2:DescribeSecurityGroups", "ec2:DescribeSubnets", "ec2:DescribeVpcAttribute", "iam:ListRolePolicies", "iam:GetRole", "iam:GetRolePolicy", "cloudwatch:PutMetricData" ], "Resource": [ "*" ] }, { "Effect": "Allow", "Action": [ "s3:CreateBucket" ], "Resource": [ "arn:aws:s3:::aws-glue-*" ] }, { "Effect": "Allow", "Action": [ "s3:GetObject", "s3:PutObject", "s3:DeleteObject" ], "Resource": [ "arn:aws:s3:::aws-glue-*/*", "arn:aws:s3:::*/*aws-glue-*/*" ] }, { "Effect": "Allow", "Action": [ "s3:GetObject" ], "Resource": [ "arn:aws:s3:::crawler-public*", "arn:aws:s3:::aws-glue-*" ] }, { "Effect": "Allow", "Action": [ "logs:CreateLogGroup", "logs:CreateLogStream", "logs:PutLogEvents" ], "Resource": [ "arn:aws:logs:*:*:/aws-glue/*" ] }, { "Effect": "Allow", "Action": [ "ec2:CreateTags", "ec2:DeleteTags" ], "Condition": { "ForAllValues:StringEquals": { "aws:TagKeys": [ "aws-glue-service-resource" ] } }, "Resource": [ "arn:aws:ec2:*:*:network-interface/*", "arn:aws:ec2:*:*:security-group/*", "arn:aws:ec2:*:*:instance/*" ] } ] }-
Policy 2:
  {
      "Version": "2012-10-17",
      "Statement": [
          {
              "Effect": "Allow",
              "Action": [
                  "s3:GetObject",
                  "s3:PutObject"
              ],
              "Resource": [
                  "arn:aws:s3:::{ your bucket arn }/segment-logs/*",
                  "arn:aws:s3:::{ your bucket arn }/transformed/*"
              ]
          }
      ]
  }
- Navigate to the Glue service in your AWS console.
- Click Get started and then select Jobs from the left navigation on the Glue console page.
- Select Spark script editor and click Create.
-
The following code sample is the source code for a generic Glue job. Copy the code example to your clipboard and paste it into the Glue editor window, modifying as necessary to reflect the names of the events you wish to extract from the Segment logs (see line #25).
import sys from awsglue.transforms import * from awsglue.utils import getResolvedOptions from awsglue.context import GlueContext from awsglue.dynamicframe import DynamicFrame from awsglue.job import Job from pyspark.context import SparkContext from pyspark.sql.functions import unix_timestamp ## @params: [JOB_NAME,S3_JSON_INPUT_PATH,S3_CSV_OUTPUT_PATH] args = getResolvedOptions(sys.argv, ['JOB_NAME', 'S3_JSON_INPUT_PATH', 'S3_CSV_OUTPUT_PATH']) sc = SparkContext() glueContext = GlueContext(sc) spark = glueContext.spark_session job = Job(glueContext) job.init(args['JOB_NAME'], args) # Load JSON into dynamic frame datasource0 = glueContext.create_dynamic_frame.from_options('s3', {'paths': [args['S3_JSON_INPUT_PATH']], 'recurse': True}, 'json') print("Input file: ", args['S3_JSON_INPUT_PATH']) print("Input file total record count: ", datasource0.count()) # Filters the JSON documents that we want included in the output CSV supported_events = ['Product Added', 'Order Completed', 'Product Clicked'] def filter_function(dynamicRecord): if ('anonymousId' in dynamicRecord and 'userId' in dynamicRecord and 'properties' in dynamicRecord and 'sku' in dynamicRecord["properties"] and 'event' in dynamicRecord and dynamicRecord['event'] in supported_events): return True else: return False # Apply filter function to dynamic frame interactions = Filter.apply(frame = datasource0, f = filter_function, transformation_ctx = "interactions") print("Filtered record count: ", interactions.count()) # Map only the fields we want in the output CSV, changing names to match target schema. applymapping1 = ApplyMapping.apply(frame = interactions, mappings = [ \ ("anonymousId", "string", "ANONYMOUS_ID", "string"), \ ("userId", "string", "USER_ID", "string"), \ ("properties.sku", "string", "ITEM_ID", "string"), \ ("event", "string", "EVENT_TYPE", "string"), \ ("timestamp", "string", "TIMESTAMP_ISO", "string")], \ transformation_ctx = "applymapping1") # Repartition to a single file since that is what is required by Personalize onepartitionDF = applymapping1.toDF().repartition(1) # Coalesce timestamp into unix timestamp onepartitionDF = onepartitionDF.withColumn("TIMESTAMP", \ unix_timestamp(onepartitionDF['TIMESTAMP_ISO'], "yyyy-MM-dd'T'HH:mm:ss.SSS'Z'")) # Convert back to dynamic frame onepartition = DynamicFrame.fromDF(onepartitionDF, glueContext, "onepartition_df") # Write output back to S3 as a CSV glueContext.write_dynamic_frame.from_options(frame = onepartition, connection_type = "s3", \ connection_options = {"path": args['S3_CSV_OUTPUT_PATH']}, \ format = "csv", transformation_ctx = "datasink2") job.commit() - Select the Job details tab.
- Enter a name for your Glue job.
- Leave Type as Spark.
- Make any optional changes on the Job details page, and click Save to save the job script.
To review key parts of the Python script in more detail:
-
The script is initialized with a few job parameters. You’ll see how to specify these parameter values when the job below runs. For now, see that Segment is passing in the location of the raw JSON files using
S3_JSON_INPUT_PATHand the location where the output CSV should be written throughS3_CSV_OUTPUT_PATH.args = getResolvedOptions(sys.argv, ['JOB_NAME', 'S3_JSON_INPUT_PATH', 'S3_CSV_OUTPUT_PATH']) -
The Spark and Glue contexts are created and associated. A Glue Job is also created and initialized.
sc = SparkContext() glueContext = GlueContext(sc) spark = glueContext.spark_session job = Job(glueContext) job.init(args['JOB_NAME'], args) -
The first step in Segment’s Job is to load the raw JSON file as a Glue DynamicFrame.
datasource0 = glueContext.create_dynamic_frame.from_options('s3', {'paths': [args['S3_JSON_INPUT_PATH']], 'recurse': True}, 'json') - Since not all events that are written to S3 by Segment are relevant to training a Personalize model, Segment uses Glue’s
Filtertransformation to keep the records needed. -
The
datasource0DynamicFrame created above is passed toFilter.apply(...)function along with thefilter_functionfunction. It’s infilter_functionwhere Segment keeps events that have a product SKU anduserIdspecified. The resulting DynamicFrame is captured asinteractions.def filter_function(dynamicRecord): if dynamicRecord["properties"]["sku"] and dynamicRecord["userId"]: return True else: return False interactions = Filter.apply(frame = datasource0, f = filter_function, transformation_ctx = "interactions") -
Segment calls Glue’s
ApplyMappingtransformation, passing theinteractionsDynamicFrame from above and field mapping specification that indicates the fields Segment wants to retain and their new names. These mapped field names become the column names in Segment’s output CSV. You’ll notice that Segment is using the product SKU as theITEM_IDandeventas theEVENT_TYPE. Segment also renames thetimestampfield toTIMESTAMP_ISOsince the format of this field value in the JSON file is an ISO 8601 date and Personalize requires timestamps to be specified in UNIX time (number seconds since Epoc).applymapping1 = ApplyMapping.apply(frame = interactions, mappings = [ \ ("anonymousId", "string", "ANONYMOUS_ID", "string"), \ ("userId", "string", "USER_ID", "string"), \ ("properties.sku", "string", "ITEM_ID", "string"), \ ("event", "string", "EVENT_TYPE", "string"), \ ("timestamp", "string", "TIMESTAMP_ISO", "string")], \ transformation_ctx = "applymapping1") -
To convert the ISO 8601 date format to UNIX time for each record, Segment uses Spark’s
withColumn(...)to create a new column calledTIMESTAMPthat is the converted value of theTIMESTAMP_ISOfield. Before Segment can callwithColumn, Segment needs to convert the Glue DynamicFrame into a Spark DataFrame. That is accomplished by callingtoDF()on the output of ApplyMapping transformation above. Since Personalize requires Segment’s uploaded CSV to be a single file, Segment callsrepartition(1)on the DataFrame to force all data to be written in a single partition. After creating theTIMESTAMPin the expected format,DyanmicFrame.fromDF()is called to convert the DataFrame back into a DyanmicFrame.# Repartition to a single file onepartitionDF = applymapping1.toDF().repartition(1) # Coalesce timestamp into unix timestamp onepartitionDF = onepartitionDF.withColumn("TIMESTAMP", \ unix_timestamp(onepartitionDF['TIMESTAMP_ISO'], "yyyy-MM-dd'T'HH:mm:ss.SSS'Z'")) # Convert back to dynamic frame onepartition = DynamicFrame.fromDF(onepartitionDF, glueContext, "onepartition_df") -
Segment’s CSV is written back to S3 at the path specified by the
S3_CSV_OUTPUT_PATHjob property and commits the job.glueContext.write_dynamic_frame.from_options(frame = onepartition, connection_type = "s3", \ connection_options = {"path": args['S3_CSV_OUTPUT_PATH']}, \ format = "csv", transformation_ctx = "datasink2") job.commit()
Run Your AWS Glue ETL Job
With Segment’s ETL Job script created and saved, it’s time to run the job to create the CSV needed to train a Personalize Solution. To do this:
-
Open another AWS console browser tab/window by right-clicking on the AWS logo in the upper left corner of the page and select Open Link in New Tab (or Window).
-
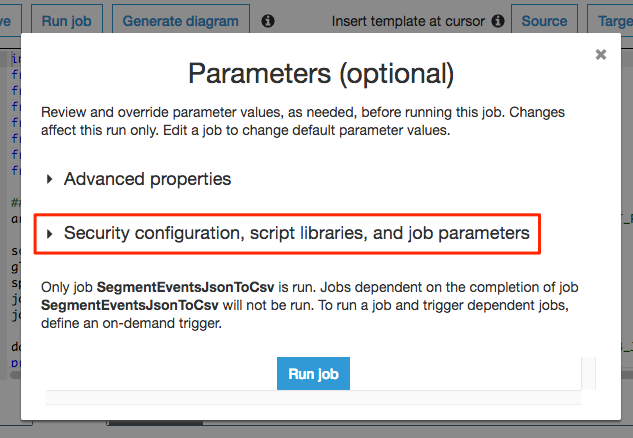
While still in the Glue service console and the job listed, click Run job. This will cause the Parameters panel to display.
-
Click the Security configuration, script libraries, and job parameters section header to cause the job parameters fields to be displayed.
- Scroll down to the Job parameters section. This is where Segment will specify the job parameters that Segment’s script expects for the path to the input data and the path to the output file.
- Create two job parameters with the following key and value.
- Be sure to prefix each key with
--as shown. Substitute your account ID for[ACCOUNT_ID]in the values below. You copy the bucket name to your clipboard from the S3 service page in the tab/window you opened above. The order they are specified does not matter.
Key Value –S3_JSON_INPUT_PATH s3://personalize-data-[ACCOUNT_ID]/raw-events/ –S3_CSV_OUTPUT_PATH s3://personalize-data-[ACCOUNT_ID]/transformed 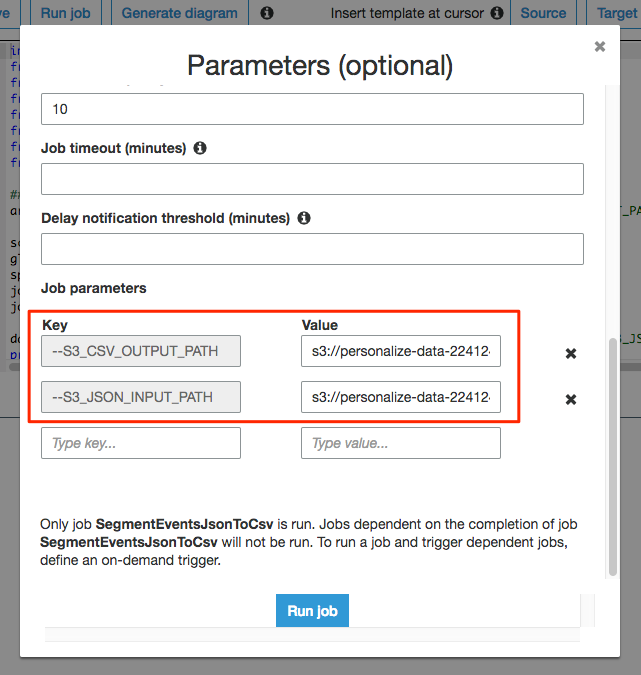
- Be sure to prefix each key with
-
Click Run job to start the job. Note that this dialog scrolls.
-
Once the job has started running, you’ll see log output in the Logs tab at the bottom of the page. It may take a few minutes to complete.
- When the job completes, click the X in the upper right corner of the page to exit the job script editor.
Verify Output File
To verify the output file:
- Go to the S3 service page in the AWS console and find the bucket with a name starting with
personalize-data-.... - Click on the bucket name. If the job completed successfully, you’ll see a folder named transformed.
-
Click on transformed and you’ll see the output file created by the ETL job.

Create Personalize Dataset Group, Solution and Campaign
Create Personalize Dataset Group
To create a personalize dataset group:
-
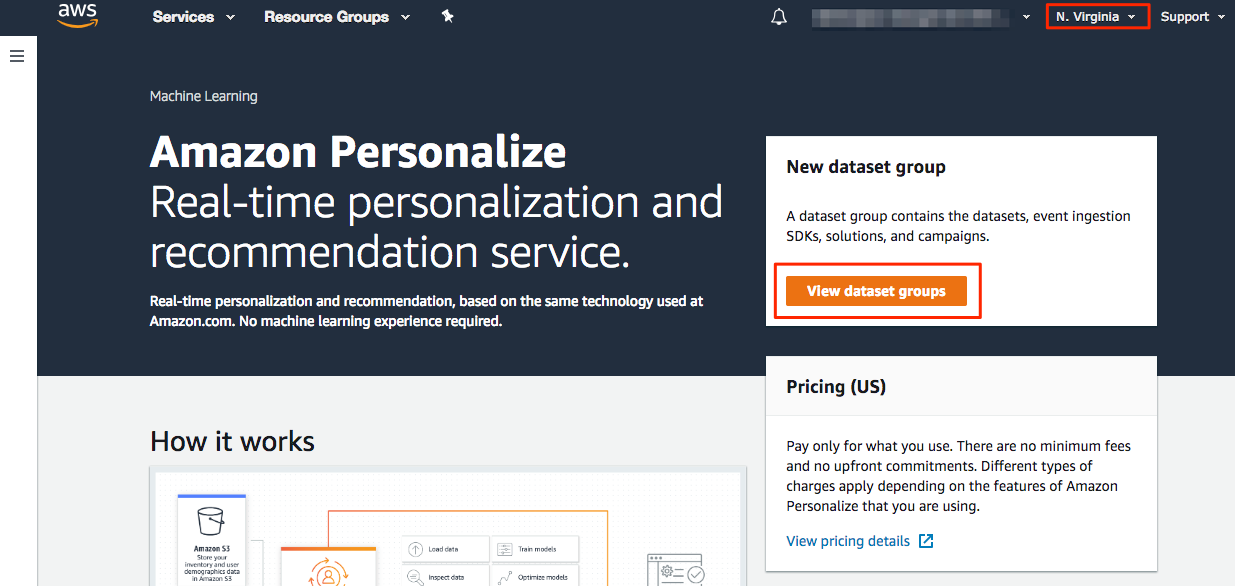
Browse to the Amazon Personalize service landing page in the AWS console.
-
Click View dataset groups to get started.
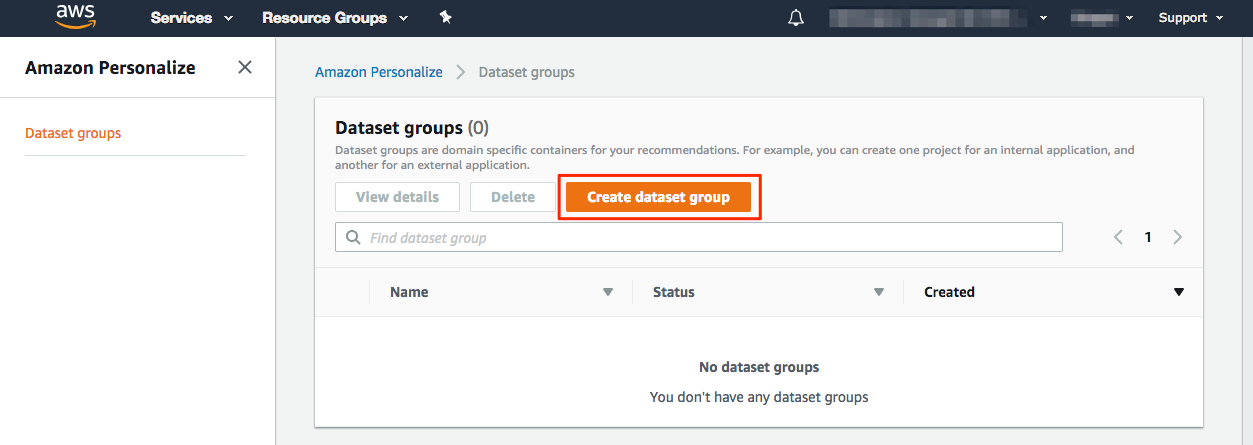
-
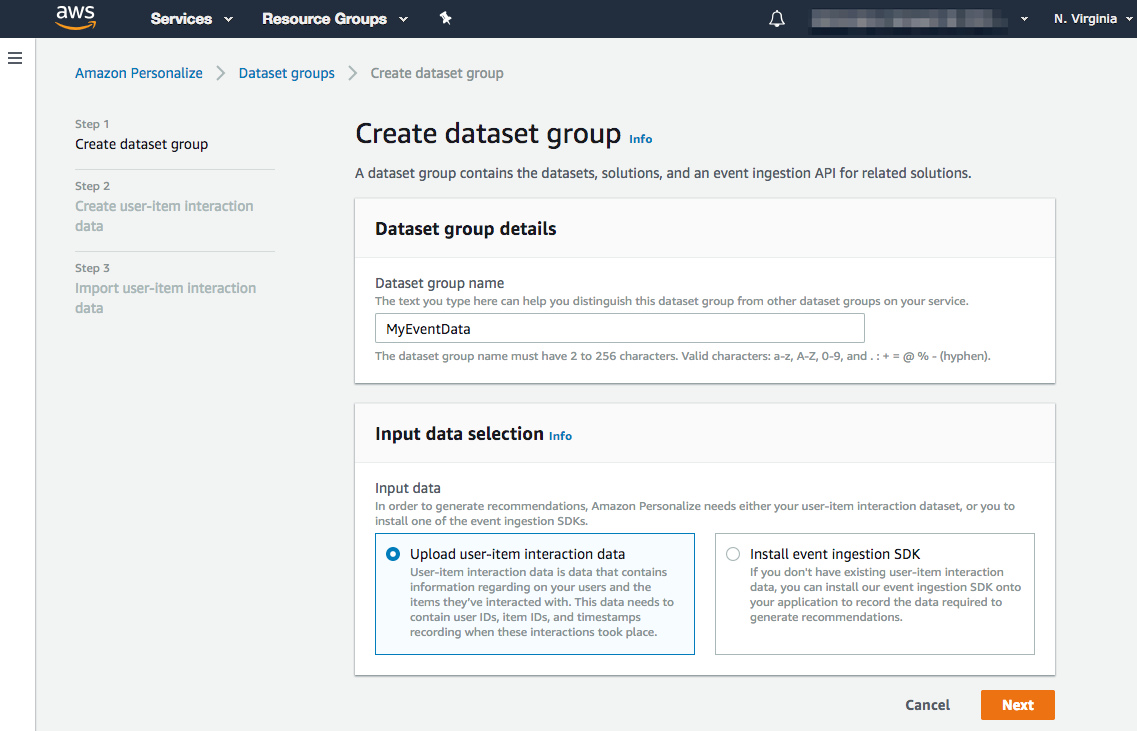
On the Dataset Groups page, click Create dataset group.
-
On the Create dataset group page, give your dataset group a name.
-
Select Upload user-item interaction data since Segment will be uploading the CSV prepared in the previous steps.
-
Click Next to continue.
-
On the Create user-item interaction data page, select Create new schema and give your schema a name.
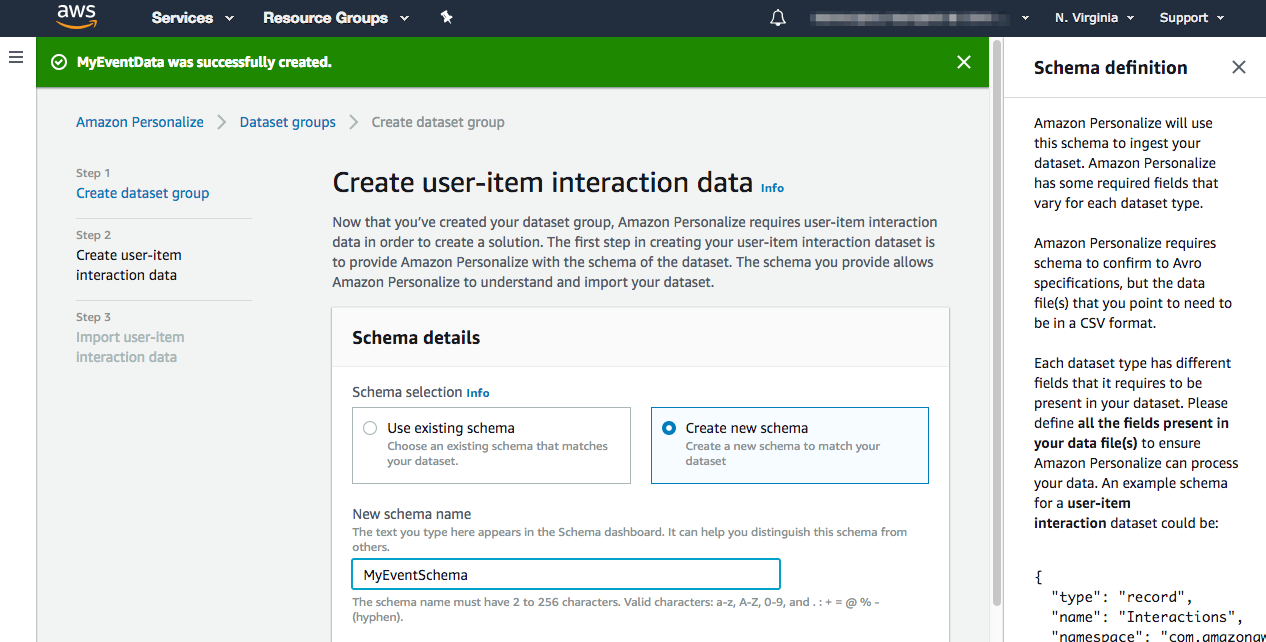
- Scroll down to the Schema definition editor. Dataset schemas in Personalize are represented in Avro. Learn more about For detailed Personalize schema definitions.
- Avro is a remote procedure call and data serialization framework developed within Apache’s Hadoop project. It uses JSON for defining data types and protocols, and serializes data in a compact binary format.
-
This example uses the following example schema:
{ "type": "record", "name": "Interactions", "namespace": "com.amazonaws.personalize.schema", "fields": [ { "name": "USER_ID", "type": "string" }, { "name": "ITEM_ID", "type": "string" }, { "name": "EVENT_TYPE", "type": "string" }, { "name": "TIMESTAMP", "type": "long" } ], "version": "1.0" }- The required fields for the user-item interaction dataset schema are
USER_ID,ITEM_ID, andTIMESTAMP. There’s also an optional fieldEVENT_TYPE.
- The required fields for the user-item interaction dataset schema are
-
Copy the contents of Avro schema to your clipboard and paste it into the “Schema definition” editor (replacing the proposed schema).
-
Click Next to save the schema and move to the next step.
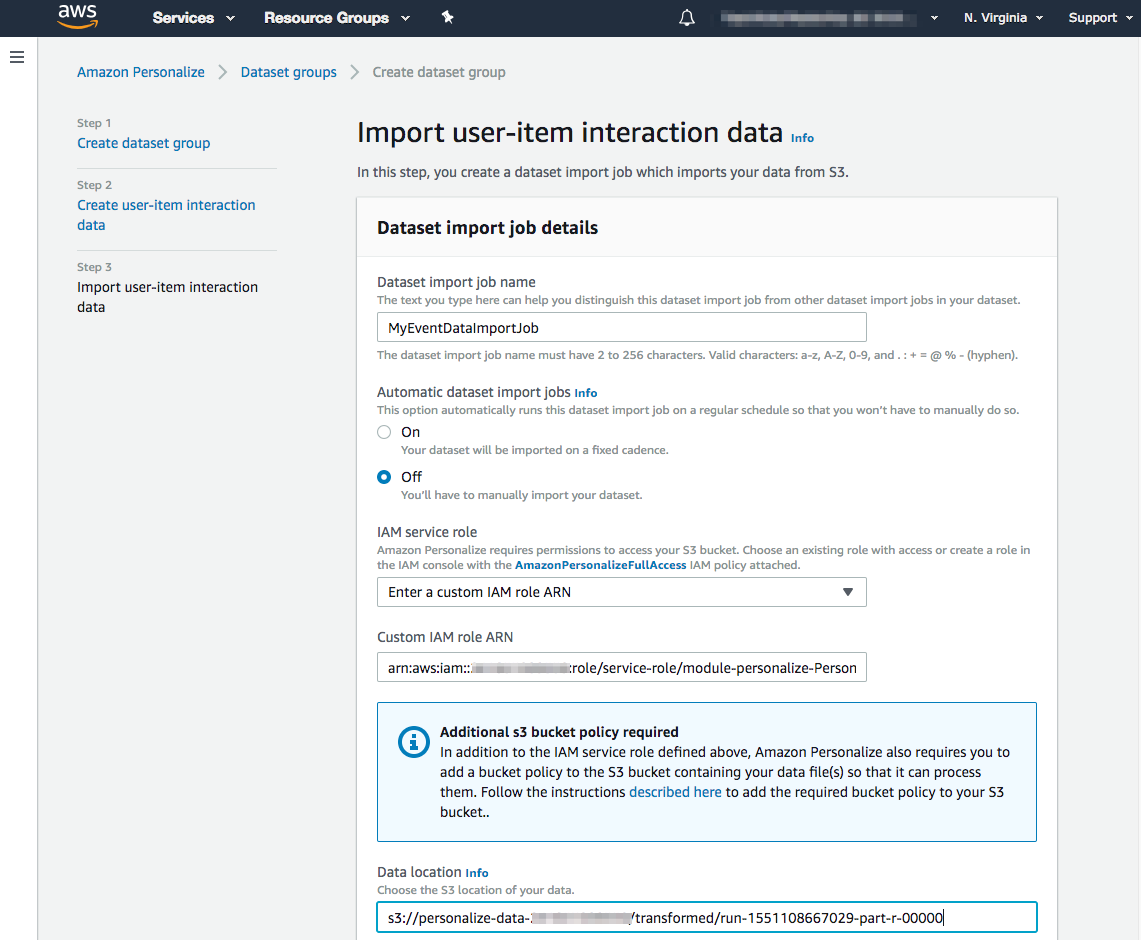
-
The Import user-item interaction data step is displayed next. To complete this form Segment needs to get two pieces of information from IAM and S3. Give your import job a name and set the automatic import to Off.
- For the IAM service role, select Create a new role from the dropdown.
-
In the next pop-up, Segment recommends listing your bucket name in the Specific S3 buckets option, but you’re free to choose the option that best suits your needs.
-
Find the location of the CSV file you generated in the earlier steps. This needs to be configured in the Data Location field on this screen.
- After clicking the Finish button at the bottom of the page, you’ll return to the Personalize Dashboard where you can monitor the progress of your interaction dataset as it is being created.
Be patient as this process can take a long time to complete.
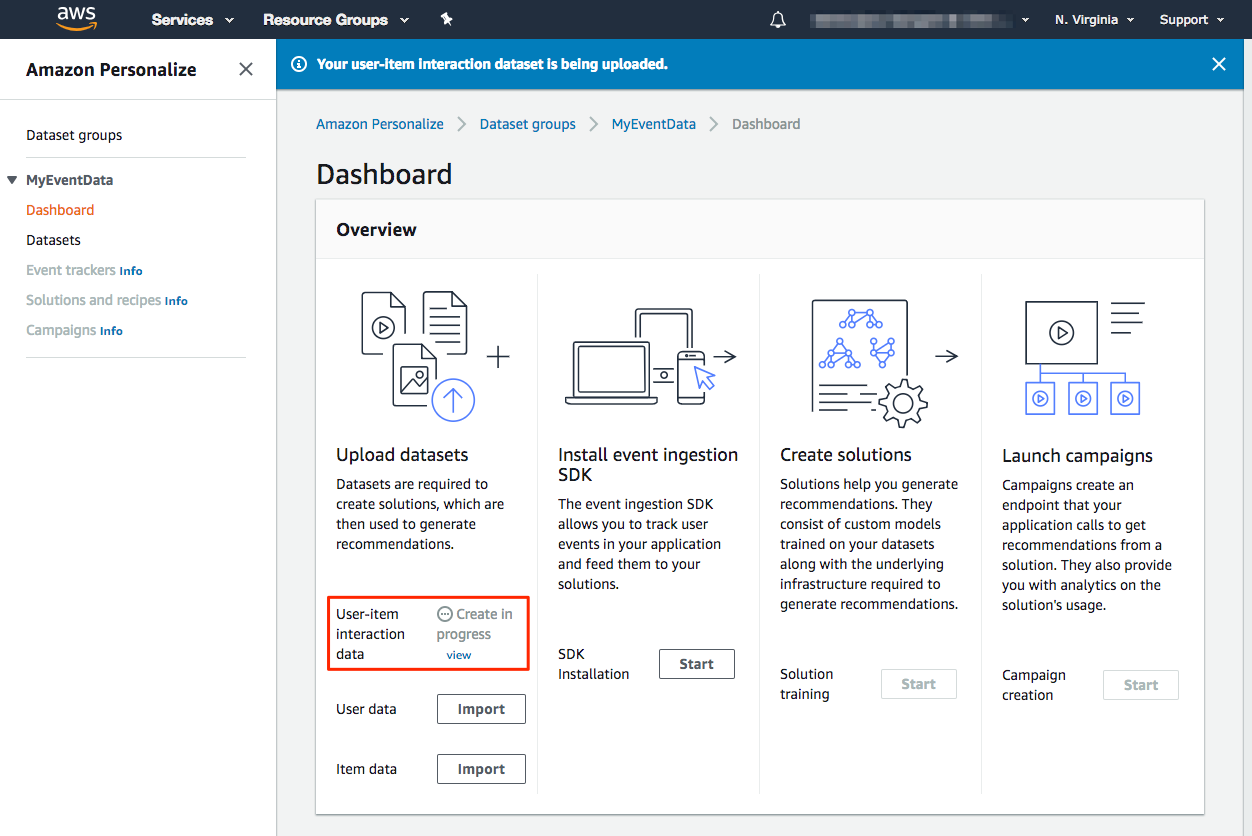
Create Personalize Solution
Once Segment’s event CSV is finished importing into a user-item interaction dataset, Segment can create a Personalize Solution. To do this:
-
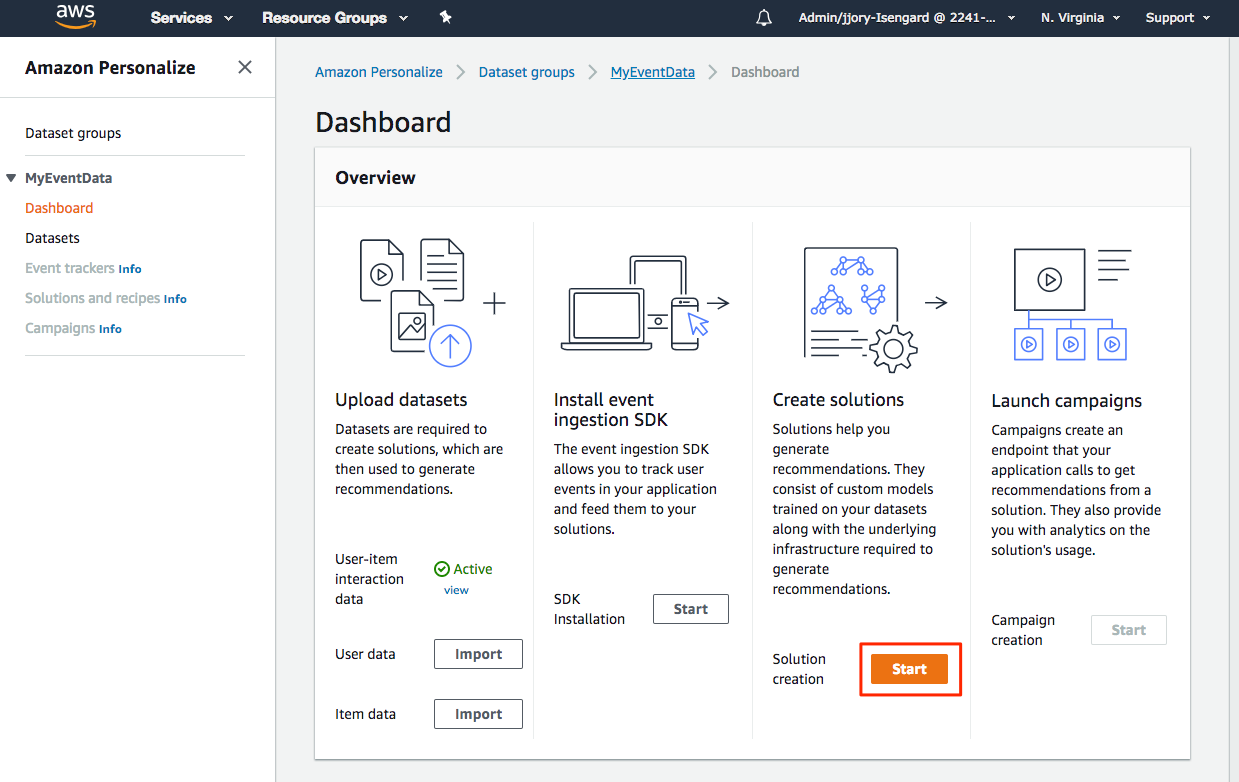
From the Dashboard page for the dataset group created above, click Start in the Create solutions column.
- On the Create solution page, enter a Solution name.
- For a discussion on the different recipes you can use with Personalize, see here.
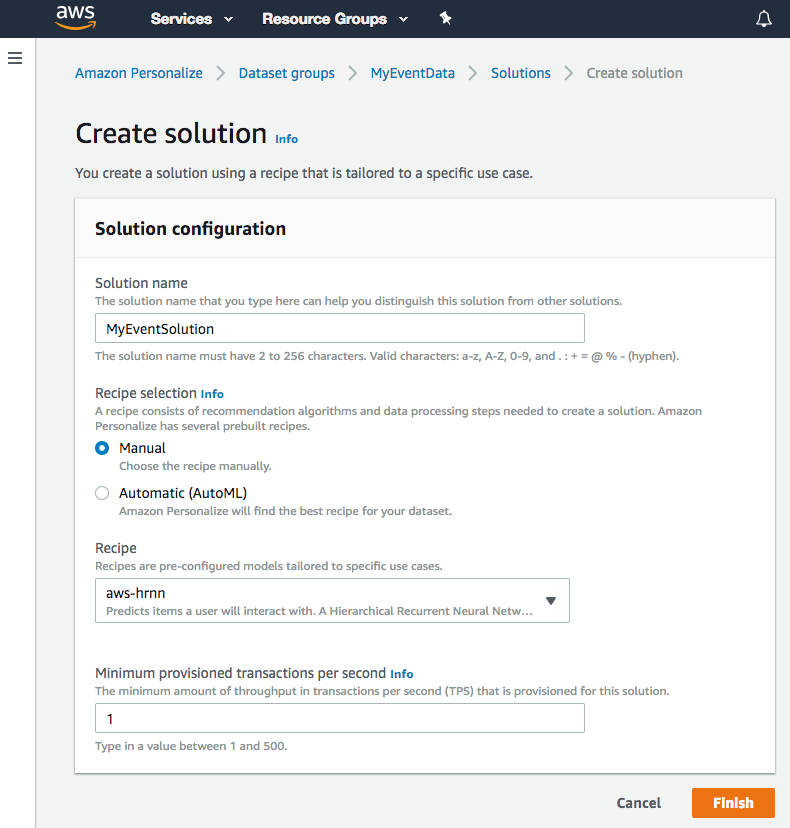
-
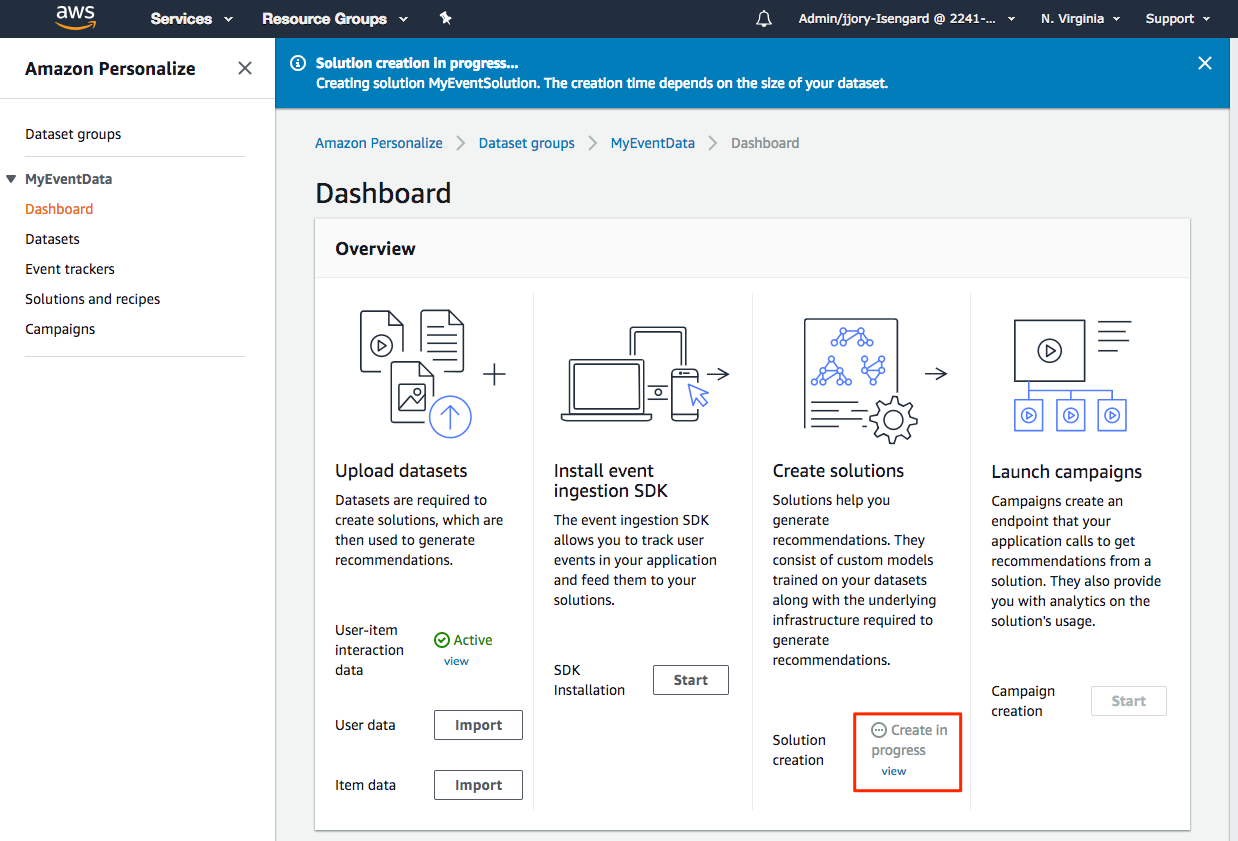
Click Finish to create your Solution. This process can take several minutes to several hours to complete.
Create Personalize Campaign
A deployed solution is known as a campaign, and is able to make recommendations for your users. To deploy a solution, you create a campaign in the console or by calling the CreateCampaign API. You can choose which version of the solution to use. By default, a campaign uses the latest version of a solution.
To create a Personalize campaign:
-
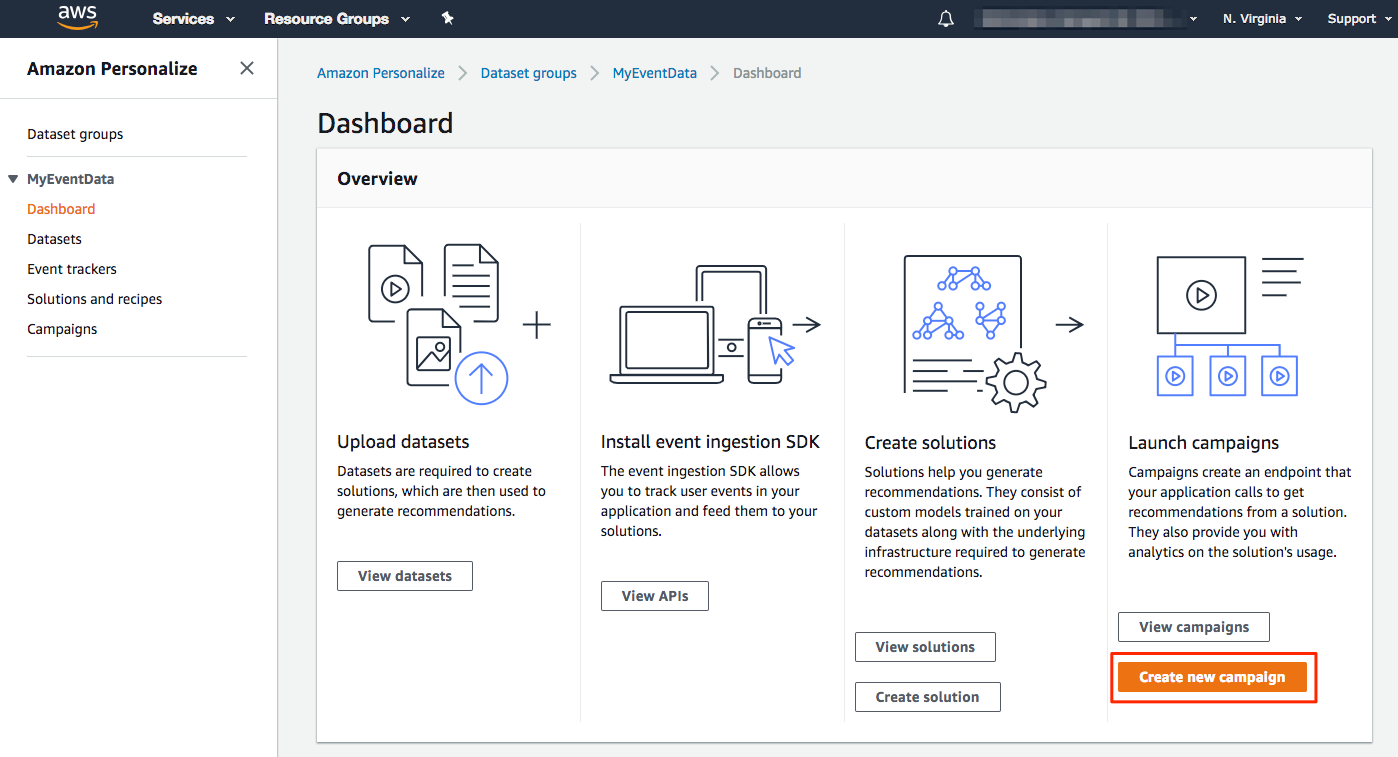
From the Dataset Group Dashboard, click Create new campaign.
- Enter the name for your campaign.
-
Select the solution you created above and click Create campaign.

-
Personalize will start creating your new campaign. This process can take several minutes.
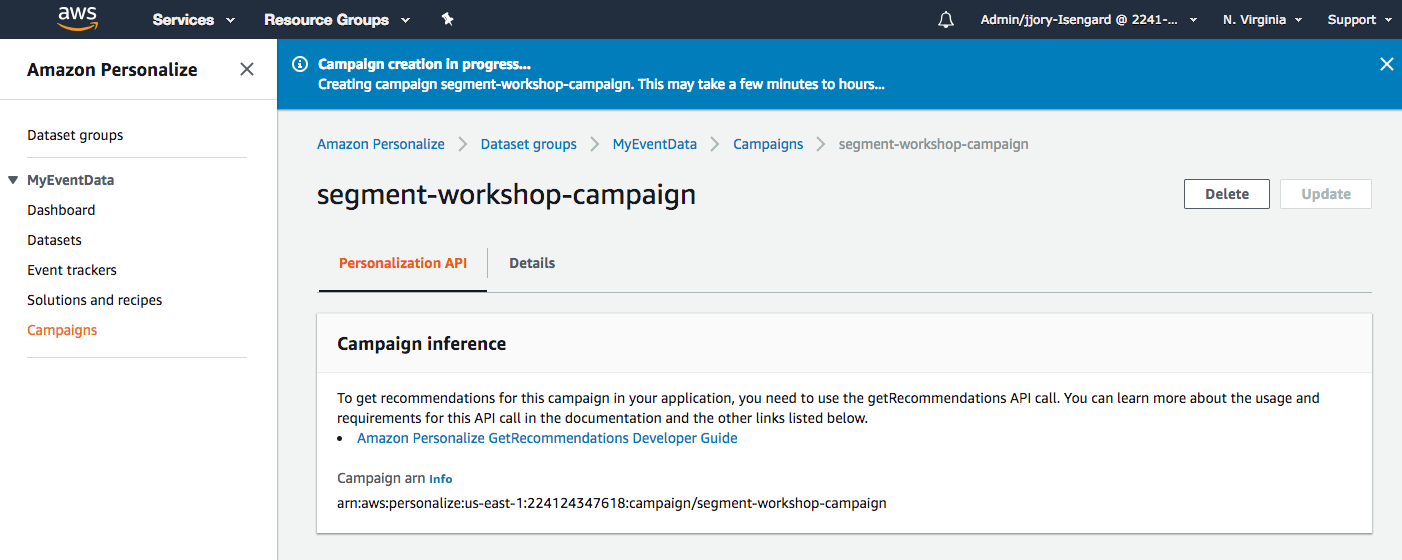
In the next section, Segment will build a real-time clickstream ingestion pipeline that accepts events from Segment and can query the solution you just deployed.
Getting Recommendations and Live Event Updates
Once you deploy your Personalize solution and enable a Campaign, your Lambda instance consumes event notifications from Segment and uses the Solution and Campaign to react to events which drive your business cases.
The example code Segment provides below shows how to forward events to the Personalize Solution you deployed to keep your model updated. It then forwards an identify event back to Segment with the recommendations from your Solution.
Set up Segment IAM policy & role for invoking your Lambda
Segment will need to be able to call (“invoke”) your Lambda in order to process events. This requires you to configure an IAM role for your Lambda which allows the Segment account to invoke your function.
Create an IAM policy
To create an IAM policy:
-
Sign in to the Identity and Access Management (IAM) console and follow these instructions to Create an IAM policy to allow Segment permission to invoke your Lambda function.
-
Select Create Policy from JSON and use the following template policy in the
Policy Documentfield. Be sure to change the{region},{account-id}and{function-names}with the applicable values. Here’s example of a Lambda ARNarn:aws:lambda:us-west-2:355207333203:function:my-example-function.
NOTE: You can put in a placeholder ARN for now, as you will need to come back to this step to update with the ARN of your Lambda once that’s been created.
{
  "Version": "2012-10-17",
  "Statement": [
    {
        "Effect": "Allow",
        "Action": [
            "lambda:InvokeFunction"
        ],
        "Resource": [
            "lambda ARN 1",
            "lambda ARN 2",
            ...
            "lambda ARN n"
        ]
    }
  ]
}
Create an IAM role
To create an IAM role:
- Sign in to the Identity and Access Management (IAM) console and follow these instructions to Create an IAM role to allow Segment permission to invoke your Lambda function.
- While setting up the new role, add the policy you created in the previous step.
- Finish with any other set up items you may want (like
tags). - Search for and click on your new roles from the IAM home.
-
Select the Trust Relationships tab, then click Edit trust relationship.
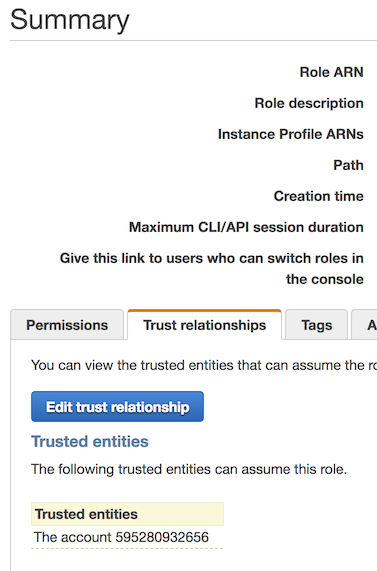
- Copy and paste the following into your trust relationship. You should replace
<your-source-id>with either the Source ID of the attached Segment source (the default) or the custom external ID you set in your Amazon Lambda destination settings.
NOTE: Your Source ID can be found by navigating to Settings > API Keys from your Segment source homepage.
For security purposes, Segment will set your Workspace ID as your External ID. If you are currently using an External ID different from your Workspace ID, reach out to Segment support so they can change it and make your account more secure.
{
  "Version": "2012-10-17",
  "Statement": [
    {
      "Effect": "Allow",
      "Principal": {
        "AWS": "arn:aws:iam::595280932656:role/customer-personalize-prod-destination-access"
      },
      "Action": "sts:AssumeRole",
      "Condition": {
        "StringEquals": {
          "sts:ExternalId": "YOUR_SEGMENT_SOURCE_ID"
        }
      }
    }
  ]
}
If you have multiple Sources using this Role, or require the use of multiple externalIds, replace the sts:ExternalId setting above with:
"sts:ExternalId": ["YOUR_SEGMENT_SOURCE_ID", "ANOTHER_SOURCE_ID", "AN_EXTERNAL_ID", "ANOTHER_EXTERNAL_ID"]
Build a Lambda Function to Process Segment Events
In order to process events from Segment, you will need to provide a Lambda function that can handle your event flow. This function can be used to forward events to a Tracker for your Personalize solution, or to post process events, get recommendations from your Solution, or to push these results back to Segment for later use in the destinations you have configured.
Segment allows you to send each call type (track,identify,etc) to a different Lambda function. The example below shows one generic function that could be used to handle any call.
Segment provides an example Lambda function, written in Python, for you to get up and running.
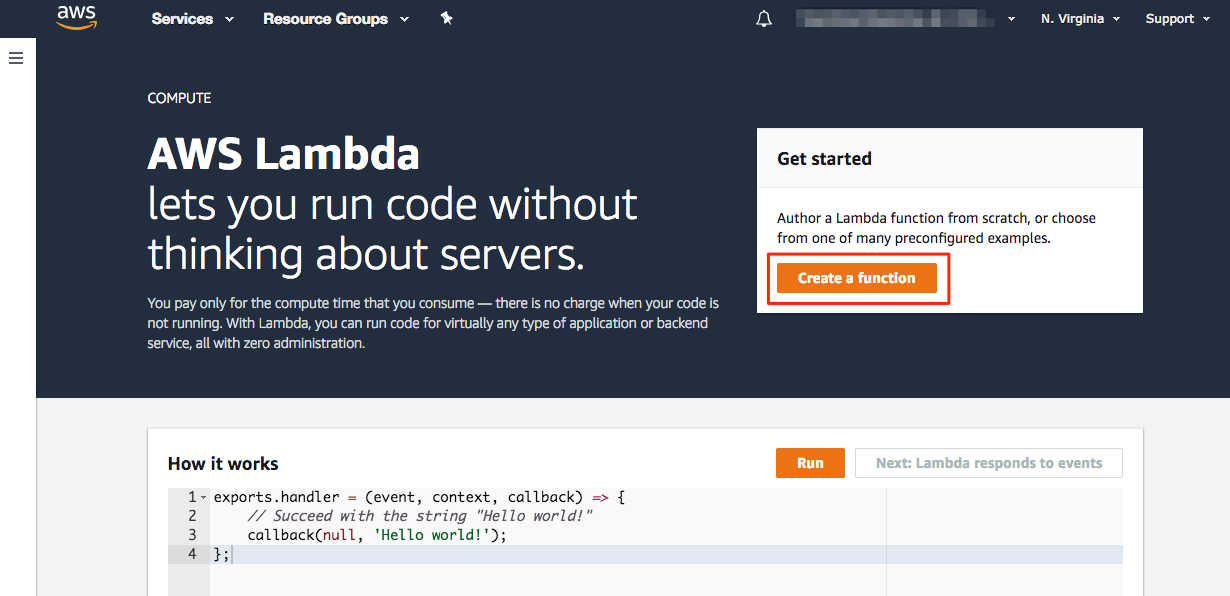
To build a Lambda function to process Segment events:
- Go to the Lambda service page in your AWS account.
- Ensure that you are in AWS Region ‘us-west-2’. You must be in us-west-2 so that Segment’s Lambdas can communicate with your resources.
-
Click Create a function to create a new function.
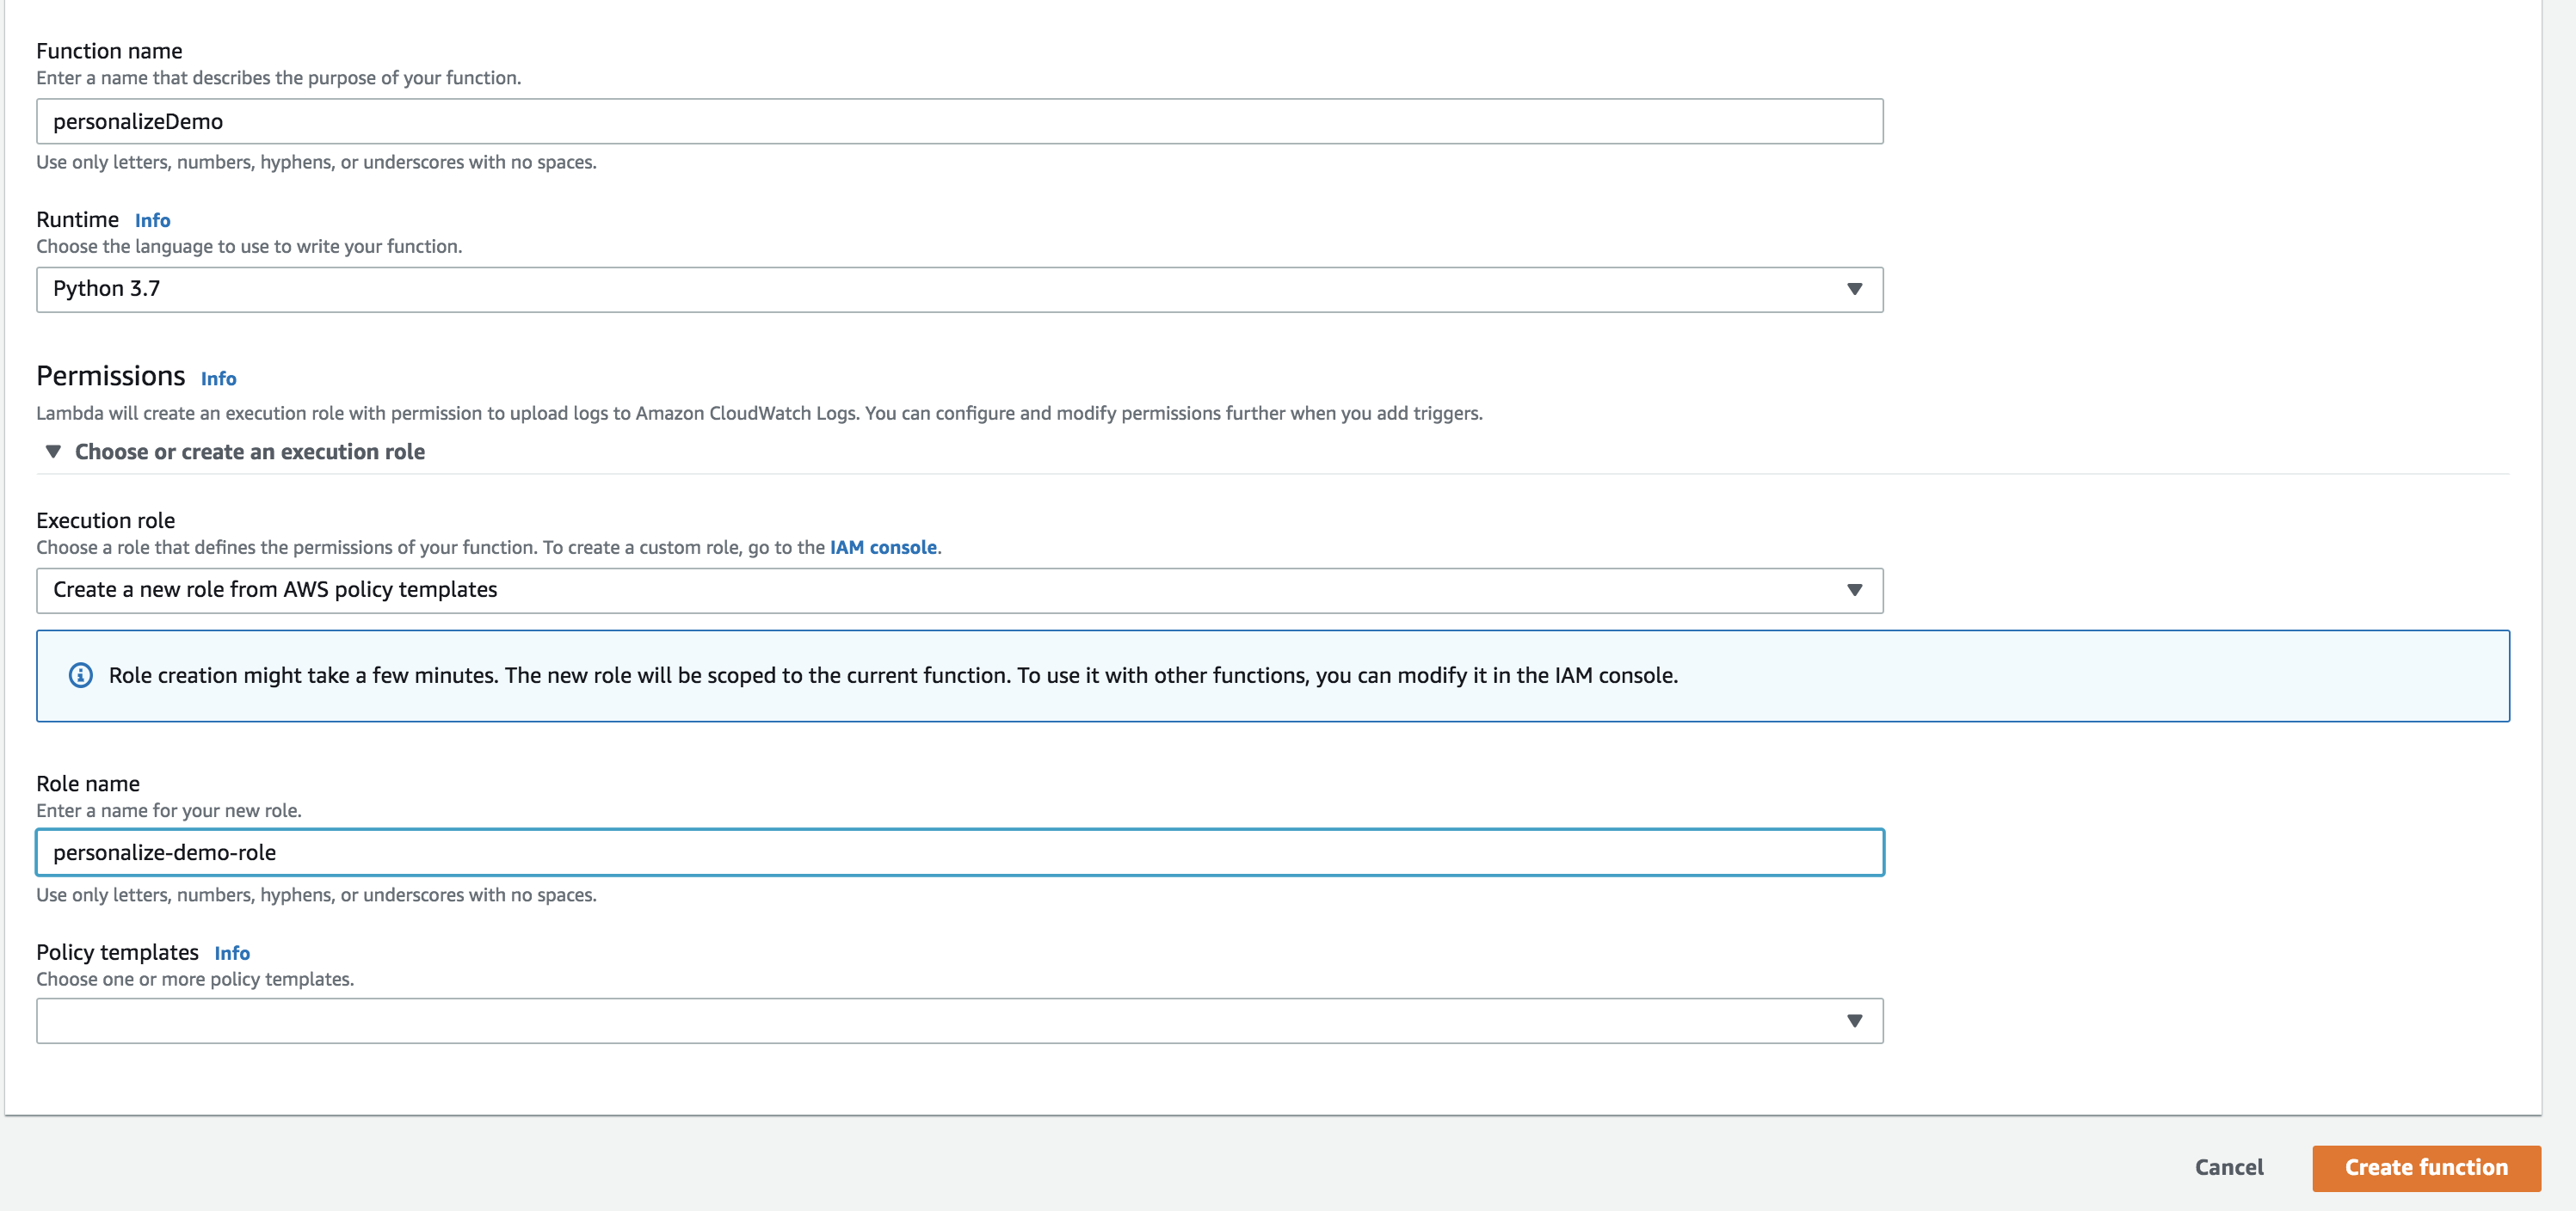
-
Select Author from scratch since Segment will be providing the source code for the function.
-
Enter a name for your function and select Python 3.7 for the runtime.
- For the Role field, select Create a new role from AWS policy templates from the dropdown.
-
Create a Role name that makes sense for you, and leave Policy templates empty. You will come back to modify this role shortly.
-
Click Create function.
Lambda Function Source Code
-
Download the
.zipfile at https://github.com/segmentio/segment-lambda-recipes/blob/master/segment-personalize/support/segment_personalize_boilerplate.zip. - Within the Lambda function screen, scroll down to the Function code panel.
- For Code entry type choose Upload a .zip file, and click Upload, then load the
.zipyou downloaded in the first step.
You should now be able to see the code (and associate folders) in the code editor.
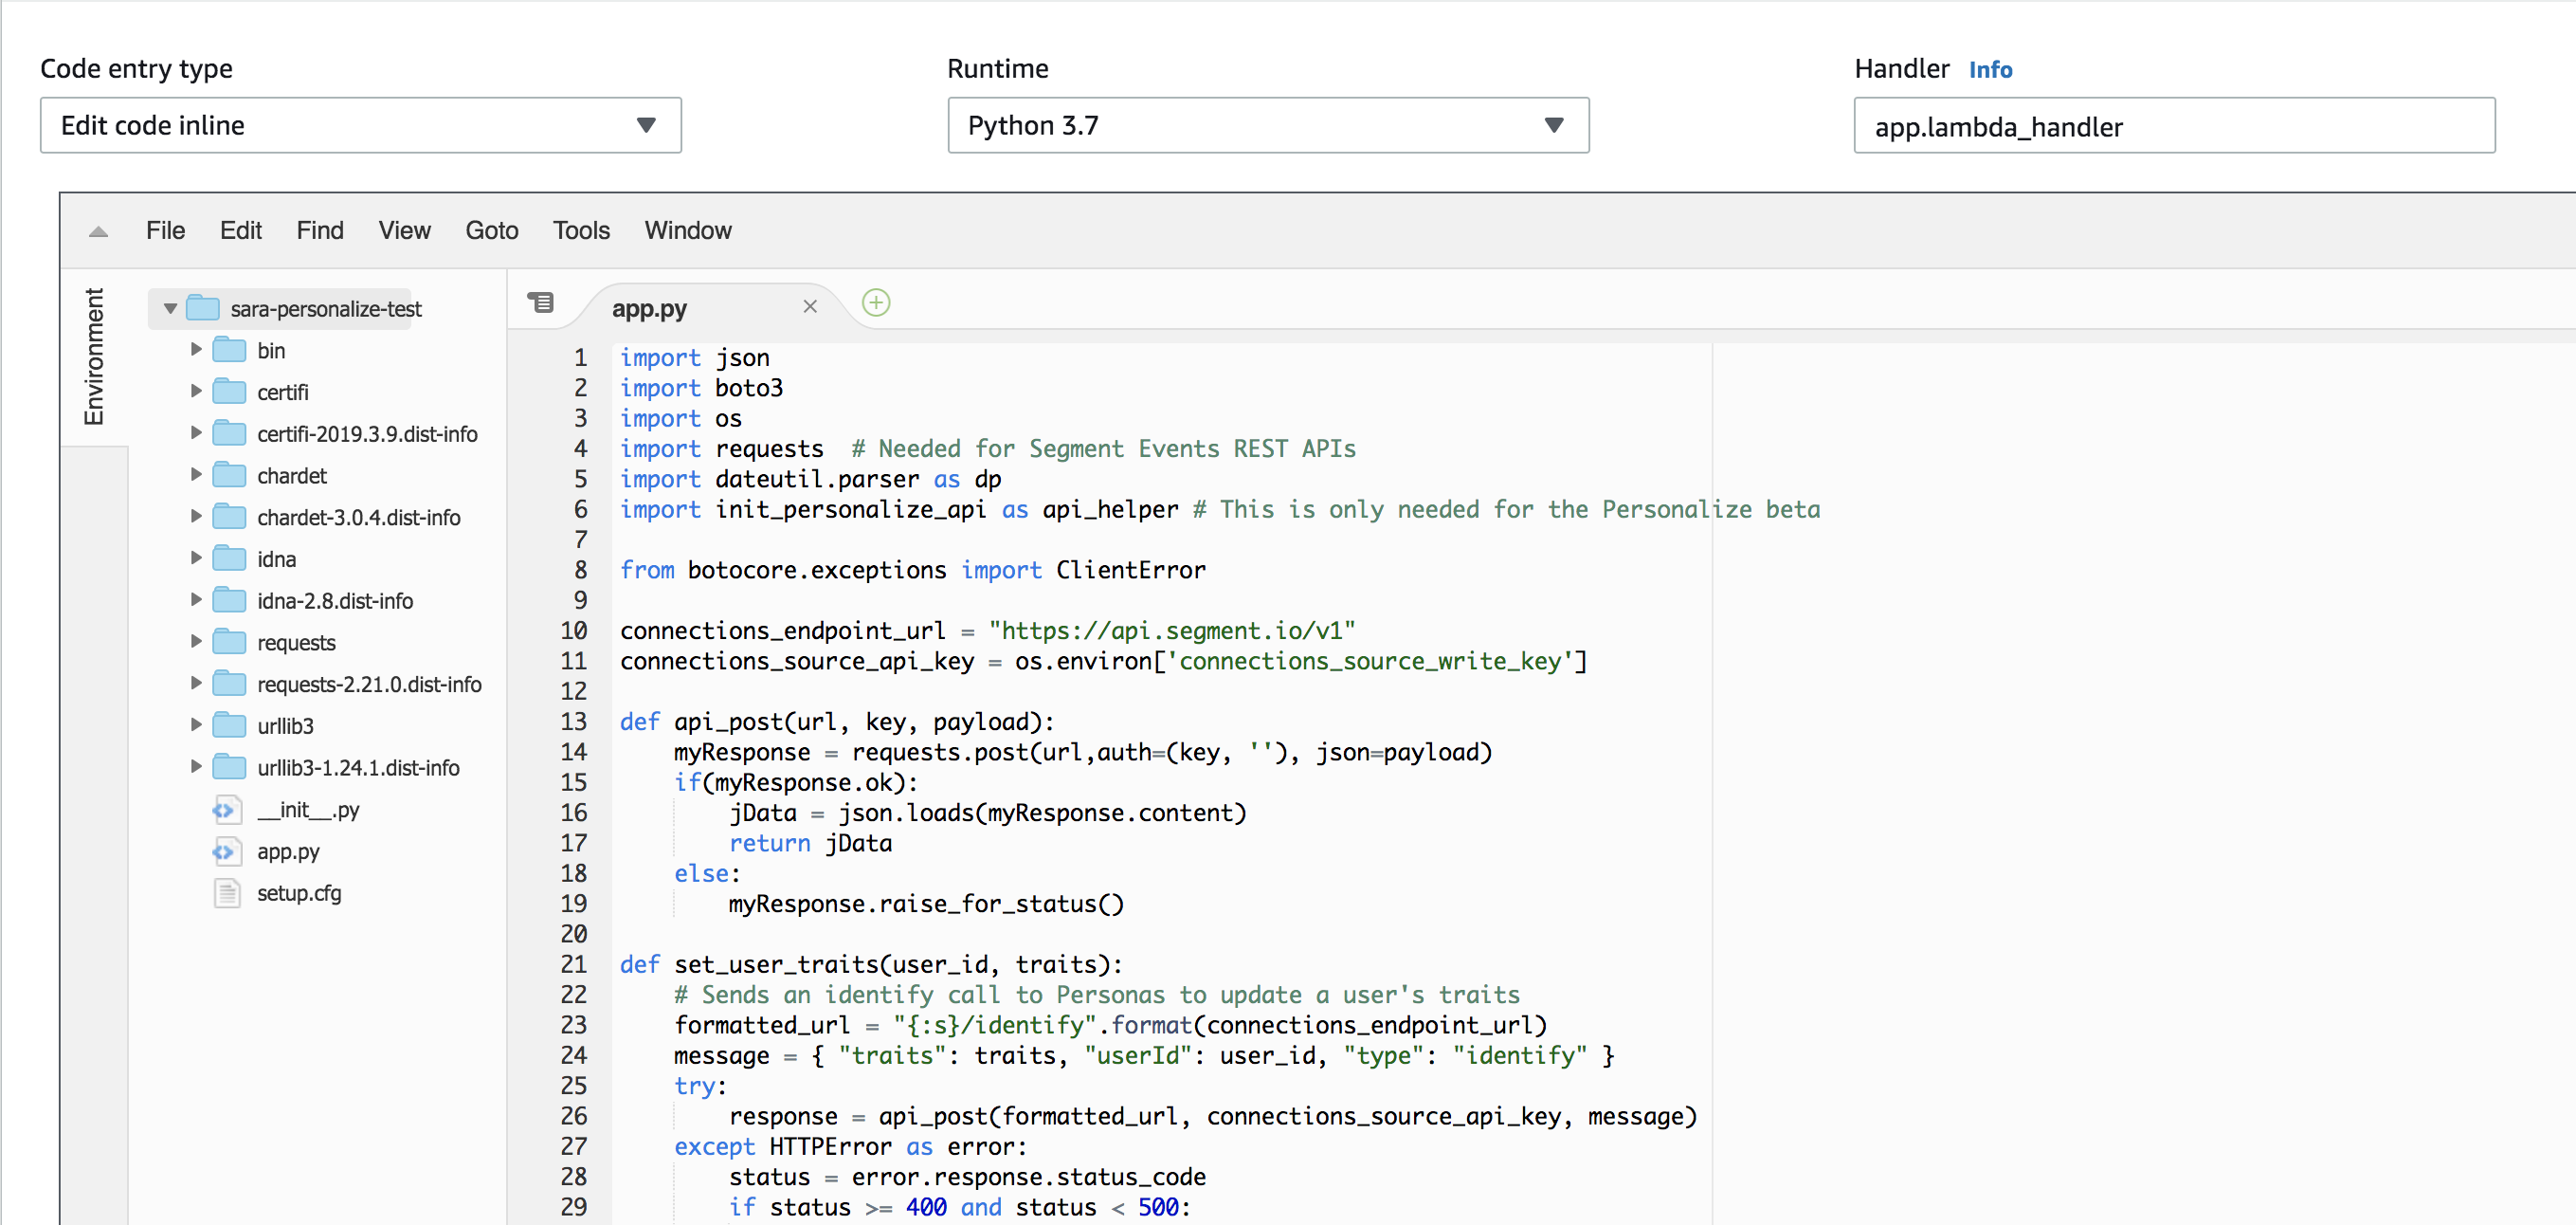
Segment will call your lambda once per event. The provided code maps Segment event fields from the Segment event it gets, and sends them to your Personalize Tracker. It then calls Personalize to get a recommendation for the userId in the event, and pushes that recommendation back as a user trait into Segment, using the identify call.
Make sure you are clicking Save frequently during the next steps!
Wire up Personalize API using Lambda Layer (Preview only)
You will notice in the function source the following import and function call.
import of import init_personalize_api as api_helper
...
api_helper.init()
This import and function call uses some boilerplate code, packaged as a Lambda Layer needed to configure the Personalize API with the AWS Python SDK. This is only necessary while Personalize is in Preview. Once Personalize is GA and the API is bundled with the Python SDK, as well as other language SDKs, this supporting Layer will no longer be needed.
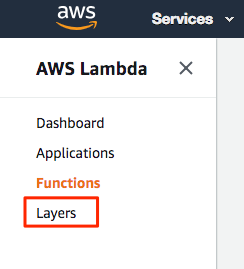
To install Segment’s Layer:
-
Open the Lambda navigation panel and click Layers.

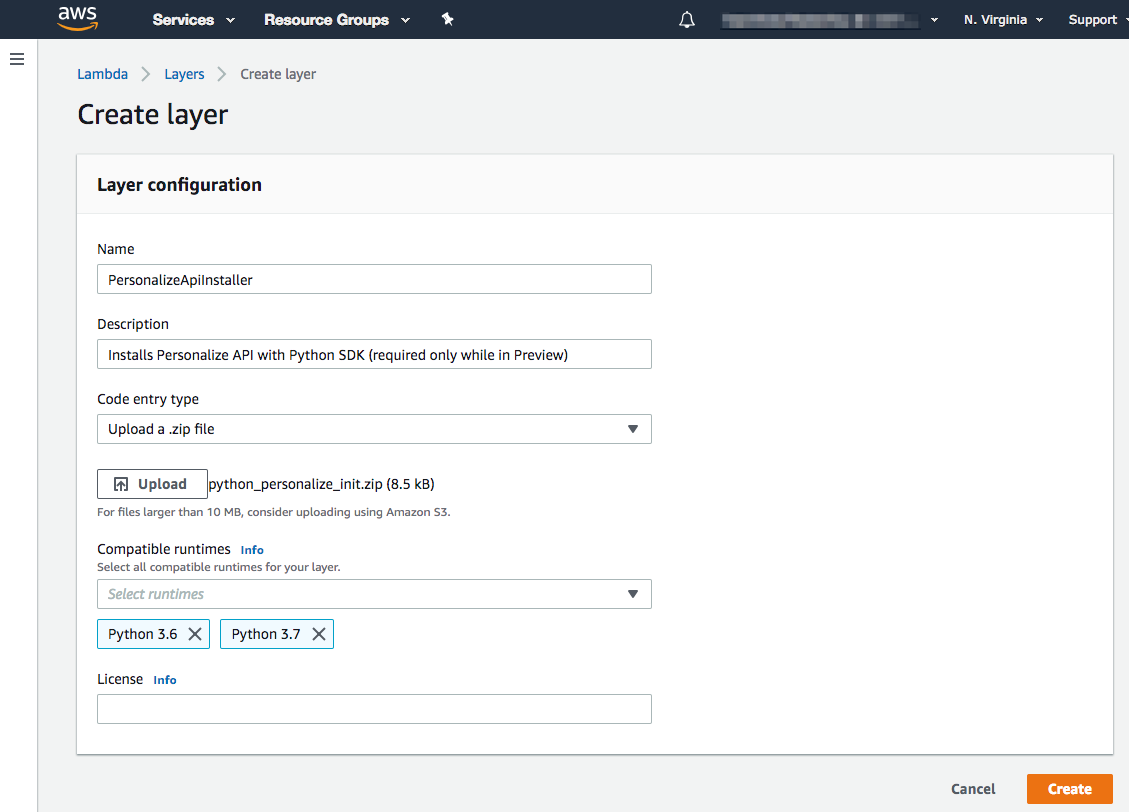
-
From the Lambda Layers view, click Create layer.

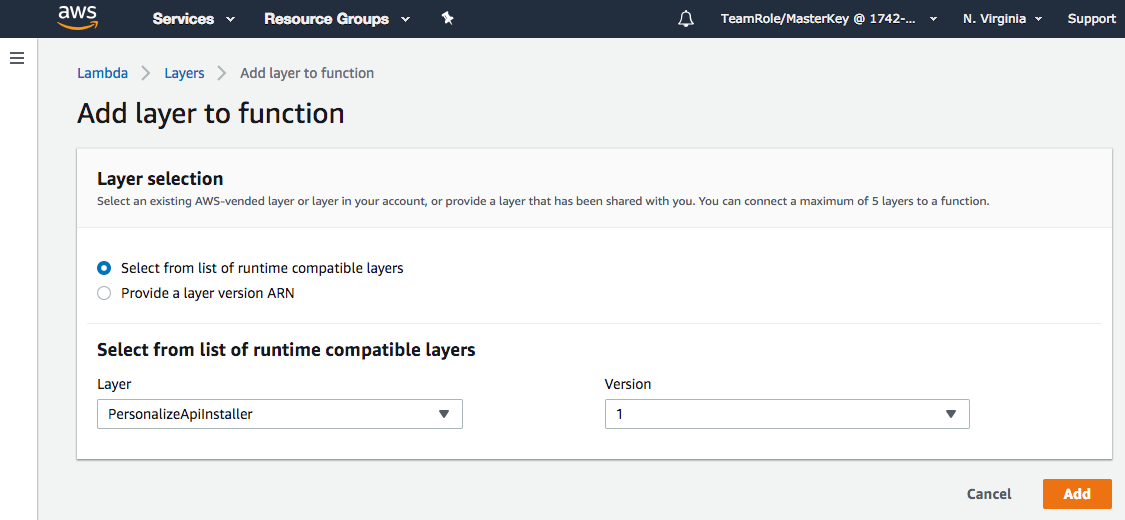
- Create the layer by specifying a name such as “PersonalizeApiInstaller”, browsing to the pre-made zip in https://github.com/segmentio/segment-lambda-recipes/blob/master/segment-personalize/support/python_personalize_init.zip, and select Python 3.7 as the compatible runtime.
-
Click Create to upload the zip file and create the layer.
- Add the layer just created to Segment’s function.
-
Return to the Lambda function by opening the Lambda navigation panel and clicking Functions.
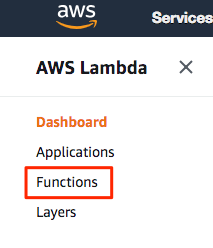
- Click on your function name to access the configuration page again.
-
In the Lambda Designer, click the Layers panel below the function name and then Add layer in the Referenced layers panel at the bottom of the page.
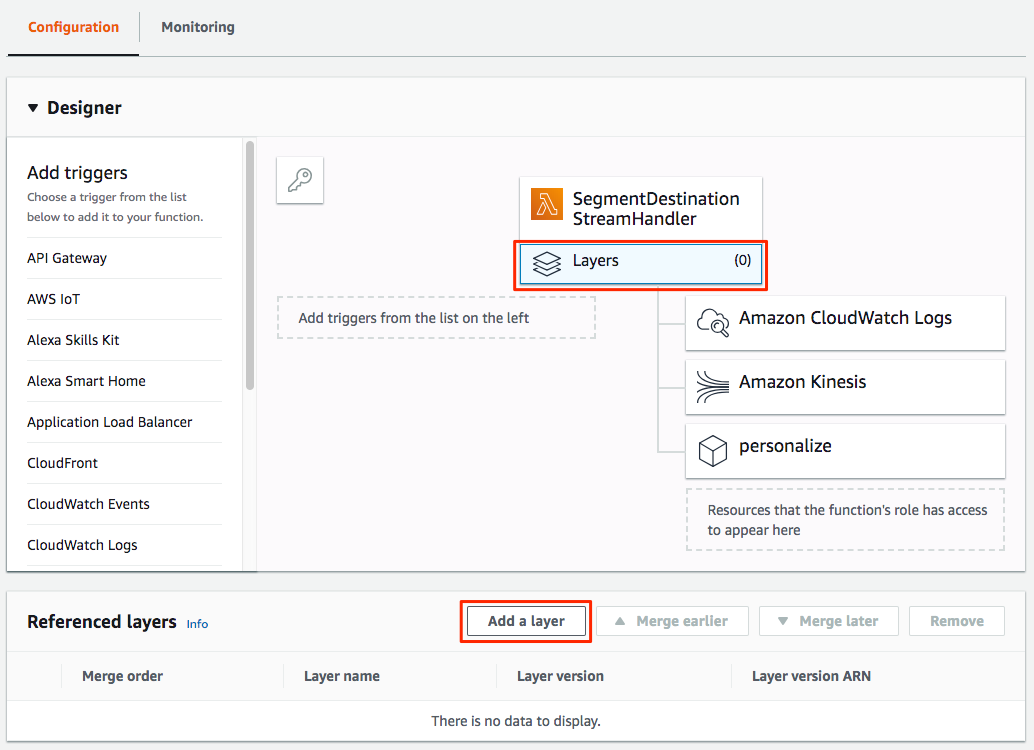
- Select the layer you just added and the latest version.
-
Click Add to add the layer to the function.
Update your IAM role for your Lambda to call Personalize
You need to modify the IAM Role & Policy originally created with this Lambda to allow it to send and receive data from Personalize. To do this:
-
From the Execution role section of your Lambda function, click the **View the
** link. 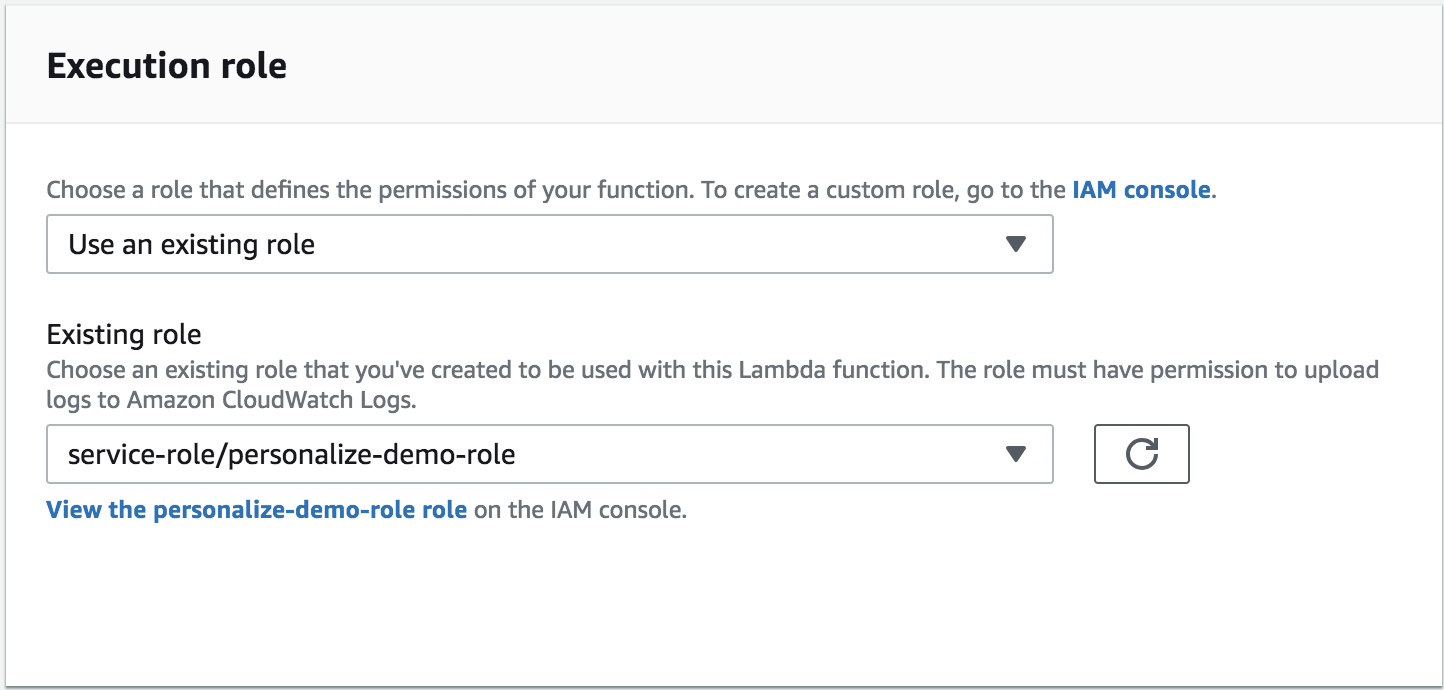
-
Click the arrow next to your policy in this role, then Edit Policy.
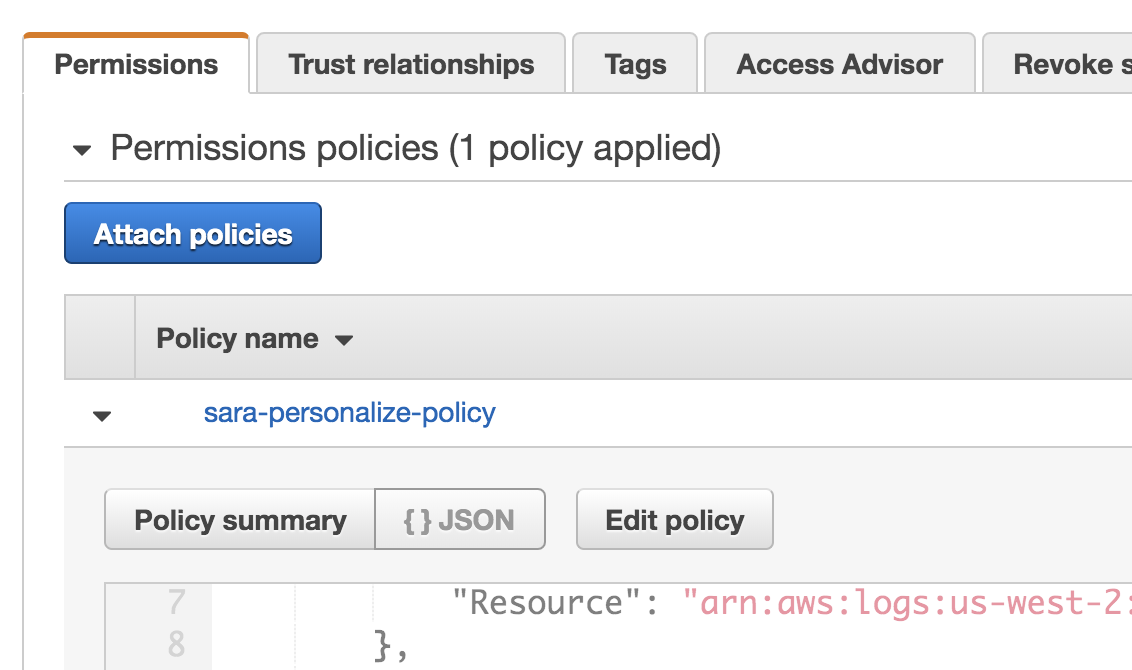
- Add the code below to the existing permissions from within the JSON editor.
- Click Review Policy and Save Changes.
{
    "Effect": "Allow",
    "Action": [
        "personalize:GetRecommendations",
        "personalize:Record",
        "personalize:PutEvents"
    ],
    "Resource": [
        "*"
    ]
}
Wire-up Personalize Event Tracker
Another dependency in the function is the ability to call the Personalize PutEvents API endpoint as shown in the following excerpt.
    personalize_events.put_events(
      trackingId = os.environ['personalize_tracking_id'],
      userId = event['userId'],
      sessionId = event['anonymousId'],
      eventList = [
          {
              "eventId": event['messageId'],
              "sentAt": int(dp.parse(event['timestamp']).strftime('%s')),
              "eventType": event['event'],
              "properties": json.dumps(properties)
          }
      ]
      )
The trackingId function argument identifies the Personalize Event Tracker which handles the events Segment submits. This value is passed to Segment’s Lambda function as an Environment variable.
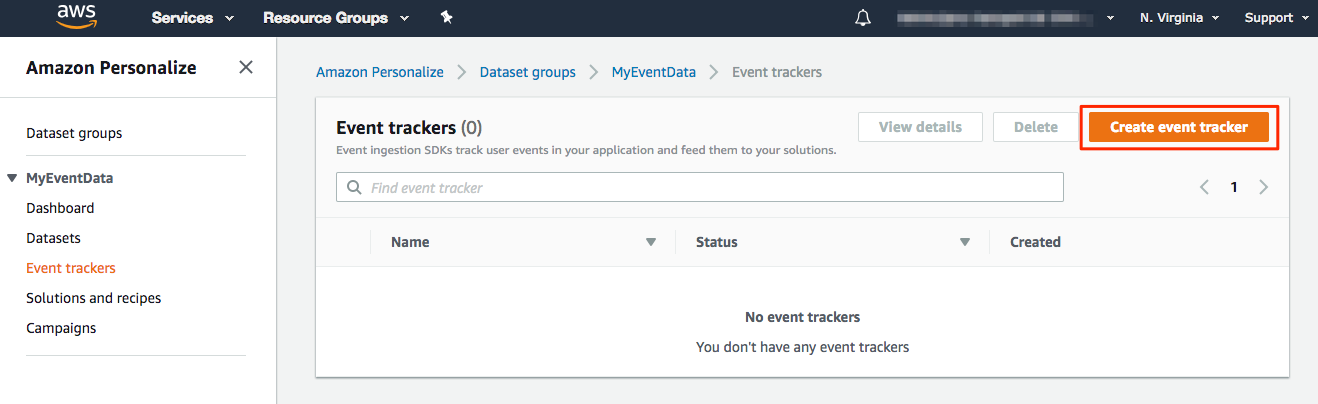
You need to create a Personalize Event Tracker for the Dataset Group you created earlier. To do this:
-
In another browser tab/window, go to the Personalize service landing page in the AWS console.
-
Click on your Dataset Group and then Event trackers in the left navigation.
-
Click Create event tracker button.
-
Enter a name for your Event Tracker.
-
You need to configure a role for Personalize to that allows it to execute the tracker. This is the same as the execution role you defined earlier for Personalize. Often this is automatically included as a policy labelled “AmazonPersonalizeFullAccess”
{ "Version": "2012-10-17", "Statement": [ { "Effect": "Allow", "Action": [ "personalize:*" ], "Resource": "*" }, { "Effect": "Allow", "Action": [ "cloudwatch:PutMetricData" ], "Resource": "*" }, { "Effect": "Allow", "Action": [ "s3:GetObject", "s3:PutObject", "s3:DeleteObject", "s3:ListBucket" ], "Resource": [ "arn:aws:s3:::*Personalize*", "arn:aws:s3:::*personalize*" ] }, { "Effect": "Allow", "Action": [ "iam:PassRole" ], "Resource": "*", "Condition": { "StringEquals": { "iam:PassedToService": "personalize.amazonaws.com" } } } ] }-
This may be automatically included as policy “AmazonPersonalize-ExecutionPolicy-
" { "Version": "2012-10-17", "Statement": [ { "Action": [ "s3:ListBucket" ], "Effect": "Allow", "Resource": [ "arn:aws:s3:::{ your s3 bucket }" ] }, { "Action": [ "s3:GetObject", "s3:PutObject" ], "Effect": "Allow", "Resource": [ "arn:aws:s3:::{ your s3 bucket }/*" ] } ] }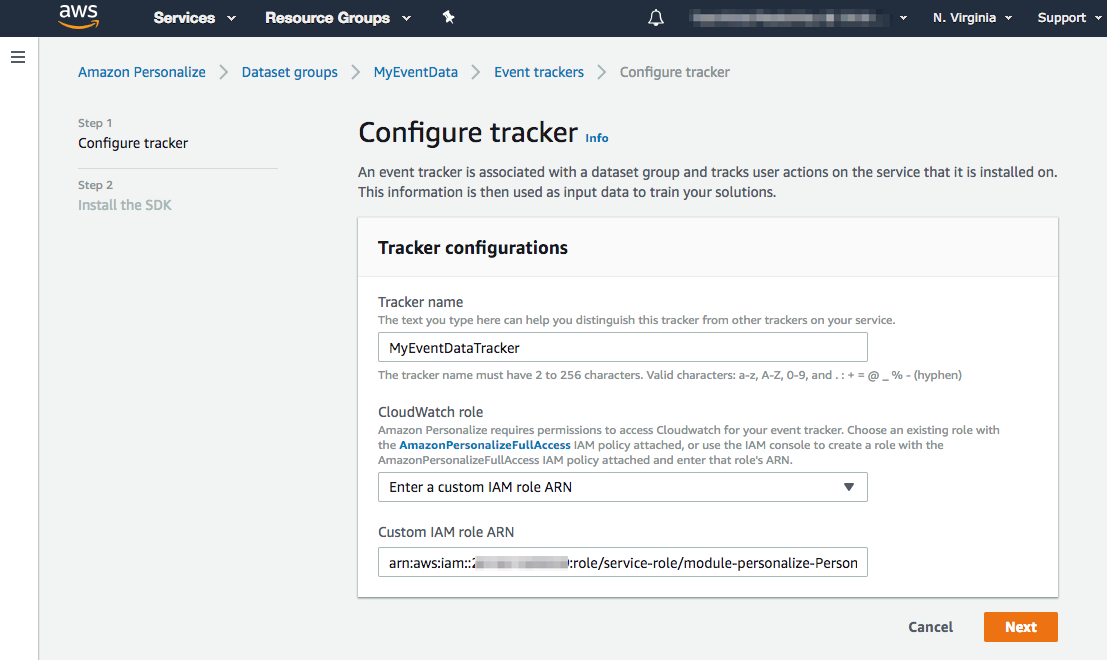
-
-
The Event Tracker’s tracking ID is displayed on the following page and is also available on the Event Tracker’s detail page. Copy this value to your clipboard.
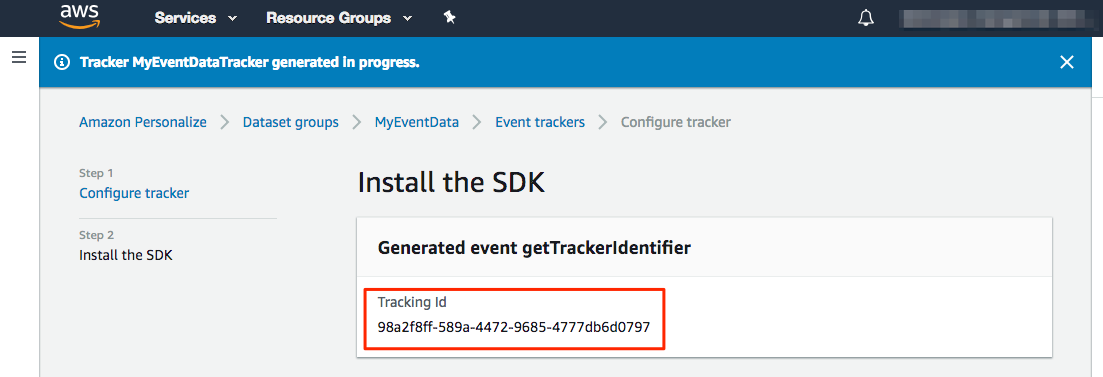
-
Returning to the Lambda function, paste the Event Tracker’s tracking ID into an Environment variable for the function with the key
personalize_tracking_id.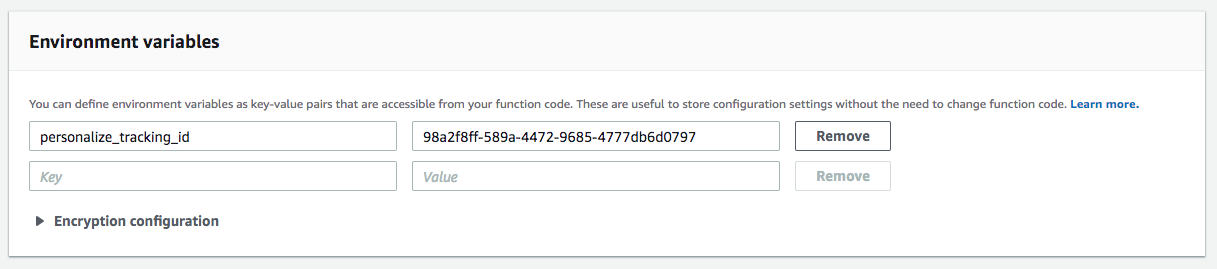
-
Add environment variables for Segment and for the function to tell it the Personalize Campaign to call for retrieving recommendations.
-
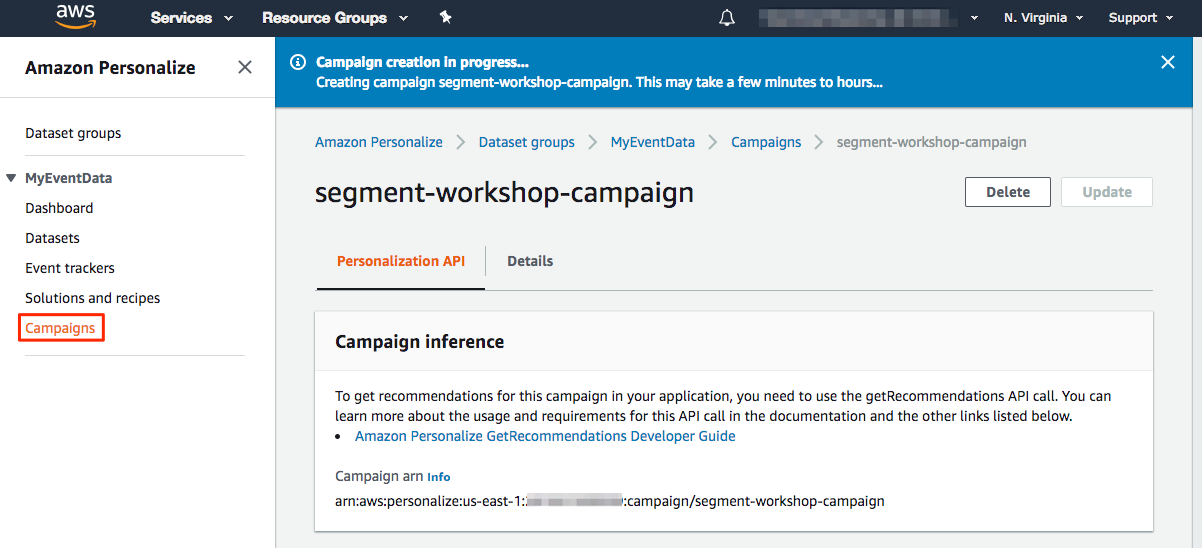
To obtain the Personalize Campaign ARN, go to the Personalize service landing page in the AWS console.
-
Select the Dataset Group you created earlier and then Campaigns in the left navigation.
-
Click on the campaign you created earlier and copy the Campaign ARN to your clipboard.
-
Return to your Lambda function and scroll down to the Environment variables panel.
- Add an environment variable with the key
personalize_campaign_arnand value of the Campaign ARN in your clipboard. -
Scroll to the top of the page and click Save to save your changes.

- You need a key for the Segment source that will get Segment’s update events. Go back to your Segment workspace tab or window, and click on the source which will receive events from your Lambda, and copy the write key from the Overview tab.
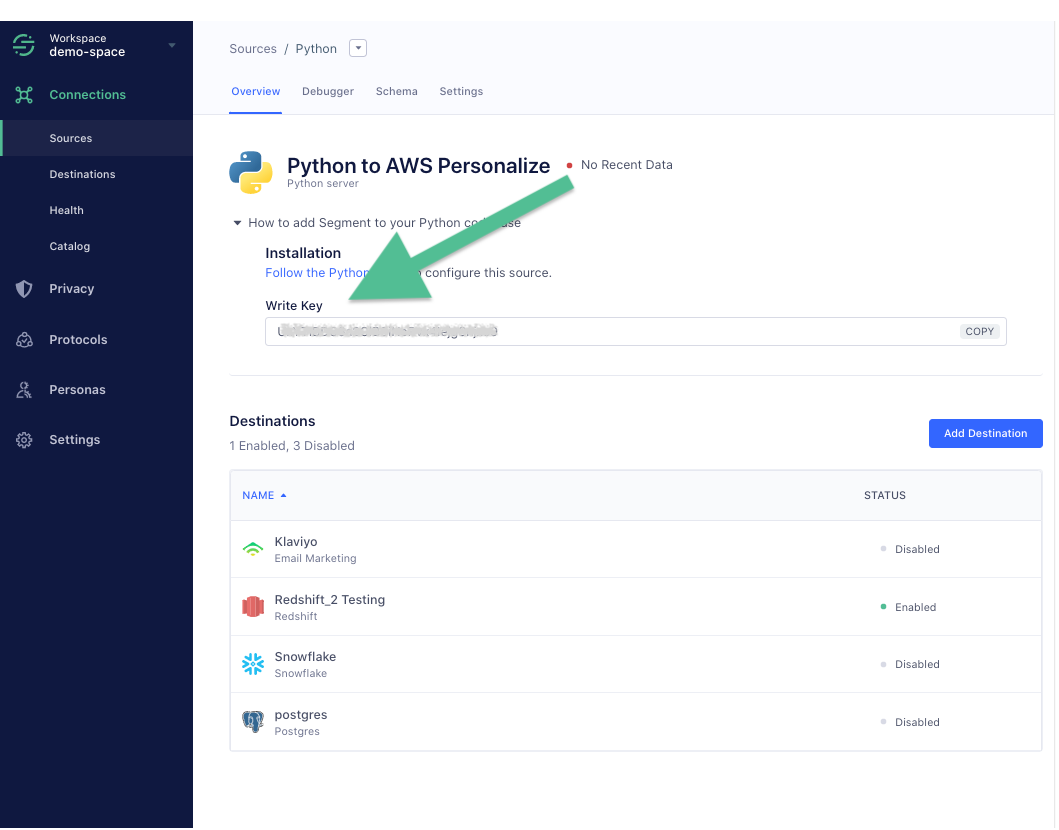
- Go back to your Lambda tab or window, and paste the key under a property called
connections_source_api_key.
Make sure to click Save here or you will need to do this again.
Your lambda is now ready to receive events from Segment. Next, you will need to enable your Segment Personalize Destination.
Configure Segment Personalize Lambda Destination
Once your Lambda function is enabled, you can send it events from Segment using the Personalize Destination.
- In the Segment source that you want to connect to your Personalize destination to, click Add Destination.
- Search and select the Personalize destination and enter details for these settings options
Segment allows you to send each call type to a different Lambda. If you leave the Lambda field blank for a given call type, Segment won’t attempt to send any of those calls.
Track
There are two settings relevant for track calls:
- Lambda for track calls - the Lambda where the Segment app should route track calls.
- Events - a list of specific events to send. You may send all track events (see setting details for instructions on how), but use caution with this option, as it may significantly increase your Lambda costs.
FAQ
What is the Log Type Setting?
This setting controls the Log Type for your Lambda function using Cloud Watch. Select option Tail if you would like to see detailed logsin Cloud Watch.
My Lambda <> Segment connection is timing out, what do I do?
Due to how Segment’s event delivery system, Centrifuge, works, your Lambda can’t take more than five seconds to run per message. If you’re consistently running into timeout issues, you should consult the AWS Lambda docs, as well as docs for your language of choice, for tips on optimizing performance.
Engage
You can send computed traits and audiences generated using Engage to this destination as a user property. To learn more about Engage, schedule a demo.
For user-property destinations, an identify call is sent to the destination for each user being added and removed. The property name is the snake_cased version of the audience name, with a true/false value to indicate membership. For example, when a user first completes an order in the last 30 days, Engage sends an Identify call with the property order_completed_last_30days: true. When the user no longer satisfies this condition (for example, it’s been more than 30 days since their last order), Engage sets that value to false.
When you first create an audience, Engage sends an Identify call for every user in that audience. Later audience syncs only send updates for users whose membership has changed since the last sync.
Real-time to batch destination sync frequency
Real-time audience syncs to Amazon Personalize may take six or more hours for the initial sync to complete. Upon completion, a sync frequency of two to three hours is expected.
Settings
Segment lets you change these destination settings from the Segment app without having to touch any code.
| Setting | Description |
|---|---|
| Client Context | map, defaults to {}. An optional map to pass to the Lambda function. See AWS Lambda documentation for more information. |
| External ID (Read-Only) | string, defaults to #SEGMENT_WORKSPACE_ID . This is an optional string Segment will use to assume the role provided to invoke the Lambda function. If this setting is not defined, we’ll use the Source ID. This value is read-only. Reach out to support if you wish to change it. For more information about external IDs while assuming AWS roles, check here. |
| Lambda (required) |
string. The name of the Lambda function to invoke. These are the supported name formats:
* Function name (my-function) or with alias (my-function:v1).
* Function ARN (arn:aws:lambda:us-west-2:123456789012:function:my-function).
* Partial ARN (123456789012:function:my-function).
You can append a version number or alias to any of the formats. |
| Log Type | select. Lambda log type. By default None.
Select Tail if you would like to see detailed logs in Cloud Watch. |
| Region | string. AWS Region where the lambda lives. If it is not defined, we’ll use us-west-2 by default. |
| Role Address (required) |
string. The address of the AWS role that will be invoking Lambda (ex: arn:aws:iam::874699288871:role/example-role). |
This page was last modified: 26 Oct 2023
Need support?
Questions? Problems? Need more info? Contact Segment Support for assistance!