Mapping Segment to Adobe Analytics
This page explains in detail how to configure your Segment Adobe Analytics Destination settings to customize how your Segment calls are formatted when they’re sent to Adobe Analytics.
Segment uses a user-action data model, which uses different types of calls to track a user’s different activities on a website or app. Adobe Analytics uses page views as the basic unit of activity, and specific data variables such as “props”, eVars, lVars, and hVars to add details that allow more granular analysis. The Adobe Analytics destination settings in the Segment App allow you to create mappings between properties in your Segment calls and Adobe’s expected format.
Tip: Mobile implementations use the ADBMobileConfig.json file to store the settings that you would otherwise enter in the Adobe Analytics destination settings in the Segment app. This file includes the Report Suite ID, Timestamp Option, Tracking Server Secure URL, Tracking Server URL, and Use Secure URL for Server-side settings. See the Segment Adobe Analytics Mobile documentation to learn more.
Implementing Success Events
You can choose to use the automatic Ecommerce Spec mapping when you start sending Success Events to Adobe, which means you don’t have to set up mappings in Segment and Adobe. If you need event support beyond the the standard Ecommerce spec, for example to support more event types or different ones, you can implement custom Track events or Page calls.
Using default Ecommerce Spec Events
The Adobe Analytics destination automatically works with Segment’s standard Ecommerce Spec. Segment automatically maps the following events to Adobe Analytics events if you are using a device-mode (“bundled”) destination for iOS, Android, Analytics.js, or if you are sending unbundled events from a Server library.
| Segment Event Name | Adobe Analytics Event Name |
| Product Viewed
Product List Viewed |
prodView |
| Product Added | scAdd |
| Product Removed | scRemove |
| Cart Viewed | scView |
| Checkout Started | scCheckout |
| Order Completed | purchase |
| Cart Opened | scOpen |
Segment sends the Ecommerce event data to Adobe just as it would send a standard Track event. These Ecommerce events are automatically mapped and sent to Adobe Analytics along with product description data. If you implement Segment events using the Ecommerce spec and naming conventions, you do NOT need to create a mapping in your Segment Adobe destination settings. You only need to map event names if you want to set them as the value of an eVar. To learn more about configuring eVars see the section below on configuring conversion variables in your destination settings.
Ecommerce properties such as orderId and products are also sent automatically. However, if you use other custom properties and want to send them to Adobe’s eVar, prop, hVar, or lVar variables, you do need to map them as properties in your Segment Adobe Analytics destination settings.
Example using Segment Ecommerce spec
Given the sample Order Completed Segment event below, you can see how the original Track event is mapped to the Adobe event in the tab to the right.
analytics.track('Order Completed', {
 orderId: '50314b8e9bcf000000000000',
 total: 30.00,
 revenue: 25.00,
 shipping: 3.00,
 tax: 2.00,
 discount: 2.50,
 coupon: 'hasbros',
 currency: 'USD',
 products: [
   {
     id: '507f1f77bcf86cd799439011',
     sku: '45790-32',
     name: 'Monopoly: 3rd Edition',
     price: 19,
     quantity: 1,
     category: 'Games'
   },
   {
     id: '505bd76785ebb509fc183733',
     sku: '46493-32',
     name: 'Go Pro',
     price: 99,
     quantity: 2,
     category: 'Electronics'
   }
 ]
});
{
   "reportSuiteId":"segmenttestreportsuite",
   "trackingServerUrl":"jimsbrims.sc.omtrdc.net",
   "trackingServerSecureUrl":"jimsbrims.sc.omtrdc.net",
   "useSecureServerUrl":false,
   "timestampOption":"disabled",
   "enableTrackPageName":true,
   "productIdentifier":"name",
   "disableVisitorId":false,
   "preferVisitorId":false,
   "sendBothTimestampVisitorId":false,
   "events":[

   ],
   "customDelimiter":{

   },
   "removeFallbackVisitorId":false,
   "useLegacyLinkName":true
}
<request>
   <scXmlVer>1.0</scXmlVer>
   <reportSuiteID>segmenttestreportsuite</reportSuiteID>
   <trackingServerUrl>jimsbrims.sc.omtrdc.net</trackingServerUrl>
   <visitorID>user-id</visitorID>
   <pageName>None</pageName>
   <pageURL>http://www.mysite.com</pageURL>
   <ipAddress>0.0.0.0</ipAddress>
   <currencyCode>USD</currencyCode>
   <contextData>
      <total>30</total>
      <transactionID>50314b8e9bcf000000000000</transactionID>
      <purchaseID>50314b8e9bcf000000000000</purchaseID>
      <revenue>25</revenue>
      <shipping>3</shipping>
      <tax>2</tax>
      <discount>2.5</discount>
      <coupon>hasbros</coupon>
      <currency>USD</currency>
      <a>
         <action>Order Completed</action>
         <HourOfDay>0</HourOfDay>
         <DayOfWeek>3</DayOfWeek>
      </a>
   </contextData>
   <linkType>o</linkType>
   <linkURL>http://www.mysite.com</linkURL>
   <linkName>Link Name - http://www.mysite.com</linkName>
   <events>purchase</events>
   <products>Games;Monopoly: 3rd Edition;1;19.00,Electronics;Go Pro;2;198.00</products>
</request>
When you use Segment’s Analytics.js Device Mode integration, Segment does the following:
-
Sets
window.s.productswith the product description string.The product description is a semi-colon delimited string per product which is additionally delimited by commas if you have multiple products. The string format per product is
[category];[name];[quantity];[total]. Total is calculated by multiplying price and quantity for each product.Note: You can choose whether to map the
name,sku, oridfor each item in theproductsarray. So you could alternatively send product descriptions with[category];[sku];[quantity];[total]. To configure this option, go to your Adobe Analytics settings in Segment, locate the Advanced Options, and select the mapping from the Product Identifier. Thenameis the default identifier.For the example above, Segment would set
window.s.productsto'Games;Monopoly: 3rd Edition;1;19,Electronics;Go Pro;2;198'.The default fallback value for
quantityis1, and forpriceit is0.Important: Don’t use this option if any items in the
productsarray have property values that include commas or semi-colons. Adobe Analytics uses these characters as delimiters. -
Updates common variables such as
channel,campaign,state,zip, andpageName. These values are set if they exist at the property level, your existing Adobe Analytics variables already attached on thewindow.sobject, orcontext.page.title(forpageName). -
Sets
window.s.eventswith the corresponding Adobe Analytics naming convention. The example above would set this as'purchase'. -
Checks if the event name is mapped as an
eVarand if so, sets it on thewindow.s. -
Checks if any other top-level properties (not the custom properties at the item level inside
productsarray) have been mapped to a custom variable in the Segment settings such aseVar,prop, andhVar. If so, set them on thewindow.s. -
Sets
window.s.purchaseIDandwindow.s.transactionIDas theorderId, which for the example above would be'50314b8e9bcf000000000000'. Note that this is only forOrder Completedevents.However, Segment checks the
properties.currencyproperty to see if you passed a currency in your event. If you did not, the defaultcurrencyCodeset on page load isUSD.Important: To collect
transactionID, make sure you enable the transactionID storage setting inside your Adobe Reporting Suite. -
Attaches the
timestampaswindow.s.timestampif your Timestamp Option (in the Adobe settings in Segment) is set to Timestamp Enabled or Timestamp Optional. -
Sets
window.s.linkTrackEventsto the Adobe Analytics event name. In the example above, this ispurchase. -
Sets
window.s.linkTrackVarswhich is a string of keys that Adobe Analytics reads from thewindow.sobject when you send the request. For the example above, the value oflinkTrackVarswould be set as'pageName,events,products,purchaseID,transactionID,timestamp'. -
Finally, sends the event using
window.s.tl(true, 'o', 'Order Completed');.
Creating Custom Track events
You can send custom Track events to Adobe to create events that are not included in the standard Ecommerce spec. Segment strongly recommends that you create a tracking plan for both your Segment and Adobe Analytics events before you send any events or properties to Adobe. Once you have your tracking plan prepared, you can use the list of events to set up a mapping in the Segment destination settings UI.
When configuring the mapping, the list of Track events must be defined in both Adobe Analytics, and the Segment destination settings UI, including the properties to send as custom data variables.
This means that you must create a mapping for each event and property to a corresponding Adobe Analytics event, prop, or eVar.
The images below show an example of how you might map an event and the corresponding custom variables in the Segment destination settings UI:


Using the sample settings in the image above, if you make the Track call example below:
analytics.track('Watched Video', {
  plan: 'free',
  videoName: 'The Uptick'
});
Here’s what happens to this event sent from the browser using Segment’s Analytics.js library or another Device Mode integration:
-
First Segment checks if the event name,
'Watched Video', is mapped in your Segment settings for Adobe Analytics. If you haven’t configured a mapping for this event name, Segment does nothing and aborts the call. If a mapping is configured, Segment setswindow.s.linkTrackEventsandwindow.s.eventsto the corresponding Adobe Analytics event name as specified in the mapping, in this example'event1'. -
Next, if the setting for Timestamp Option is either Timestamp Enabled or Timestamp Optional, Segment maps the
timestamptowindow.s.timestamp. -
If any properties were included in the event’s mapping or on the
window.sobject, Segment updates common variables such aschannel,campaign,state,zipwith the track call values. -
Next, Segment checks if the Segment event name,
Watched Videois mapped to aneVar. Because it is mapped in the example case above, Segment setswindow.s.eVar3as'Watched Video'. -
Segment checks if any other properties are mapped to either a
prop,eVar, orhVar. For the example above,window.s.prop1is set as'free'andwindow.s.eVar4is set as'The Uptick'. -
Next, Segment tries to set
window.s.pageNameto one of the following values, in order of precedence:
properties.pageName(for backward compatibility)options.pageName(if you already havewindow.s.pageNamedefined on the web page)context.page.title(which is automatically tracked by Analytics.js, and always has a value) If you don’t configure any otherpageNamemappings,window.s.pageNameis set to the value of the<title>tag in the page where the.track()call was fired.
-
Next, Segment creates a comma-delimited joined string of variable keys to send as
window.s.linkTrackVars. This tells Adobe Analytics which properties on thewindow.sobject to send with this event. In the example above, the string would be'eVar3,events,pageName,timestamp,eVar3,prop1'. -
Finally, Segment flushes the request to Adobe Analytics using
window.s.tl(true, 'o', 'Watched Video')
Note: true sets a 500ms delay to give your browser time to flush the event. It also tells Adobe that this event is something other than a href link. The 'o' stands for 'Other', as opposed to 'd' for 'Downloads' and 'e' for 'Exit Links'. The final parameter is the link name as it appears in reports inside Adobe Analytics.
Creating Page calls
By default, the Segment snippet includes an empty Page call. Page calls are more similar to the native Adobe tracking methodology, and don’t require as extensive a mapping process.
When you make a page call, here’s what Segment does from the browser when you use Segment’s Analytics.js or another Device Mode integration:
-
Sets the Adobe property
window.s.pageNameto thenameof the page call. By default, a Segment.page()call sets this property asundefinedsince no parameters are passed, but if you include anamesuch as.page('Home'), Segment setswindow.s.pageNameto'Home'.Note: If you don’t pass a
name, Adobe Analytics uses theurlas the page name by default. -
Sets the Adobe property
window.s.eventsto thenamefrom your.page(<name>)call. -
Checks if the page call is associated with a
userIdfrom a previous.identify()call. If so, Segment sets theuserIdaswindow.s.visitorID.
IMPORTANT: Adobe Analytics doesn’t support setting visitorID if you send a timestamped call. So Segment first checks if your Timestamp Option is disabled and that a userId exists on the event, and only then sets window.s.visitorID.
-
Checks for some common properties, and sets them on the
window.sobject:channelcampaignstatezip
Segment first uses the
propertiesyou sent using the.page()call. An example page call in order to set the four properties above would be:analytics.page({ channel: 'Laptops', campaign: '0813', state: 'RI', zip: '02818' });For
campaign, Segment uses the Segment spec and checkscontext.campaign.namefirst before checkingproperties.campaign.If you already set any of these properties on your existing Adobe Analytics instance on the page (
window.s.channel,window.s.campaign, etc.), Segment uses those as the default value. This way you can easily set a default values for all your web pages, but can still programmatically change them for each page if needed. -
If your Timestamp Option is either Timestamp Enabled or Timestamp Optional, Segment attaches the
timestamptowindow.s.timestamp. Make sure this setting matches your actual timestamp setting inside Adobe Analytics for the same Report Suite ID. -
Checks if any of the page call’s properties are mapped to any custom Adobe Analytics variables such as
eVar,props, andhVar.Given the mapping settings below:


If you make the following page call:
analytics.page({
  browser: 'chrome',
  searchTerm: 'swim shorts',
  section: 'swimwear'
});
Segment sets the following properties on the
window.sobject:window.s.prop1 = 'chrome'window.s.eVar7 = 'swim shorts'window.s.eVar3is set to theurlof the page where the call was made (.page()automatically sets aurlproperty)window.s.hier1 = 'swimwear'
-
Finally, Segment flushes the page view request to Adobe Analytics using
window.s.t().
Conversion Variables - eVars
Custom Conversion variables, also known as eVars, are how Adobe segments conversion success metrics in custom marketing reports. To learn more, see the Adobe documentation about eVars and how to configure them.
You must configure an eVar mapping in your Segment destination settings to send eVars to Adobe on Track and Page calls. When configuring the mapping, the list of eVars must be defined in the Adobe Analytics UI. Map your Adobe Analytics eVar names to the Segment property names you’re using in your Segment events. Enter a Segment property name on the left and an Adobe Analytics eVar number on the right. You can view your Segment events and properties in your Schema.
An example eVar mapping in the Segment Destination settings UI should look like this:
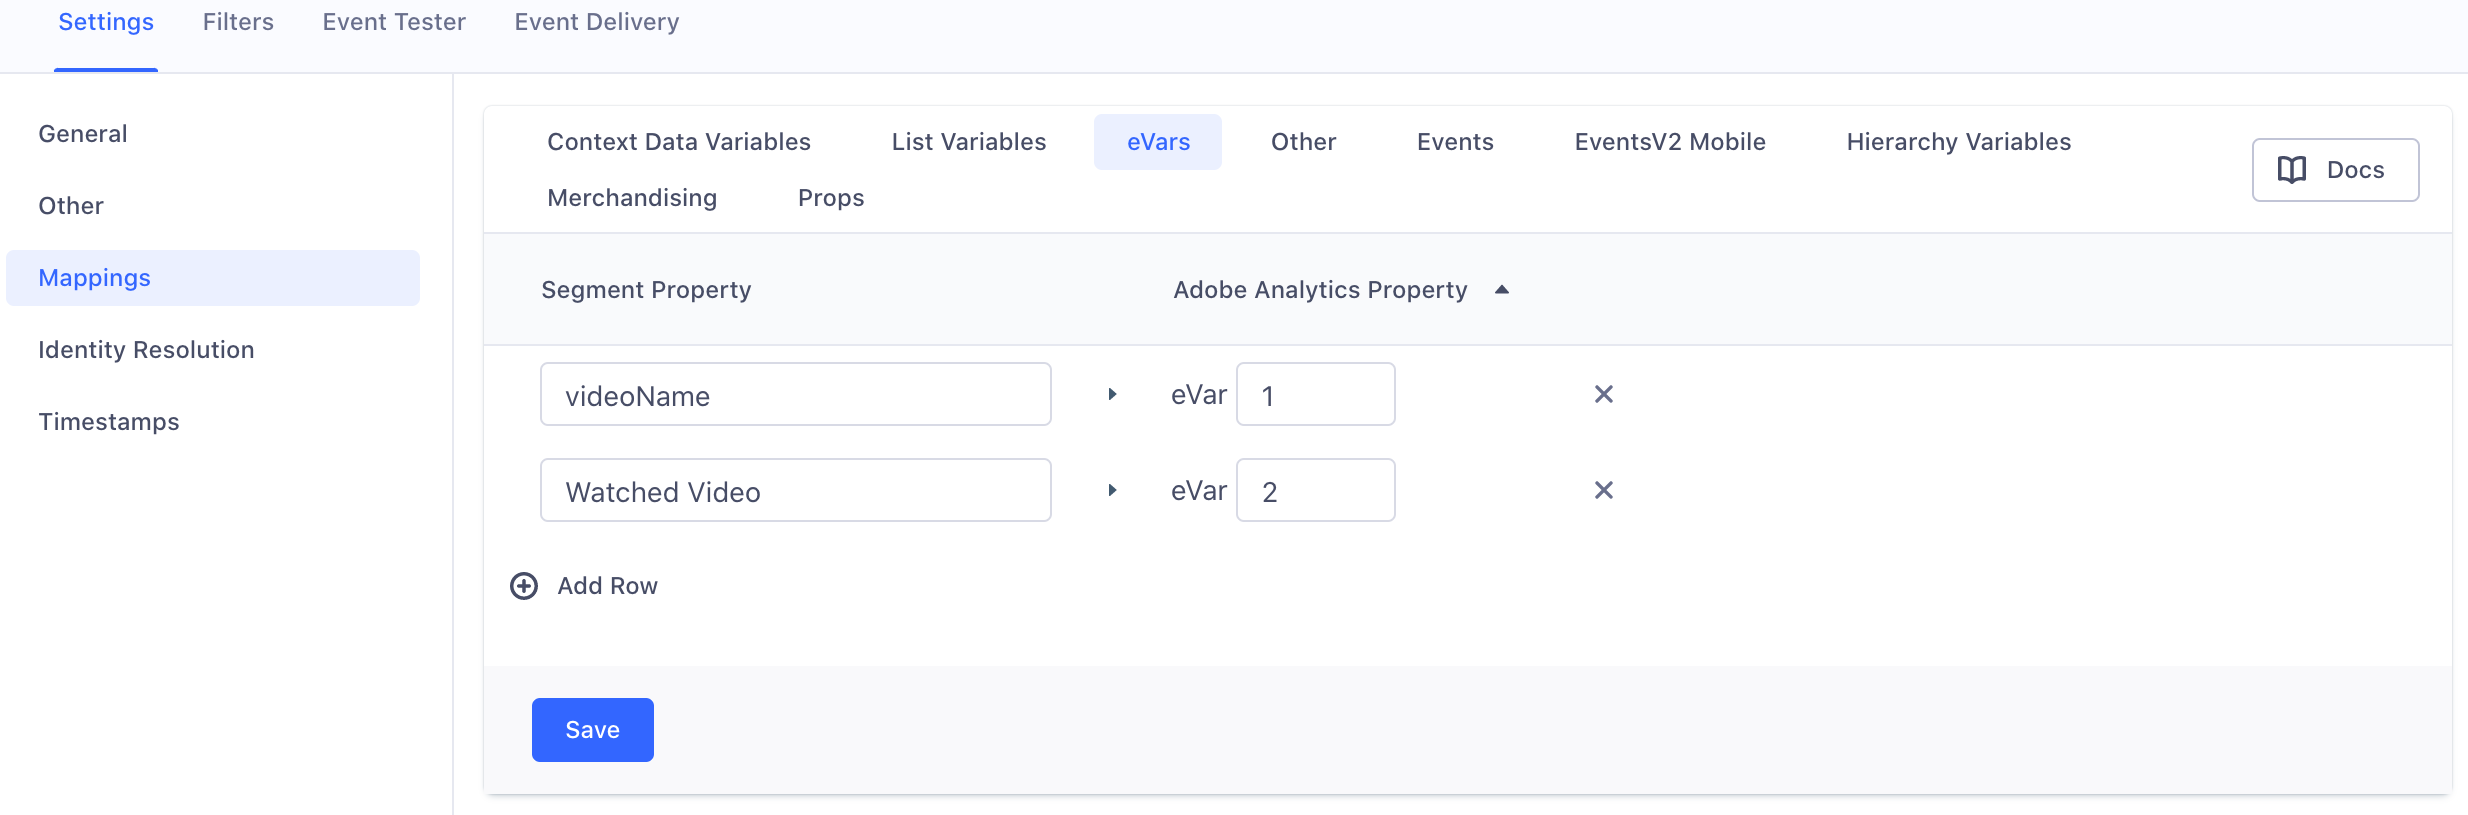
You can only map properties to Adobe eVar properties. For example, you could map the following properties to Adobe: path, referrer, search, signup_mode, title and url.
Merchandising events
The Merchandising Events setting allows you to set eVars and events on a per-product basis within the “products” string, and supports increment and currency events. This provides robust product string support, which you can read more about in the Adobe Analytics Compontents guide.
Per the Adobe documentation, Segment formats the s.products as [category][item][quantity][total][incrementor][merchString]. Segment automatically assigns the product category, quantity, and total. The [item] defaults to the Product Name. If you want to use the SKU or ID instead, you can change this by using the Product Identifier setting.
The success event incrementor and merchandising string are determined by your Segment Adobe destination settings. These rely on the “Segment Event”, “Adobe Analytics Event”, and “Segment Property”. You do not need to select an incrementor for product-scoped merchandising events. You can use the merchandising string to send Segment property values to Adobe as eVars. Each eVar is separated from the next eVar by a |.
The Segment Adobe Analytics Merchandising setting runs as follows:
- Looks for the Segment event name if a
trackcall, or for theproperty.eventNameif apagecall. - Maps to the Adobe event to send in as an increment or currency event.
- Reads if the event is scoped to the product or event level.
- Optional: Sets a value on the event. This value is the increment or currency to pass to Adobe.
If you don’t include a value, Segment sends the event without one, and Adobe understands this as an increment of
1. If you configure a value and the value is not present on thetrackorpagecall, Segment does not send the event to Adobe. - Map of product eVars to set on the products string. This is only supported at the product level, as expected by Adobe Analytics.
Note: Some events in the Ecommerce spec do not use the “products” array and product information is located in the top level property object, for example the Product Added Spec. Make sure you specify properties.key as the Segment key in the mapping when adding an eVar for Product Added, Product Removed, and Product Viewed.
Let’s take the following example:

The configuration in the example image above configures an Order Completed Segment event which sends Adobe Analytics:
event1ins.eventswith the value passed fromproperties.increment.event2ons.productswith the value passed fromproperties.products.price.- the value for
properties.products.priceStatusineVar1ons.products. - the value for
properties.products.couponineVar2ons.products.
Considerations:
- Segment also passes in
event2without a value ons.events, as this is a requirement for Adobe. - Segment still maps to Adobe’s predefined
scAddevent. See the default Ecommerce Spec events. - Segment uses dot notation for product values, for example
products.priceStatusparses through properties for this value. This includes the product string, so if you want a value nested in products, you would configureproducts.priceStatus.
Once you have the above example mapping configured, you send the relevant event to Segment.
For example, in a Node.js environment Segment sends:
  analytics.track('Order Completed', {
  orderId: '50314b8e9bcf000000000000',
  total: 30.00,
  revenue: 25.00,
  shipping: 3.00,
  tax: 2.00,
  discount: 2.50,
  coupon: 'hasbros',
  currency: 'USD',
  increment: 1,
  products: [
    {
      id: '507f1f77bcf86cd799439011',
      sku: '45790-32',
      name: 'Monopoly: 3rd Edition',
      price: 34.99,
      quantity: 1,
      category: 'Games',
      priceStatus: 'promo',
      coupon: 'MAYDEALS'
    }
  ]
  });
The s.events call passes in purchase and event1=1, and s.products passes in event2=34.99 and evar1=promo|evar2=MAYDEALS.
The resulting request payload to Adobe looks like:
<events>purchase,event1=1,event2</events>
<products>Games;Monopoly: 3rd Edition;1;34.99;event2=34.99;eVar1=promo|eVar2=MAYDEALS</products>
Product Identifier Setting
Adobe Analytics only accepts a single product identifier. Use this option in the settings to choose whether Segment sends the product name, ID, or SKU.
Page Example
You can send Merchandising events on Page calls. To send <events> on page, you must use the integrations object to pass an events string for Adobe Analytics. Segment merges the configured event within the setting with the array passed in. The example below passes in scAdd, as this is not automatically mapped on page.
analytics.page({
    userId: '098094356890',
    event: 'Product Added',
    properties: {
      cart_id: '124efsdovnt4edvsldfpf',
      product_id: '342039402fsl12njfs',
      sku: 'G-32',
      priceStatus:'promo',
      increment: i,
      category: 'Games',
      name: 'The Settlers of Catan',
      brand: 'Kosmos',
      variant: 'Cities and Knights',
      price: 34.99,
      quantity: 1,
      coupon: 'MAYDEALS',
      position: 2,
      url: 'https://www.example.com/product/path',
      image_url: 'https://www.example.com/product/path.jpg'
    },
    integrations: {
      "Adobe Analytics": {
        "events": ["scAdd"]
      }
    },
  });
Custom Traffic Variables - props
Custom Traffic Variables, also known as props, allow you to correlate custom data with specific traffic-related events in Adobe. To learn more about props and how to configure them in the Adobe UI, see the documentation here. You can map your Segment properties in your destination settings to any of your Adobe props.
You can either send the property value as a string (ie. 'brady') or as an array (['brady', 'edelman', 'blount']). If you choose to send them as an array, Segment defaults to join it so that it is a pipe (|) delimited string before sending to Adobe (ie. 'brady|edelman|blount'). See the documentation on setting a custom delimiter to learn more.

List Variables - lVars
List variables are similar to eVars except you can send multiple values for the same event. You can map your Segment properties in your settings to any of your list variables. To learn more about list variables and how to configure them in the Adobe UI, see the list vars documentation.
To represent the multiple values in a list, you can either send the property value as a comma delimited string (ie. 'brady,edelman,blount') or as an array (['brady', 'edelman', 'blount']). If you choose to send them as an array, Segment joins it as a comma delimited string by default before sending it to Adobe. To set up a custom delimiter, see the documentation section below on custom delimiters.
Custom Delimiter
For list variables and props you can either send the property value as a comma delimited string ('brady,edelman,blount') or as an array (['brady', 'edelman', 'blount']). You can configure a custom delimiter to join the array before sending to Adobe by entering one in the List Variables or Props setting in the Segment app. If you do not set a custom delimiter, Segment defaults to joining properties in an array as a comma delimited string.
Note: You must configure the custom delimiter in both the Adobe Analytics dashboard, and in the Segment Adobe Analytics destination settings, for each list variable and prop. Do this in the Adobe Analytics dashboard before setting up this mapping in the Segment destination settings.
The example below shows how to configure the Segment custom delimiter mapping for a List Variable.

When you send an event:
analytics.track({
   userId: 'user12345',
   event: 'Event1',
   properties: {
    list_var1: ['hello', 'world']
   }
});
Segment concatenates list_var1 into hello|world before sending it to Adobe. The XML request to Adobe includes <list1>hello|world<list1>.
Hierarchy Variables - hVars
Hierarchy variables mirror how customers can track “breadcrumbs” or “breadcrumb trails” which are a type of secondary navigation scheme that reveals the user’s location in a website or Web application. See the Adobe documentation to learn more about hier variables and how to configure them.
Map your Adobe Analytics hVars to the property names you use in your Segment Page calls. Enter a Segment property name on the left, and an Adobe Analytics hVar number on the right. You can view your Segment page calls and properties in your Schema.

Context Data Variables
Context data variables let you define custom variables on each page that processing rules can read. See the Adobe documentation to learn more about how to use Adobe Analytics contextData and use processing rules to populate analytics variables from that data.
Segment automatically sends event properties as context data on the following:
- ecommerce events that adhere to the Ecommerce Spec
- Page calls
- Track calls
- Screen calls if you are using a device-mode (“bundled”) destination for Analytics.js, or if you are sending unbundled events from a Server library.
If you want to send additional context data from the context data object in the Segment payload, configure the Context Data Variables mapping in the destination’s settings to tell Segment which context variables to send to Adobe as context data.
The context data value cannot be an object or an array as this is not an Adobe accepted data type by Adobe Analytics.
For more information on how to set up Context Data for iOS and Android see the Sending Custom Properties section in Setting up Adobe Analytics for Mobile. For more information on how to set up Context Data for Heartbeat Events see the Custom Video Metadata section in Setting up Adobe Analytics Heartbeat guide.
Segment Destination Specific Options
The Adobe Analytics destination offers several different ways to configure behavior using destination specific options. These are options that are defined in the integrations section of your event payloads rather than in the Segment app. To use these options, you must define them as values of an object in the following property of your Segment event payloads:
integrations: {
  'Adobe Analytics': {
    // insert options here...
  }
}
Here’s an example of a track call using this:
 analytics.track({
    userId: '019mr8mf4r',
    event: 'Gotta catch em all',
    properties: {
     caught: 1738
    },
    integrations: {
      'Adobe Analytics': {
        // Insert custom options here...
      }
    }
 });
The sections below explain each of these options and what they do.
Events
This option allows you to associate specific Adobe events with individual Segment events.
 analytics.track({
    userId: '019mr8mf4r',
    event: 'Gotta catch em all',
    properties: {
     caught: 1738
    },
    integrations: {
      'Adobe Analytics': {
        events: ['scAdd', 'event2']
      }
    }
 });
IMS Region
This option allows you to associate events with IMS Regions.
Note: If you specify this you must also define a Marketing Cloud Visitor Id.
 analytics.track({
    userId: '019mr8mf4r',
    event: 'Gotta catch em all',
    properties: {
     caught: 1738
    },
    integrations: {
      'Adobe Analytics': {
        imsregion: 'aamlh'
      }
    }
 });
Marketing Cloud Visitor ID
This option allows you to associate a specific Marketing Cloud Visitor ID (mcvid) with the event.
 analytics.track({
    userId: '019mr8mf4r',
    event: 'Gotta catch em all',
    properties: {
     caught: 1738
    },
    integrations: {
      'Adobe Analytics': {
        marketingCloudVisitorId: 'user1234'
      }
    }
 });
Visitor ID
This option allows you to associate a standard Visitor ID with the event.
 analytics.track({
    userId: '019mr8mf4r',
    event: 'Gotta catch em all',
    properties: {
     caught: 1738
    },
    integrations: {
      'Adobe Analytics': {
        visitorId: 'user1234'
      }
    }
 });
Link Names, Link URLs, Link Types
This option is only available when you use a cloud mode (also called server-side) connection mode. This option allows you to customize link report parameters for link names, link URLs, and link types. The default linkType in Segment is o which is a custom link. For linkType you can also choose to pass d or e for download and exit links. For more detailed information on sending LinkNames, Link Names, Link URLs, and Link Types using the integrations object see the the “Best Practices for Adobe Analytics” section.
 analytics.track({
    userId: '019mr8mf4r',
    event: 'Gotta catch em all',
    properties: {
     caught: 1738
    },
    integrations: {
      'Adobe Analytics': {
        linkUrl: 'http://customLinkNameUrl.com',
        linkType: 'e',
        linkName: 'Custom Exit Link'
      }
    }
 });
Download mappings with the Segment Public API
Download your Adobe Destination mappings by sending a GET request to Segment’s Public API endpoint for Get Destination. The response from the Public API includes the field names for both the Segment fields and Adobe fields.
The endpoint: https://api.segmentapis.com/destinations/{destinationId}/
This page was last modified: 23 Oct 2023
Need support?
Questions? Problems? Need more info? Contact Segment Support for assistance!