Linked Audiences
Engage Foundations requires a Business tier account and includes Unify.
See the available plans, or contact Support.
Linked Audiences empowers marketers to effortlessly create targeted audiences by combining behavioral data from the Segment Profile and warehouse entity data within a self-serve, no-code interface.
This tool accelerates audience creation, enabling precise targeting, enhanced customer personalization, and optimized marketing spend without the need for constant data team support.
With Linked Audiences, you can:
- Preserve rich relationships between all the data in your warehouse by creating connections with any entity data back to your audience profile.
- Build advanced audience segments that include the rich context needed for personalization downstream.
- Use a low code builder, enabling marketers to activate warehouse data without having to wait for data pull requests before launching campaigns to targeted audiences.
To learn more about specific use cases you can set up with Linked Audiences, see Linked Audiences Use Cases.
See how you can use Linked Audiences with Braze and Iterable to better understand how you can utilize Linked Audiences for your destinations.
Prerequisites
Before you begin setting up your Linked Audience, ensure you have:
- Set up Profiles Sync.
- Set up your warehouse permissions using either BigQuery, Databricks, Redshift, or Snowflake.
- Ensure someone has set up your data graph.
- Workspace Owner or Unify Read-only, Engage User, Entities Read-only, and Source Admin roles in Segment.
Overview
Setting up Linked Audiences
To set up your Linked Audience, complete the following steps:
- Step 1: Build a Linked Audience
- Step 2: Activate your Linked Audiences
- Step 3: Send a test event to your destination
- Step 4: Enable your Linked Audience
- Step 5: Monitor your Activation
Step 1: Build a Linked Audience
Linked Audiences allows you to filter based on properties like profile traits, relational data mapped to the Data Graph, events, and existing audiences.
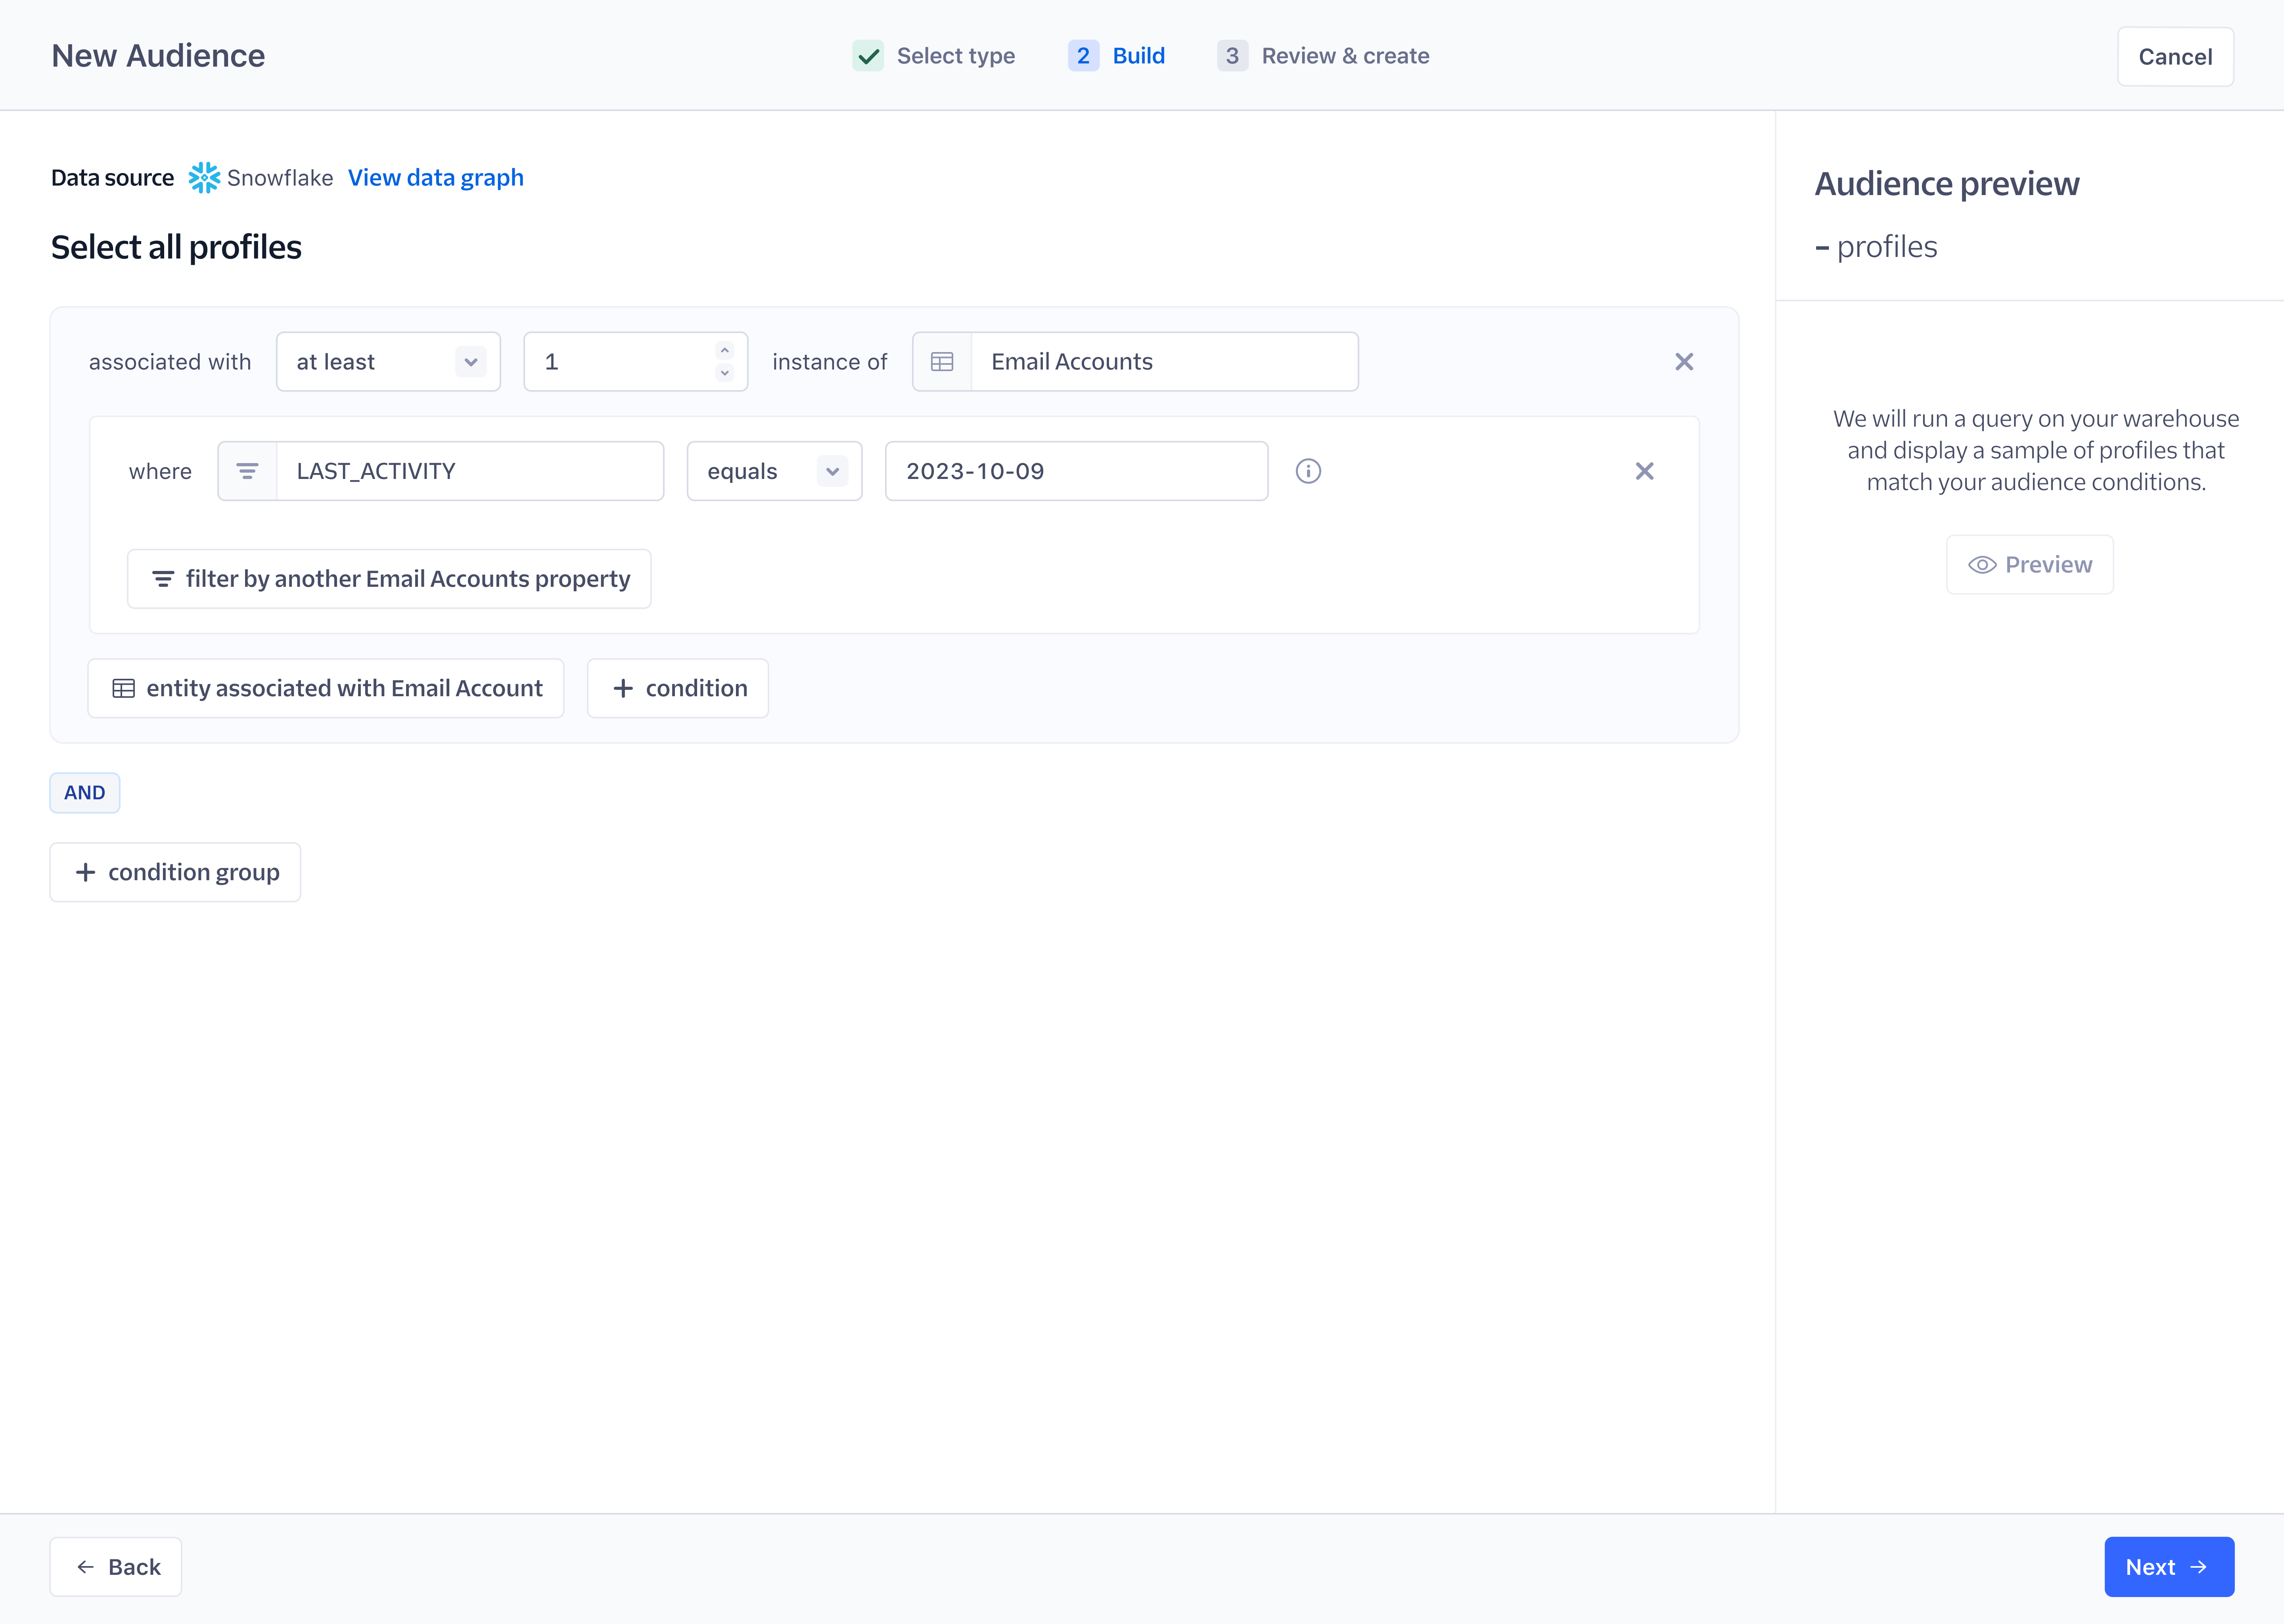
To build a Linked Audience:
- Navigate to Engage > Audiences.
- Select + New audience > Audience.
- On the Select Audience Type screen, select Linked audience, then click Next. Note: If you cannot select Linked audience, ensure you’ve set up your Data Graph in Unify.
- Select the conditions on which to build your audience.
- Click Preview to view your audience selection and see a count and list of audience members who meet the criteria.
- Select the Entities tab on the preview side sheet to select an entity tied to your audience definition. You can view a preview of the entity count and a sample list of the selected entity.
- When your audience is complete and accurate, click Next.
- Enter an audience name and description to identify this configuration. Optionally, select a folder to add this audience.
- Click Create Audience.
After creating your Linked Audience, you will be brought to the Overview page with the Linked Audience in a disabled state.
Linked Audience conditions
The Linked Audiences builder sources profile trait and event keys from the data warehouse. This data must be synced to the data warehouse through Profiles Sync before you can reference it in the linked audience builder. If there is a profile trait that exists in the Segment Profile that hasn’t successfully synced to the data warehouse yet, it will be grayed out so that it can’t be selected.
The Linked Audience builder also returns a subset of available entity property key values, event property and context key values, and profile trait key values that you can select in the input field drop-down. This eliminates the need to type in the exact value you want to filter on. If the value you’re looking for isn’t listed, you can manually enter it into the input field. Manually entered values are case-sensitive.
Segment displays:
- the first 100 unique string entity property values from the data warehouse.
- the top 65 event property and context key values.
- the top 65 profile trait key values.
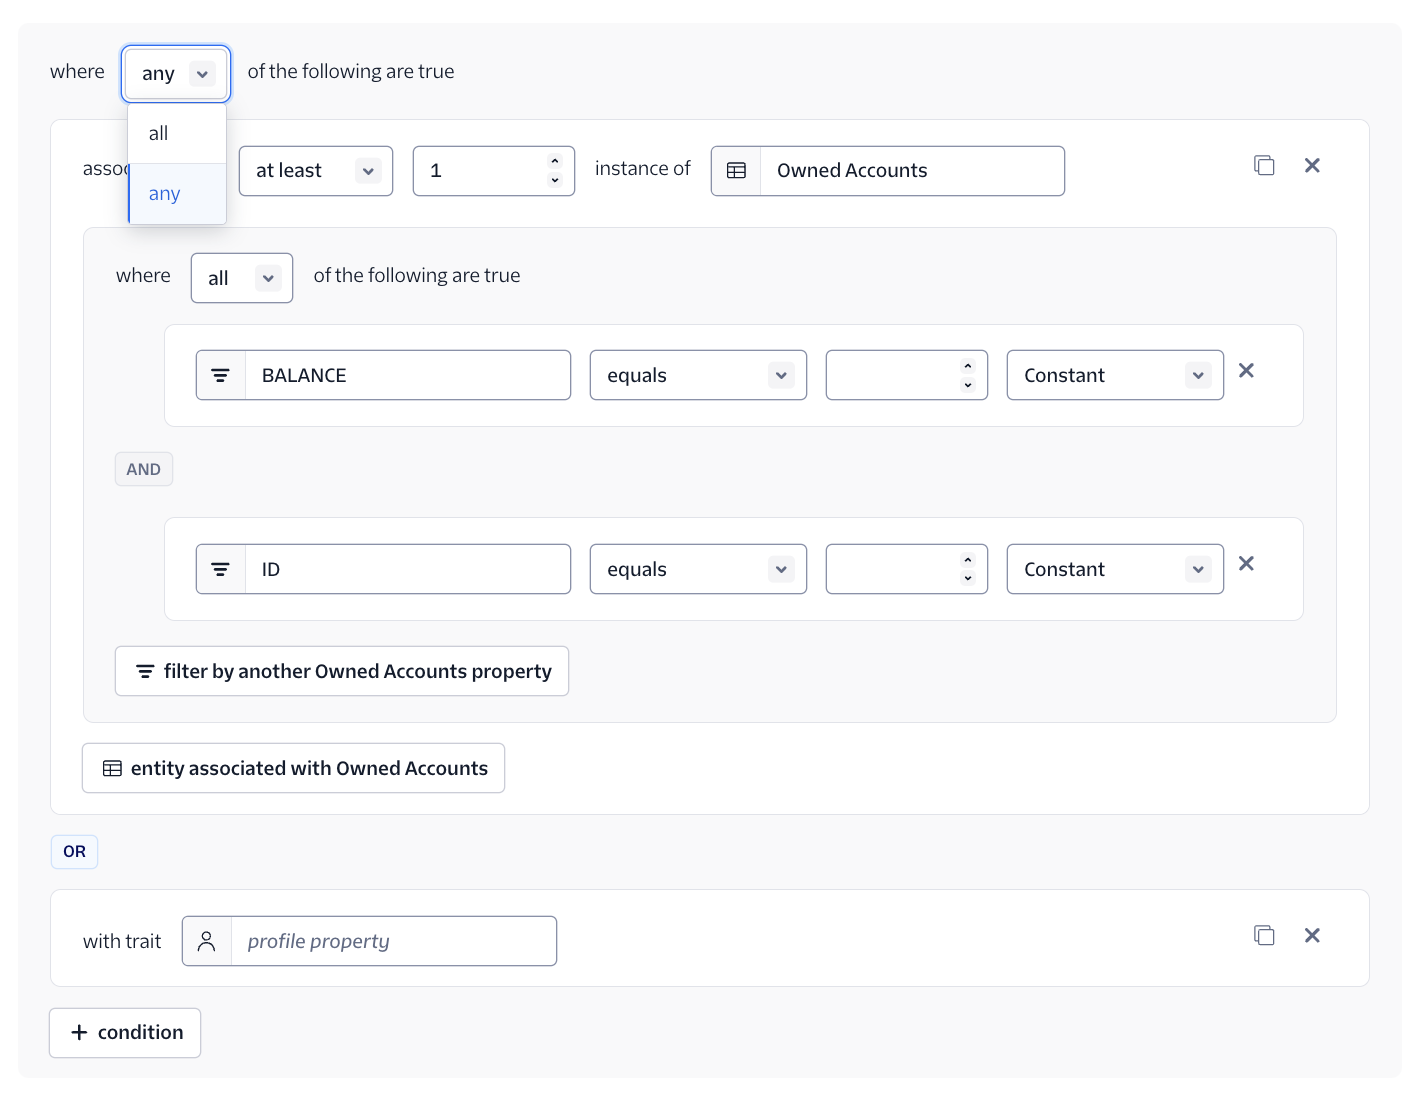
You can duplicate your conditions in the audience builder into the same condition group. You can only create nested entity conditions up to six levels in depth. For example, an entity condition that queries for relationships between Profiles, Accounts, Credit Cards, and Transactions has four levels of depth.
When building your Linked Audience, you can add multiple conditions to a single condition group, or create multiple condition groups. Segment evaluates each condition group independently to determine which profiles meet each condition group, and Segment includes the associated entities that allowed each profile to meet the criteria of each condition group. Segment then unions the matched profiles based on whether the operator between the condition groups are using the AND or OR operators to combine the result set. You can choose from the following conditions as you’re building your Linked Audience:
| Conditions | Description |
|---|---|
| with entity | Creates a condition that filters profiles associated with entity relationships defined in the Data Graph. With this condition, you can navigate the full, nested entity relationships, and filter your audience on entity column values. Each subsequent entity you select in an entity branch acts as a filter over the profiles that are available at the next depth of that specific branch. |
| without entity | Creates a condition that filters profiles that are not associated with entity relationships defined in the Data Graph. With this condition, you can navigate the full, nested entity relationships, and filter your audience on entity column values. Each subsequent entity you select in an entity branch acts as a filter over the profiles that are available at the next depth of that specific branch. |
| with trait | Creates a condition that filters profiles with a specific trait. |
| without trait | Creates a condition that filters profiles without a specific trait. |
| part of audience | Creates a condition that filters profiles that are part of an existing audience. |
| not part of audience | Creates a condition that filters profiles that are not part of an existing audience. |
| with event | Creates a condition that filters profiles that have a specific event in their event history. You can also filter on event property values. |
| without event | Creates a condition that filters profiles that do not have a specific event in their event history. You can also filter on event property values. |
The entity and event condition type supports these configurations:
at least: supports 1 or greater,
exactly: supports 0 or greater,
at most: supports 0 or greater.
*When filtering by 0, you can’t filter on by entity properties or on additional nested entities.
Operator selection
You can create audience definitions using either AND or OR operators across all condition levels. You can switch between these operators when filtering on multiple entity or event properties, between conditions within a condition group, and between condition groups.
Example:
Entity Explorer
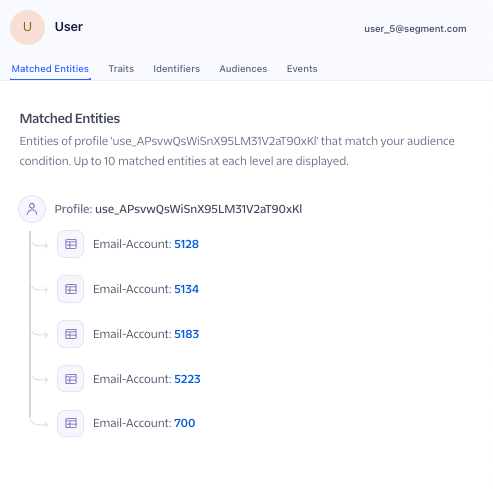
If you have defined entity conditions in your audience definition, you will see a “Matched Entities” tab in the audience preview to help you understand what entities qualified a user to be a part of an audience.
This information appears when you click the user profile generated from the audience preview. The contextual information encompasses entity relationships as well as entity column values that were used as filtering criteria in the audience definition. By default, Segment includes the entity ID. The data being returned is truncated - 10 entities at each level, 6 levels of depth. If you want to opt out of this functionality, contact Segment Support.
Dynamic references
Event conditions
When filtering on event properties, you can dynamically reference the value of another profile trait, or enter a constant value. These operators support dynamic references: equals, not equals, less than, greater than, less than or equal, greater than or equal, contains, does not contain, starts with, ends with.
Entity conditions
When filtering on entity properties, you can dynamically reference the value of another entity column (from the same entity branch at the same level or above it), profile trait, or enter a constant value. You can only dynamically reference properties of the same data type. Dynamic references are supported for specific operators depending on the data type, as in the following table:
| Data Type | Supported Operators |
|---|---|
| NUMBER | equals, not equals, less than, greater than, less than or equal, greater than or equal |
| STRING | equals, not equals, contains, does not contain, starts with, ends with |
| DATE | equals, not equals, less than, greater than, less than or equal, greater than or equal |
| TIME | equals, not equals, less than, greater than, less than or equal, greater than or equal |
| TIMESTAMP | equals, not equals, less than, greater than, less than or equal, greater than or equal |
Step 2: Activate your Linked Audience
After you build your Linked Audience, you can send events to your chosen destinations and use them for personalizing your customer communications.
To activate your Linked Audience:
- Step 2a: Connecting to a Destination
- Step 2b: Selecting your Destination Actions
- Step 2c: Defining how and when to trigger an event to your Destination
- Step 2d: Configuring the event payload
Step 2a: Connecting to a destination
Destinations are the business tools or apps that Segment forwards your data to. Adding a destination allows you to act on your data and learn more about your customers in real time. To fully take advantage of Linked Audiences, you must connect and configure at least one destination.
Linked Audiences destinations
Linked Audiences only supports Actions Destinations. List destinations aren’t supported.
Note: Ensure your destination has been enabled in Segment before you begin the steps below.
- Navigate to Engage > Audiences.
- Select the Linked Audience you set up in the previous step.
- Select Add destination.
- Select a destination from the catalog.
- Click Configure data to send to destination.
Step 2b: Select your Destination Actions
The Destination Actions framework allows you to see and control how Segment sends the event data it receives from your sources to actions-based destinations. Each Action in a destination lists the event data it requires and the event data that is optional. Segment displays available Actions based on the destination you’ve connected to your Linked Audience. You can see details of each option and how to use it in the Actions Destinations Catalog documentation.
Select the Destination Action to call when the event happens, then click Next.
Step 2c: Define how and when to trigger an event to your destination
Configure how and when events are produced with each audience run. Select the entities referenced in the audience builder to act as a trigger for your events.
| Trigger | Event type | Definition | Examples |
|---|---|---|---|
| Profile enters audience | Track | Send an event when a profile matches the audience condition. | Send a congratulatory email when a traveler qualifies for premium status with a mileage program. Send a discount to all customers with a particular product on their wishlist. |
| Profile exits audience | Track | Send an event when a profile no longer matches the audience condition. | Send an email to credit card owners to confirm that their credit cards have been paid in full. Send a confirmation to a patient when they have completed all their pre-screening forms. |
| Entity enters audience | Track | Send an event when an entity condition associated with a profile matches the audience condition. | Send a reminder to a customer when a credit card associated with their profile has an outstanding balance. Notify a traveler when a flight associated with their profile is delayed. Notify a customer when a product associated with their profile’s wishlist is back in stock. |
| Entity exits audience | Track | Send an event when an entity condition associated with a profile no longer matches the audience condition. | Send a confirmation to a customer when a credit card associated with their profile has been paid off. Send a confirmation to the primary doctor when each of their associated patients completes their annual check up. |
| Profile enters or exits audience | Identify | Send an event when a profile’s audience membership changes. | Update a user profile in a destination with the most recent audience membership. |
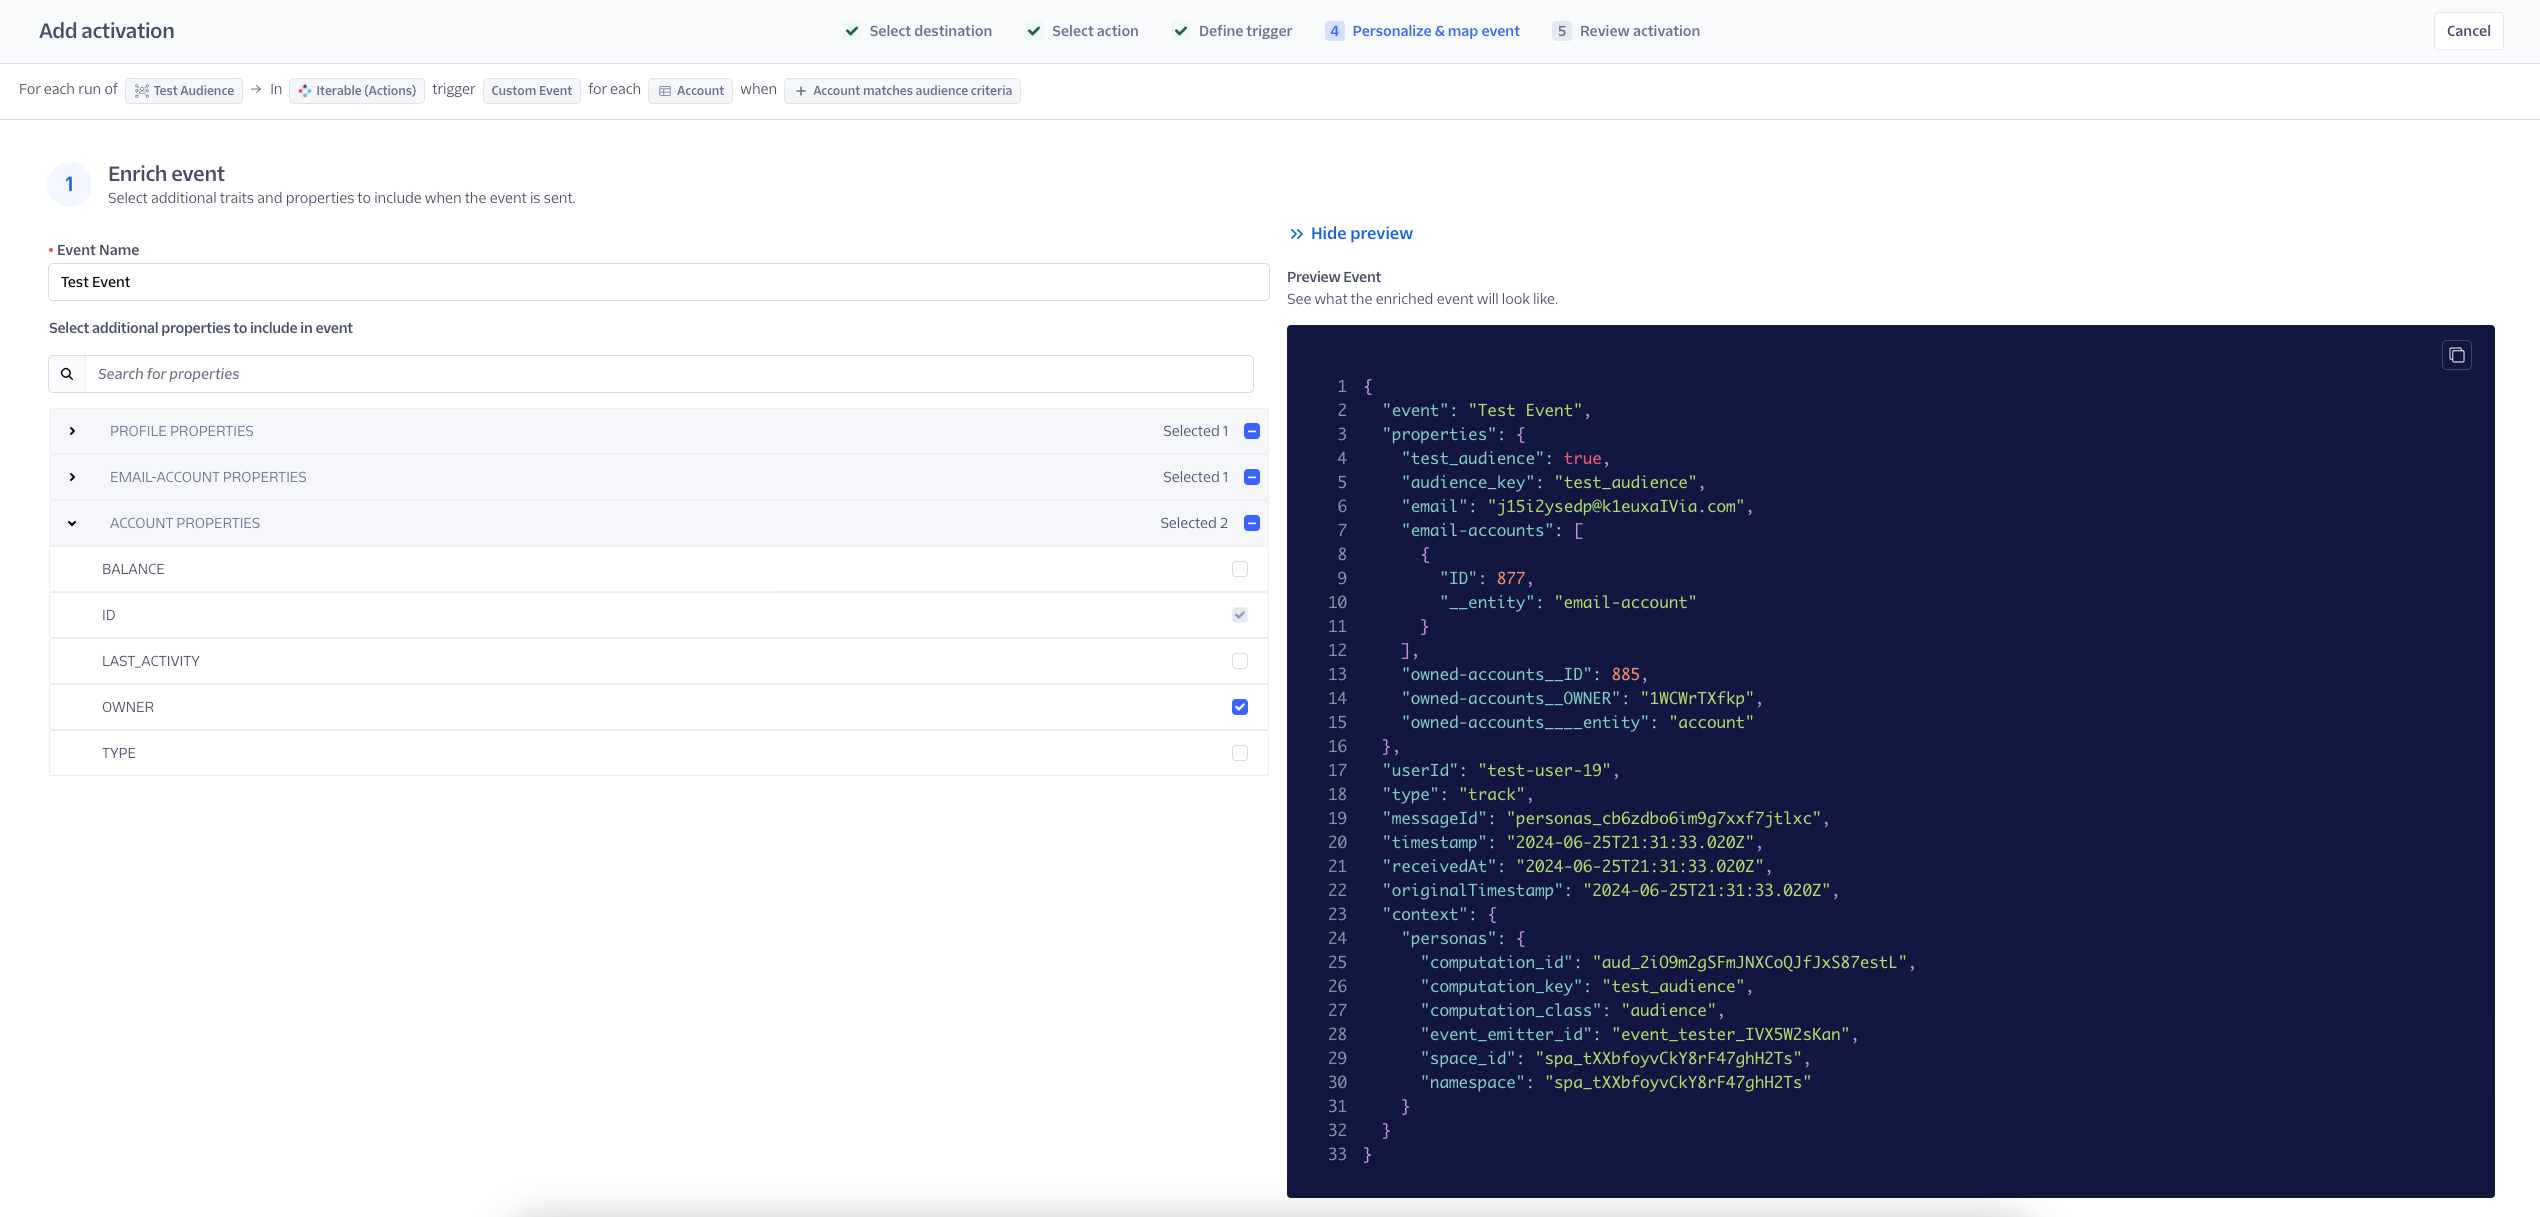
Step 2d: Configure the event
After you select an action, Segment attempts to automatically configure the data fields that will be sent to the destination. You can review and adjust these settings before enabling this event.
Enrich event
Select additional traits and properties to include when the event is sent.
Copy personalization syntax
Click Copy to use in Braze Cloud Mode (Actions) to copy the personalization syntax for the selected traits and properties to use in your destination messaging templates.
This feature is in beta for customers using Braze. Some functionality may change before it becomes generally available. This feature is governed by Segment’s First Access and Beta Preview Terms.
Show/hide preview
As you’re enriching your events in Linked Audiences, you should view a preview of the event payload schema based on the properties you select. It might look like the following:
Map event
Only required fields are displayed. All optional & pre-filled fields are hidden, though you can view hidden fields by clicking Show hidden fields.
These fields are pre-filled with properties configured by default.
Step 3: Send a test event to your destination
Send a test event to ensure that everything is connected properly and your destination receives the event.
Enter the destination User id for the profile you want to use to test the event, then click Send test event to destination.
The Event content drop-down shows you a preview of what the data sent to your destination might look like.
Step 4: Enable your Linked Audience
After building your Linked Audience, choose Save and Enable. You’ll be redirected to the Audience Overview page, where you can view the audience you created. Segment automatically disables your audience so that it doesn’t start computing until you’re ready. A run is when Segment runs the audience conditions on your data warehouse and sends events downstream.
To enable your audience, select the Enabled toggle, then select Enable audience.
Run Now
You can trigger a run for your audience if you want to send events to your destination without waiting for the next scheduled run. To do so, select Run Now. This triggers a run for the audience and sends events downstream.
Set a run schedule
Use the Audience Overview page to view the audience profile count, current run schedule, run status, and upcoming run time.
Determine when an audience should run and send data to enabled destinations with a run schedule:
- Manual: Trigger audience runs manually by clicking Run Now on the Audience Overview page.
- Interval: Trigger audience runs based on a predefined set of time intervals. Supported intervals are: 15 minutes, 30 minutes, 1 hour, 2 hours, 4 hours, 6 hours, 8 hours, 12 hours, 1 day. If you select this option, Segment will run your audience after you enable the audience.
- Day and time: Trigger audience runs at specific times on selected days of the week. If you select this option, Segment will run your audience at the first selected date and time.
You can maintain your run schedule at any time from the audience’s Settings tab.
You can also click Run Now on the Audience Overview page at any time (even if the run schedule is Interval Overview Day and time) to manually trigger a run on your warehouse and send data to enabled destinations.
There may be up to a 5 minute delay from the configured start time for audiences that are configured with the Interval and Day and time run schedules. For example, if you configured an audience with the Day and time compute schedule to run on Mondays at 8am, it can compute as late as Monday at 8:05am. This is to help us better manage our system load.
Step 5: Monitor your activation
With your Linked Audience activated, follow these steps to monitor your activation:
- From the Audience Overview page, selected one of your connected destinations.
- Under the Settings tab, click Destination delivery, which then opens the Linked Audiences Delivery Overview.
Delivery Overview for Linked Audiences
In addition to the standard Audience observability provided by Delivery Overview, Linked Audiences can filter Delivery Overview’s pipeline view by Linked Audience events.
To filter by events:
- From your Segment workspace’s home page, navigate to Engage > Audiences.
- Find an Audience, click the (…) menu, and select Delivery Overview.
- On the Delivery Overview page, select the Linked audience event dropdown to filter by a specific event.
Linked Audiences have the following steps in Delivery Overview’s pipeline view:
- Events from audience: Events that Segment created for your activation. The number of events for each compute depends on the changes detected in your audience membership.
- Filtered at source: Events discarded by Protocols: either by the schema settings or Tracking Plans.
- Filtered at destination: If any events aren’t eligible to be sent (for example, due to destination filters, insert function logic, and so on), Segment displays them at this step.
- Events pending retry: A step that reveals the number of events that are awaiting retry. Unlike the other steps, you cannot click into this step to view the breakdown table.
- Failed delivery: Events that Segment attempted to deliver to your destination, but that ultimately failed to be delivered. Failed delivery might indicate an issue with the destination, like invalid credentials, rate limits, or other error statuses received during delivery.
- Successful delivery: Events that Segment successfully delivered to your destination. You’ll see these events in your downstream integrations.
Linked Audience Alerts
You can create alerts related to the performance and throughput of Linked Audience syncs and receive in-app, email, and Slack notifications when event volume fluctuations occur.
Generate a Slack webhook to receive Slack notifications
To receive an alert in a Slack channel, you must first create a Slack webhook. For more information about Slack webhooks, see Slack’s Sending messages using incoming webhooks documentation.
To access Linked Audience alerting, navigate to Engage > Audiences, select a Linked Audience, and click the Alerts tab.
On the Alerts tab, you can create new alerts and view all active alerts for this connection. You can only edit or delete the alerts that you create, unless you have the Workspace Owner role.
Deleting alerts created by other users requires Workspace Owner role
All users can delete alerts that they created, but only those with Workspace Owner role can delete alerts created by other users.
Activation event health spikes or drops
You can create an Activation event health spikes or drops alert that notifies you when events sent from your audience to a downstream destination have failures to a destination above a certain threshold. For example, if you set a change percentage of 4% and your destination received 100 events from your audience over the first 24 hours, Segment would notify you the following day if your destination ingested fewer than 96 or more than 104 events.
To create an Activation event health spikes or drops alert:
- From your Segment workspace’s home page, navigate to Engage > Audiences.
- Select the Audience you want to create an alert for, select the Alerts tab, and click Create alert.
- On the Create alert sidesheet, select the Activation event health spikes or drops alert and pick a destination for which you’d like to monitor event health.
- Enter a percentage threshold to trigger activation event health notifications.
- Select one or more of the following alert channels:
- Email: Select this to receive notifications at the provided email address.
- Slack: Select this to send alerts to one or more channels in your workspace. You can post messages to your channel with either a webhook or a workflow.
- In-app: Select this to receive notifications in the Segment app. To view your notifications, select the bell next to your user icon in the Segment app.
- Click Save.
To make changes to an Activation event health spikes or drops alert, select the icon in the Actions column for the alert and click Edit.
To delete a Activation event health spikes or drops alert, select the icon in the Actions column for the alert and click Delete.
Audience size change
You can create an Audience size change alert that notifies you when your audience increases or decreases by a certain threshold. For example, if you set a change percentage of 4% and your destination had 100 members over the first 24 hours, Segment would notify you the following day if your audience had fewer than 96 or more than 104 members.
Audience size change alerts are currently in Public Beta
Audience size change alerts are in public beta, and Segment is actively working on this feature. Some functionality may change before it becomes generally available.
To create an Audience size change alert:
- From your Segment workspace’s home page, navigate to Engage > Audiences.
- Select the Linked Audience you want to create an alert for, select the Alerts tab, and click Create alert.
- On the Create alert sidesheet, select the Audience size change alert and pick a destination for which you’d like to monitor event health.
- Enter a percentage threshold to trigger audience size change notifications.
- Select one or more of the following alert channels:
- Email: Select this to receive notifications at the provided email address.
- Slack: Select this to send alerts to one or more channels in your workspace. You can post messages to your channel with either a webhook or a workflow.
- In-app: Select this to receive notifications in the Segment app. To view your notifications, select the bell next to your user icon in the Segment app.
- Click Save.
To make changes to an Audience size change alert, select the icon in the Actions column for the alert and click Edit.
To delete a Audience size change alert, select the icon in the Actions column for the alert and click Delete.
Maintaining Linked Audiences
You can maintain your Linked Audience by accessing these tabs on the main page of your Linked Audience:
| Tab name | Information |
|---|---|
| Overview | On this tab you can: * View relevant audience information, such as Profiles in audience count, run schedule, latest run, and next run. * Enable or disable, manually run, clone and delete audiences. - Note: Cloning a linked audience creates a new linked audience in the builder create flow with the same conditions as the linked audience that it was cloned from. * View the list of profiles in the audience with the Audience Explorer. * View connected destinations and configured activation events. |
| Builder | On this tab you can: * View or edit your linked audience conditions. - Note: If you edit an audience with configured activation events, you should disable or delete impacted events for your audience to successfully compute. Events are impacted if they reference entities that are edited or removed from the audience definition. |
| Runs | On this tab you can: * View information about the last 50 audience runs, such as start time, run duration, run result, and change summary. You can also view granular run stats to help you understand the duration of each step in the run such as: - Queueing run: The time spent in the queue waiting for other runs to finish before this one begins. - Extracting from warehouse: The duration of the audience query and data transfer from the source warehouse. - Preparing to deliver events: The time taken to process and ready events for delivery to connected destinations. * If there are no changes associated with a run, there will be no values shown for the granular run stats. |
| Settings | On this tab you can view or edit the linked audience name, description, and run schedule. |
This page was last modified: 13 Aug 2025
Need support?
Questions? Problems? Need more info? Contact Segment Support for assistance!