Increase your advertising efficiency with lookalike audiences and audience suppression
In this recipe, you’ll learn how to use Segment Personas to create hyper-specific audiences in Facebook and increase advertising efficiency.
In this recipe, you’ll learn how to use Segment Personas to create hyper-specific audiences in Facebook and increase advertising efficiency.
Twilio Segment Personas is now part of Segment’s Twilio Engage product offering.
In these uncertain economic times, marketers are coming under increasing pressure to account for advertising spend.
As we reported in our COVID Tech Stacks Report, this increased focus on advertising efficiency and ROI has driven marketers towards new tools and strategies to track and optimize their digital advertising performance.
One of the simplest ways to increase the efficiency of your advertising is to focus your advertising on those you know are a good fit for the product (lookalike audiences) and stop targeting those who aren’t (ad suppression).
Lookalike audiences and ad suppression are essential tactics for running Facebook and Instagram ads. However, most marketers execute on these the wrong way:
When creating lookalikes, they manually upload CSVs of their customers to Facebook. By doing this manually, your customer list is immediately out of date. You’re giving Facebook an incomplete and out of date view into who your best customers are.
When suppressing their ads, they case the net too wide. For example, a mistake we see often is when a company hides all their ads to past purchasers instead of using ads to cross-sell their other products. For example, let’s say your company sells both toothbrushes and toothpaste. Someone who just purchased a toothbrush shouldn’t be excluded from your toothpaste campaigns.
These problems can be avoided by using Segment Personas and Facebook in tandem. By doing so, you’ll be able to:
Automate audience creation and synchronization so that your audience lists are always up to date.
Granularly segment your lists to create “suppression segments”, customers or former customers you may want to advertise to.
Let’s jump in.
Login to Segment
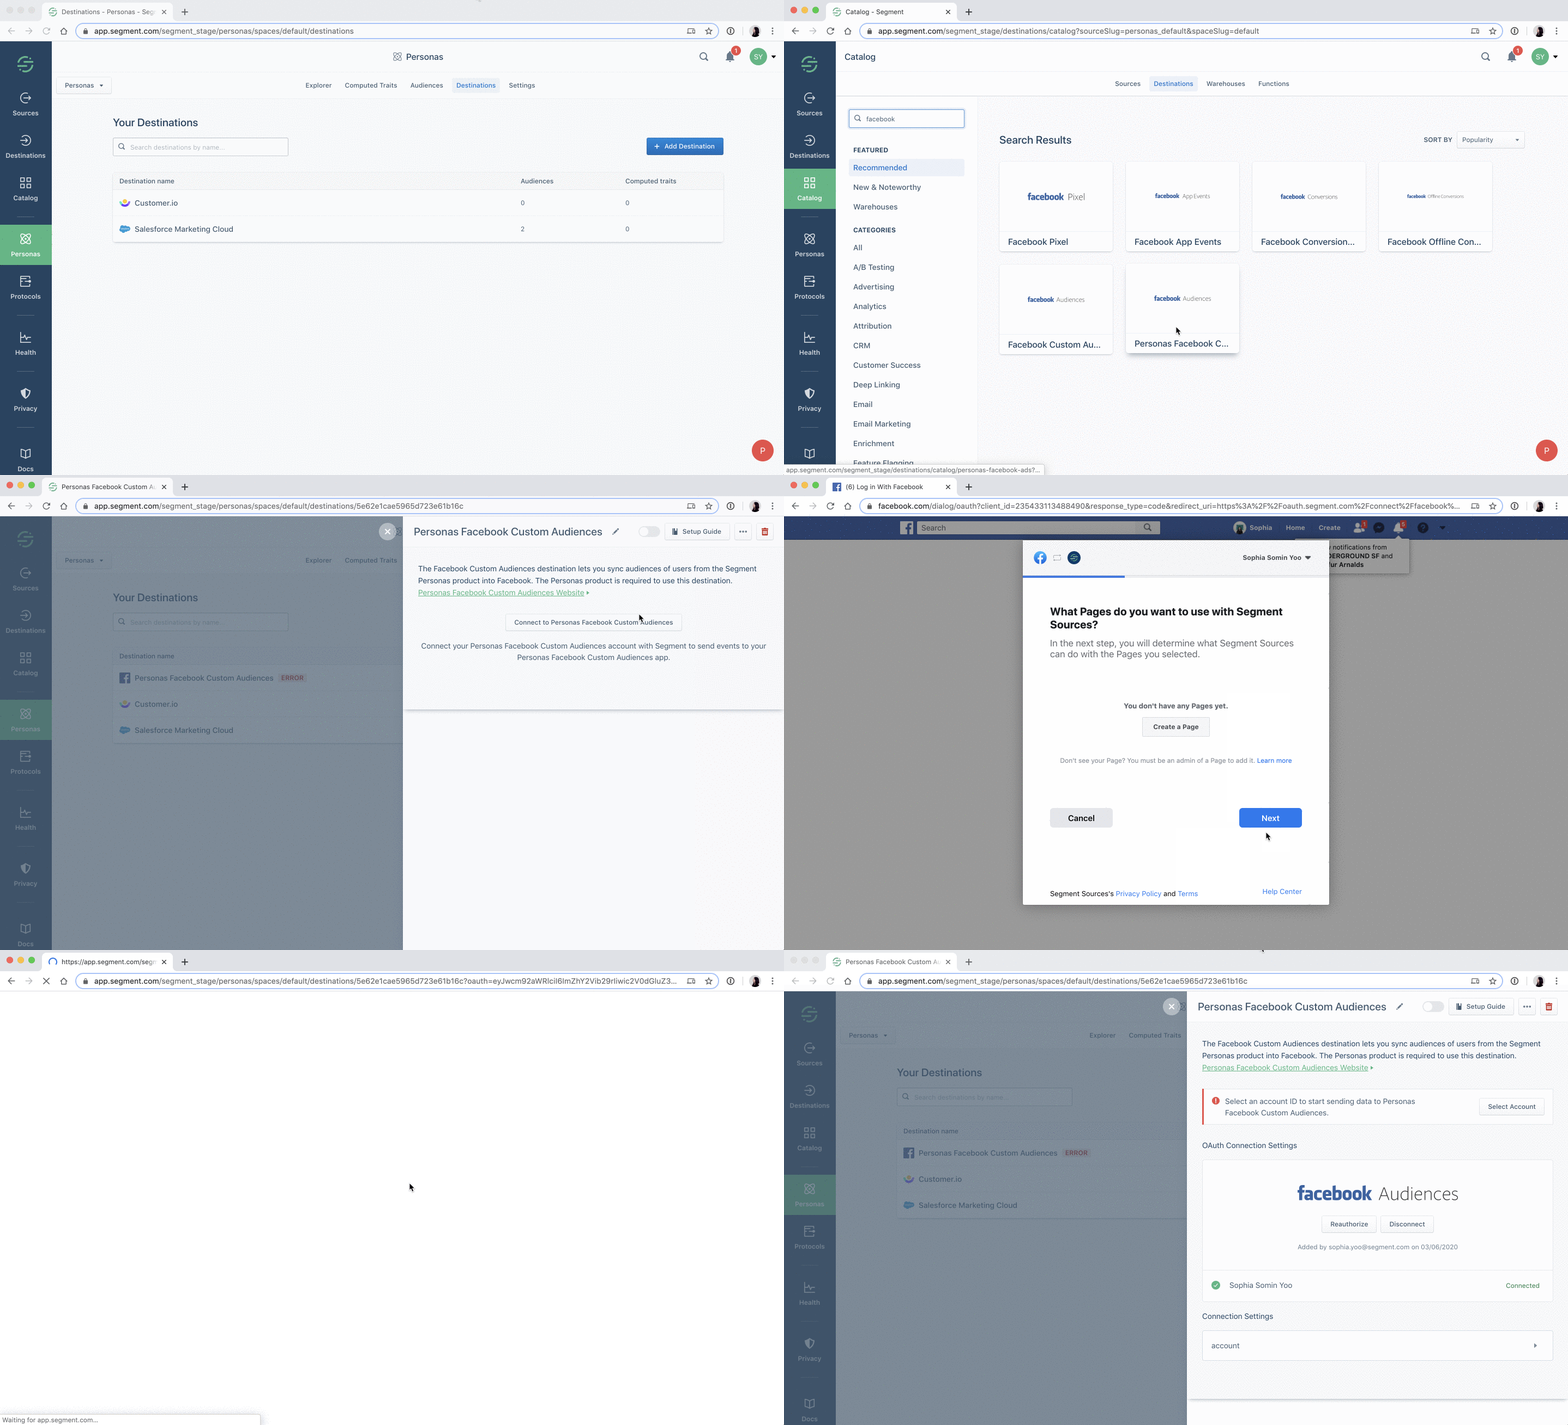
From the left-side navigation bar, click on Destinations, then Add Destination.
Search for Personas Facebook Custom Audiences and click the Configure Personas Facebook Custom Audiences button.
Follow the instructions to connect it with the Source you’re using (e.g. your website) or mobile app), and connect it to your Facebook account.
As we mentioned earlier, if you crudely exclude all existing customers from your advertising, you’re likely leaving dollars on the table. For example, here are a few profitable audiences you can create with Segment that you may have excluded before. Upsell to subscriptions: People who purchased a one-off product from you don’t need to see ads for what they just bought. But you can offer a subscription. For example, if a user bought a product off Amazon or Instacart, I could target an audience with ads for Amazon Prime or Instacart Express.
Incentivize referrals: Paid subscribers love you enough to pay you each month. Exclude them from your product-related ads and instead run ads that incentivize them to refer your product to their friends.
Bring back old customers: Former customers are unlikely to respond in the same way to your prospecting ads as people who have never heard of you. Instead of showing lapsed customers ads that tell them what they already know, run distinct ones that highlight recent product improvements to get them to return.
Reactivate disengaged users: Inactive users sometimes need just a little incentive to get them to re-engage. First, spare them from your prospecting ads, so you don’t annoy them with repetition. Next, entice them with discounts or bonus credits.
From your Segment dashboard, click Personas from the left navigation.
Select Audiences, and then click the New Audience button.
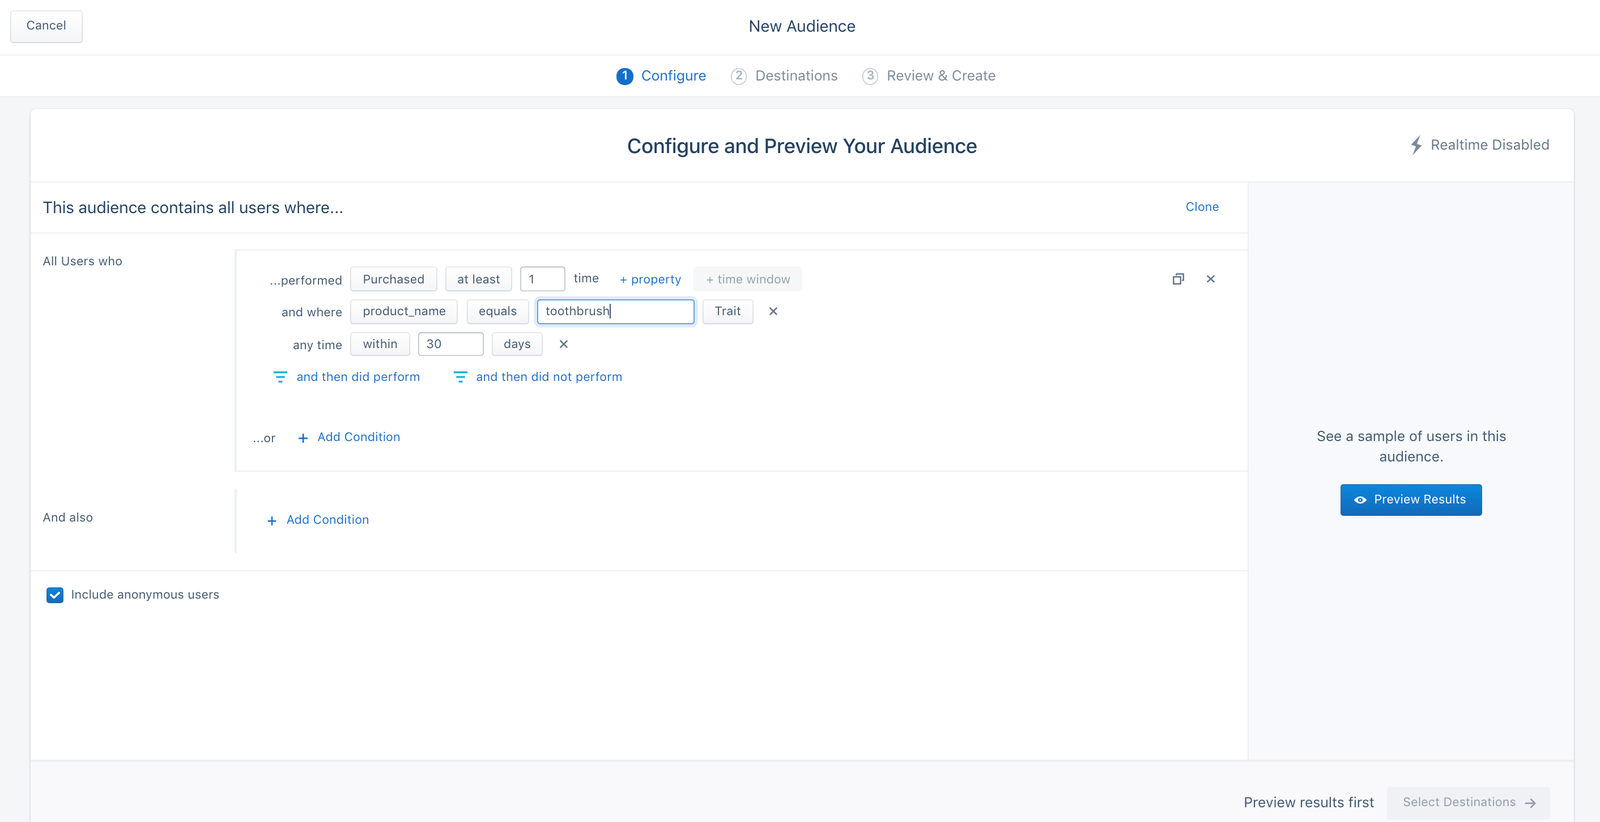
In this example, we’ll find all users that have purchased at least 1 toothbrush in the last 30 days. Here’s what that might look like:

Click Preview to see if things look correct.
Click Select Destination and select the Facebook destination we added in step 1.
Name your audience something like Customers - toothbrush 30 days and click Create Audience. Make sure to leave the Gather historical data checkbox toggled on.
From your Segment dashboard, click Personas from the left navigation.
Select Audiences, and then click the New Audience button.
In this example, we’ll find all users that have purchased at least 1 toothbrush in the last 30 days. Here’s what that might look like:
Click Preview to see if things look correct.
Click Select Destination and select the Facebook destination we added in step 1.
Name your audience something like Customers - toothbrush 30 days and click Create Audience. Make sure to leave the Gather historical data checkbox toggled on.
You’re done! Segment will now sync this live audience to your Facebook account’s custom audiences list. This should take around ten minutes (or longer if your list is hundreds of thousands of people in size).
Now, let’s verify that the Facebook audience is synced.
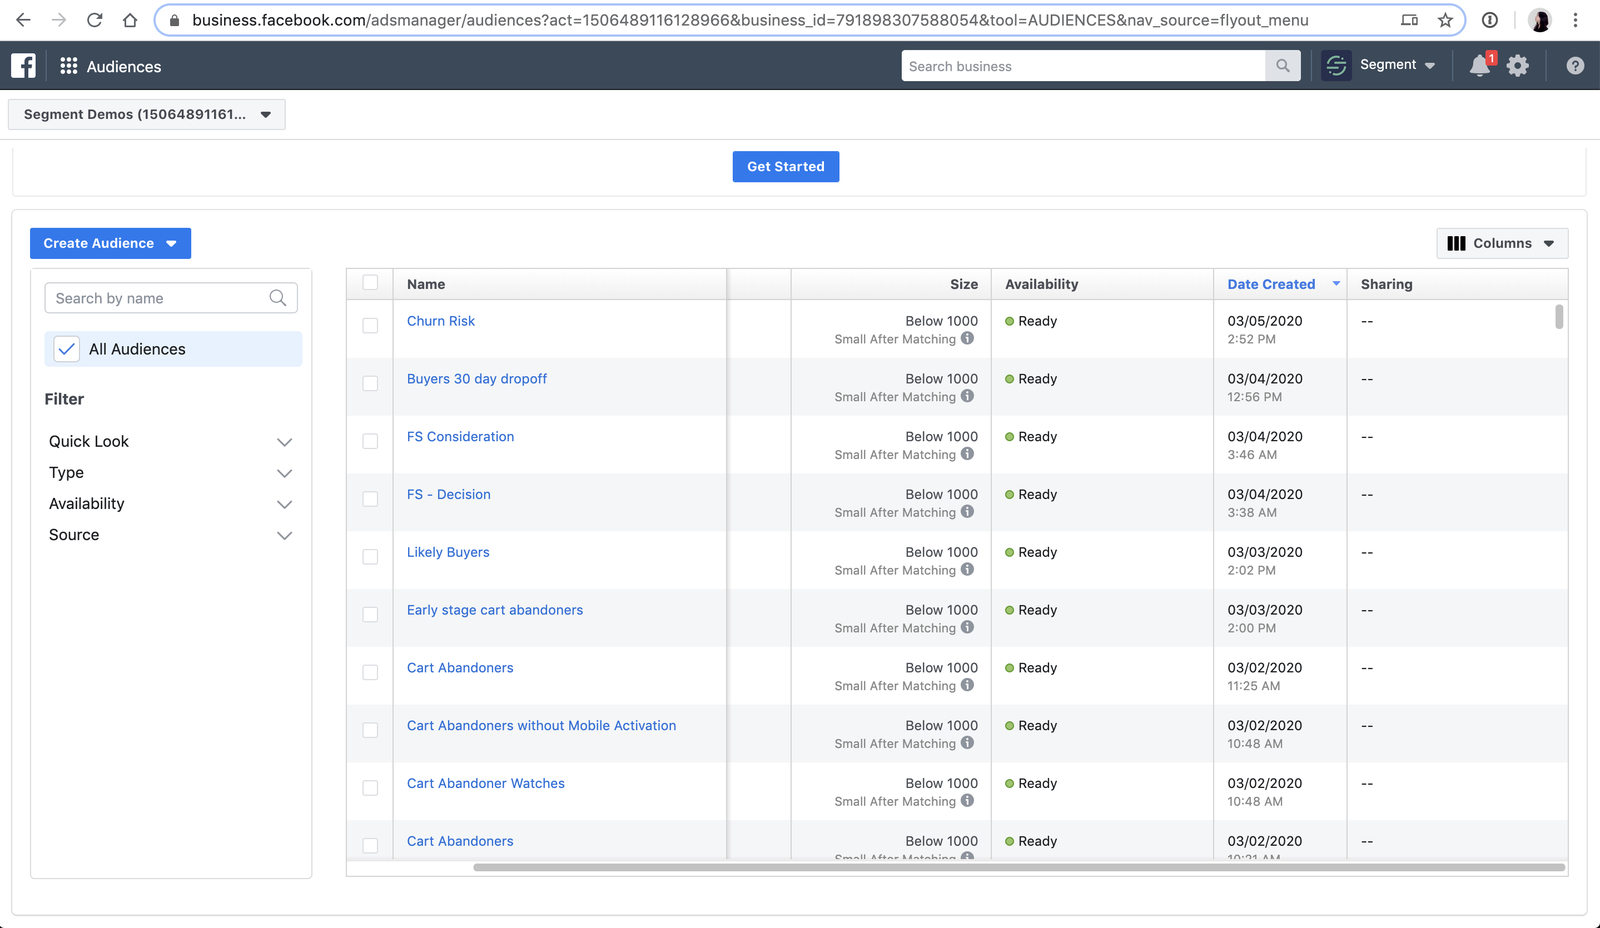
Log in to your Facebook Business Manager.
From the nav menu, select Audiences.
Locate the Facebook audience you had set up with Personas. Click into it to verify it looks correct by checking its History.
Now that we’ve synced our audiences to Facebook via Segment, it’s time to create a lookalike audience.
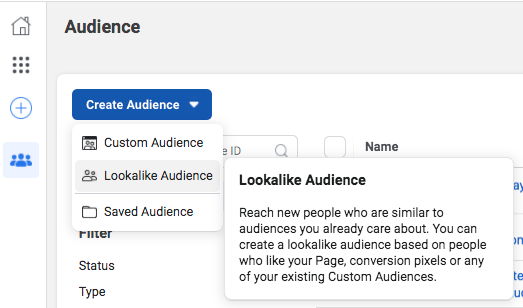
From the Audiences screen from the last step, choose Create Audience > Lookalike Audience.

Under Select Your Lookalike Source, click into it, and select the Other Sources tab. Scroll through the list to select your customer list.
Moving on, under Select Audience Location, select the country you’re targeting. e.g. United States
For Select Audience Size, choose 1%. Going any higher would dilute the efficiency of the targeting.
Click Create Audience.
From the Audiences screen from the last step, choose Create Audience > Lookalike Audience.
Under Select Your Lookalike Source, click into it, and select the Other Sources tab. Scroll through the list to select your customer list.
Moving on, under Select Audience Location, select the country you’re targeting. e.g. United States
For Select Audience Size, choose 1%. Going any higher would dilute the efficiency of the targeting.
Click Create Audience.
That’s it! We now have all our custom audiences ready to use. Now it’s time to put them into practice. Here are two campaigns you can run.
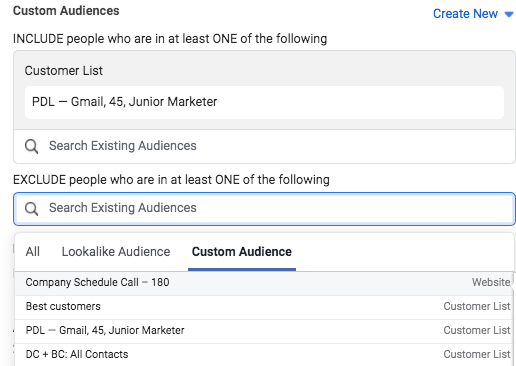
From your FB Ads Manager, navigate to the ad set you want to modify and click the edit icon.
Under the Audience settings where you had set up your targeting, locate the Custom Audiences subsection.
Click `Exclude` and start typing the name of your custom audiences list and select it.
You’re done. Click `Publish` when you’re ready to implement the changes.
From your FB Ads Manager, create a new ad set by clicking the big green Create button.
Give it a name like Lookalike Purchasers - 1% US.
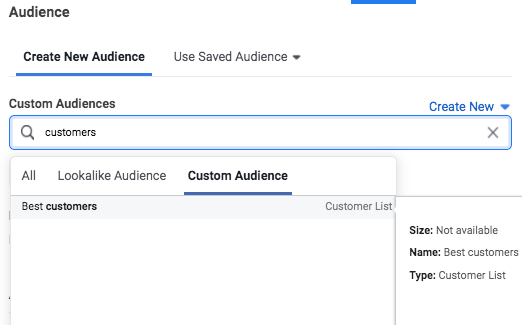
Scroll to the Audience > Custom Audience section.
Start typing the name of your custom audience and select it.

Set up the rest of the ad set as normal.
Click Publish.
From your FB Ads Manager, create a new ad set by clicking the big green Create button.
Give it a name like Lookalike Purchasers - 1% US.
Scroll to the Audience > Custom Audience section.
Start typing the name of your custom audience and select it.
Set up the rest of the ad set as normal.
Click Publish.
We’ve covered the fundamentals of setting up custom audiences using Segment Personas. Now it’s time to dive into advanced uses for Personas’ power.
Instead of creating a lookalike audience from all of your existing customers, you can segment them more narrowly for better ad targeting: For example, you can make one lookalike audience for your high spenders, and one for your budget shoppers.
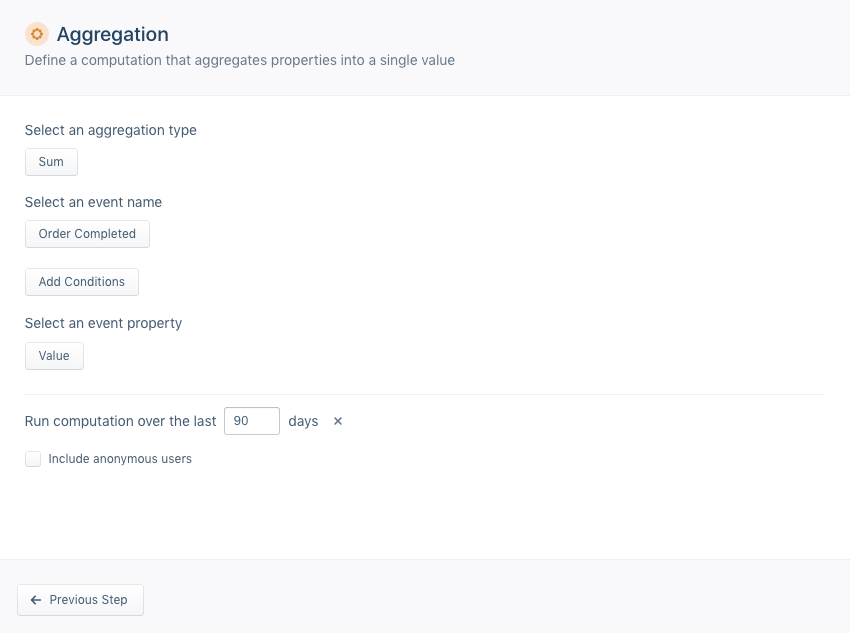
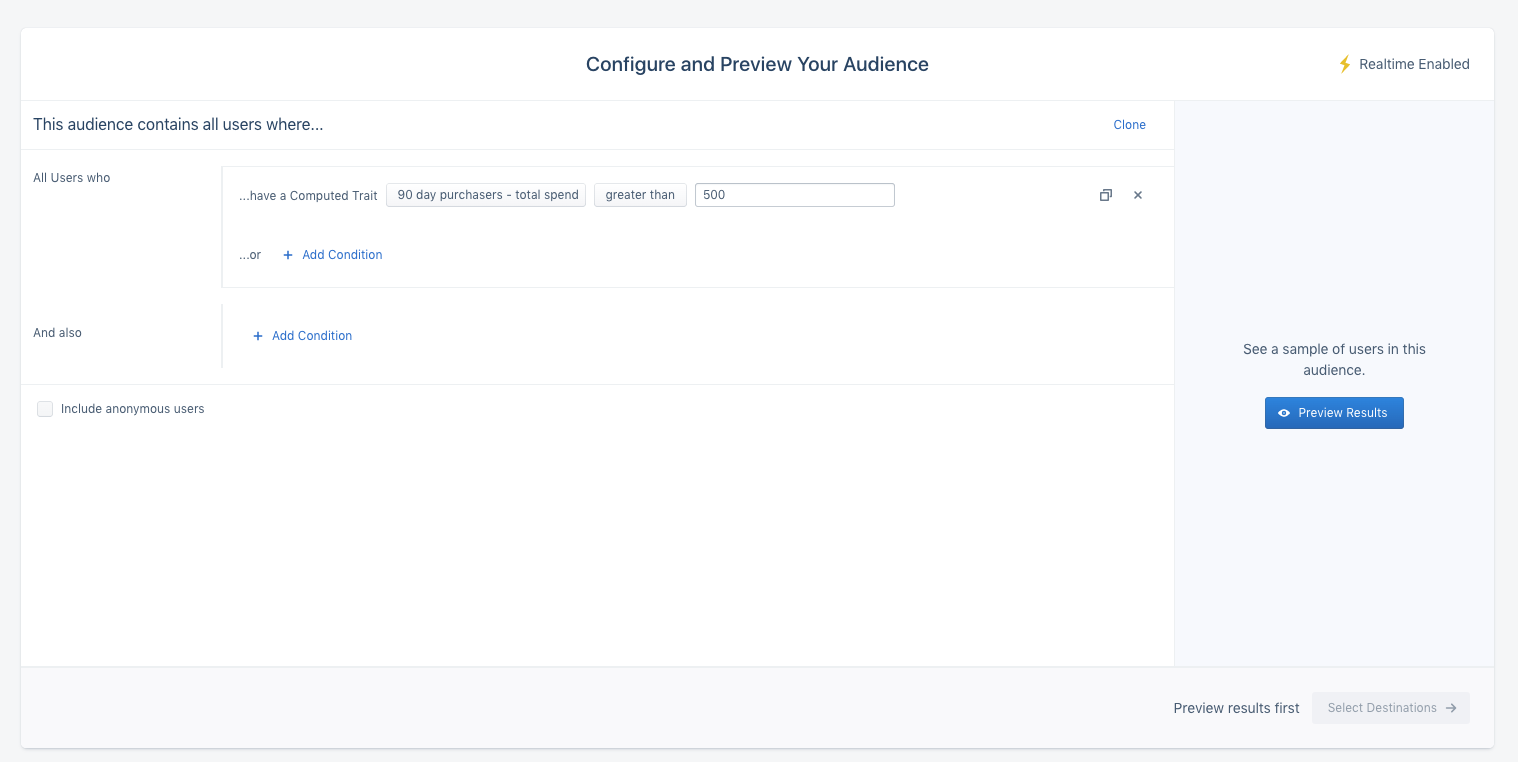
You can easily do this by leveraging Personas’ calculated traits feature. For example, you can compute the sum of every customer’s total purchases to create a “big spender” custom audience in real-time.
First, you’d define a computed trait to calculate:
Then, you’d create a custom audience from this computed trait:
Then, simply follow the same steps from earlier in the article, so you have a hyper-specific audience with which to target.
Get help implementing this use case by talking with a Segment Team member or by signing up for a free Segment workspace here.

Our annual look at how attitudes, preferences, and experiences with personalization have evolved over the past year.